
Arduino Nano-Based GPS and Barometric Sensor with Seven Segment Display and Battery Power
View and Edit Project In Cirkit Designer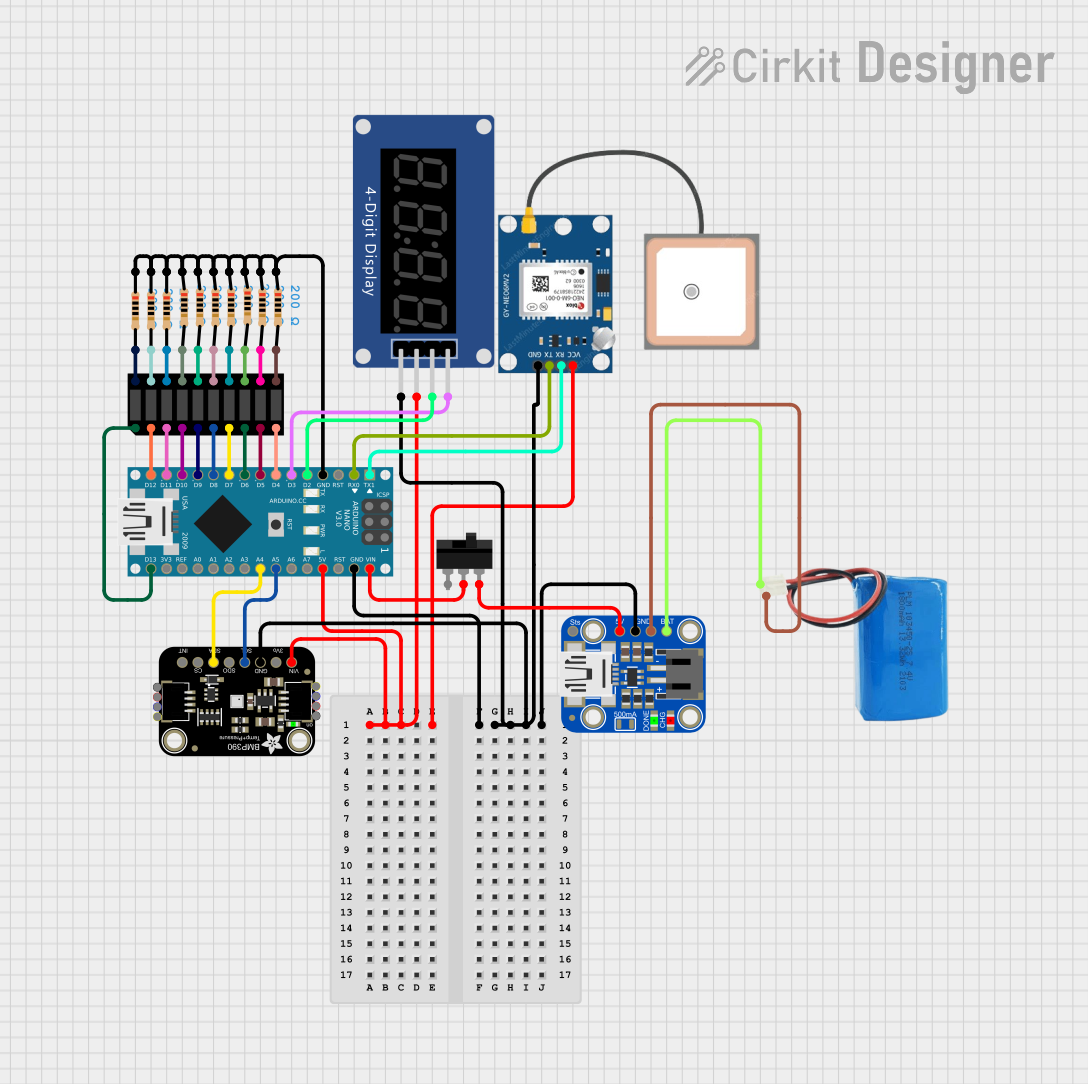
Circuit Documentation
Summary
This circuit integrates an Arduino Nano microcontroller with various sensors and displays, including a GPS module, a barometric pressure sensor, a seven-segment display, a bar graph, and a toggle switch. The circuit is powered by a 5V battery through an Adafruit Mini Lipo charger. The Arduino Nano is programmed to interface with these components, providing a comprehensive embedded system for data acquisition and display.
Component List
Arduino Nano
- Description: A small, complete, and breadboard-friendly board based on the ATmega328P.
- Pins: D1/TX, D0/RX, RESET, GND, D2, D3, D4, D5, D6, D7, D8, D9, D10, D11/MOSI, D12/MISO, VIN, 5V, A7, A6, A5, A4, A3, A2, A1, A0, AREF, 3V3, D13/SCK
5V Battery
- Description: A power source providing 5V.
- Pins: positive, negative
GPS NEO 6M
- Description: A GPS module for obtaining location data.
- Pins: VCC, RX, TX, GND
Adafruit BMP390
- Description: A barometric pressure sensor.
- Pins: VCC, 3.3V, GND, SCK/SCL, SDO/ADR, SDI/SDA, CS, INT
Seven Segment Display (TM1637) (Wokwi Compatible)
- Description: A display module for showing numerical data.
- Pins: CLK, DIO, VCC, GND
Adafruit Mini Lipo
- Description: A LiPo battery charger.
- Pins: VBAT, GND, 5V, Sts
Resistors (200 Ohms)
- Description: Resistors used for current limiting and other purposes.
- Pins: pin1, pin2
Bar Graph (Wokwi Compatible)
- Description: A bar graph display module.
- Pins: A1, A2, A3, A4, A5, A6, A7, A8, A9, A10, C8, C9, C10, C7, C6, C5, C4, C3, C2, C1
Toggle Switch
- Description: A switch for user input.
- Pins: L1, COM, L2
Wiring Details
Arduino Nano
5V connected to:
- Seven Segment Display (TM1637) VCC
- GPS NEO 6M VCC
- Adafruit BMP390 VCC
GND connected to:
- Seven Segment Display (TM1637) GND
- GPS NEO 6M GND
- Adafruit Mini Lipo GND
- Adafruit BMP390 GND
- Resistors pin1
D1/TX connected to GPS NEO 6M RX
D0/RX connected to GPS NEO 6M TX
D2 connected to Seven Segment Display (TM1637) DIO
D3 connected to Seven Segment Display (TM1637) CLK
D4 connected to Bar Graph A10
D5 connected to Bar Graph A9
D6 connected to Bar Graph A8
D7 connected to Bar Graph A7
D8 connected to Bar Graph A6
D9 connected to Bar Graph A5
D10 connected to Bar Graph A4
D11/MOSI connected to Bar Graph A3
D12/MISO connected to Bar Graph A2
D13/SCK connected to Bar Graph A1
VIN connected to Toggle Switch COM
A5 connected to Adafruit BMP390 SCK/SCL
A4 connected to Adafruit BMP390 SDI/SDA
5V Battery
- positive connected to Adafruit Mini Lipo VBAT
- negative connected to Adafruit Mini Lipo GND
GPS NEO 6M
- VCC connected to Arduino Nano 5V
- GND connected to Arduino Nano GND
- RX connected to Arduino Nano D1/TX
- TX connected to Arduino Nano D0/RX
Adafruit BMP390
- VCC connected to Arduino Nano 5V
- GND connected to Arduino Nano GND
- SCK/SCL connected to Arduino Nano A5
- SDI/SDA connected to Arduino Nano A4
Seven Segment Display (TM1637)
- VCC connected to Arduino Nano 5V
- GND connected to Arduino Nano GND
- DIO connected to Arduino Nano D2
- CLK connected to Arduino Nano D3
Adafruit Mini Lipo
- VBAT connected to 5V Battery positive
- GND connected to 5V Battery negative
- 5V connected to Toggle Switch L2
Resistors
- pin1 connected to Arduino Nano GND
- pin2 connected to Bar Graph pins:
- C1
- C2
- C3
- C4
- C5
- C6
- C7
- C8
- C9
- C10
Bar Graph (Wokwi Compatible)
- A1 connected to Arduino Nano D13/SCK
- A2 connected to Arduino Nano D12/MISO
- A3 connected to Arduino Nano D11/MOSI
- A4 connected to Arduino Nano D10
- A5 connected to Arduino Nano D9
- A6 connected to Arduino Nano D8
- A7 connected to Arduino Nano D7
- A8 connected to Arduino Nano D6
- A9 connected to Arduino Nano D5
- A10 connected to Arduino Nano D4
- C1 connected to Resistor pin2
- C2 connected to Resistor pin2
- C3 connected to Resistor pin2
- C4 connected to Resistor pin2
- C5 connected to Resistor pin2
- C6 connected to Resistor pin2
- C7 connected to Resistor pin2
- C8 connected to Resistor pin2
- C9 connected to Resistor pin2
- C10 connected to Resistor pin2
Toggle Switch
- COM connected to Arduino Nano VIN
- L2 connected to Adafruit Mini Lipo 5V
Code Documentation
Arduino Nano Code
void setup() {
  // put your setup code here, to run once:

}

void loop() {
  // put your main code here, to run repeatedly:

}
This code is a basic template for the Arduino Nano. The setup() function is where you initialize your components and settings, and the loop() function is where the main logic of your program runs repeatedly. You can add your specific logic to interface with the connected components in these functions.