
Arduino UNO Controlled Motor with Limit Switches and Pushbutton Interface
View and Edit Project In Cirkit Designer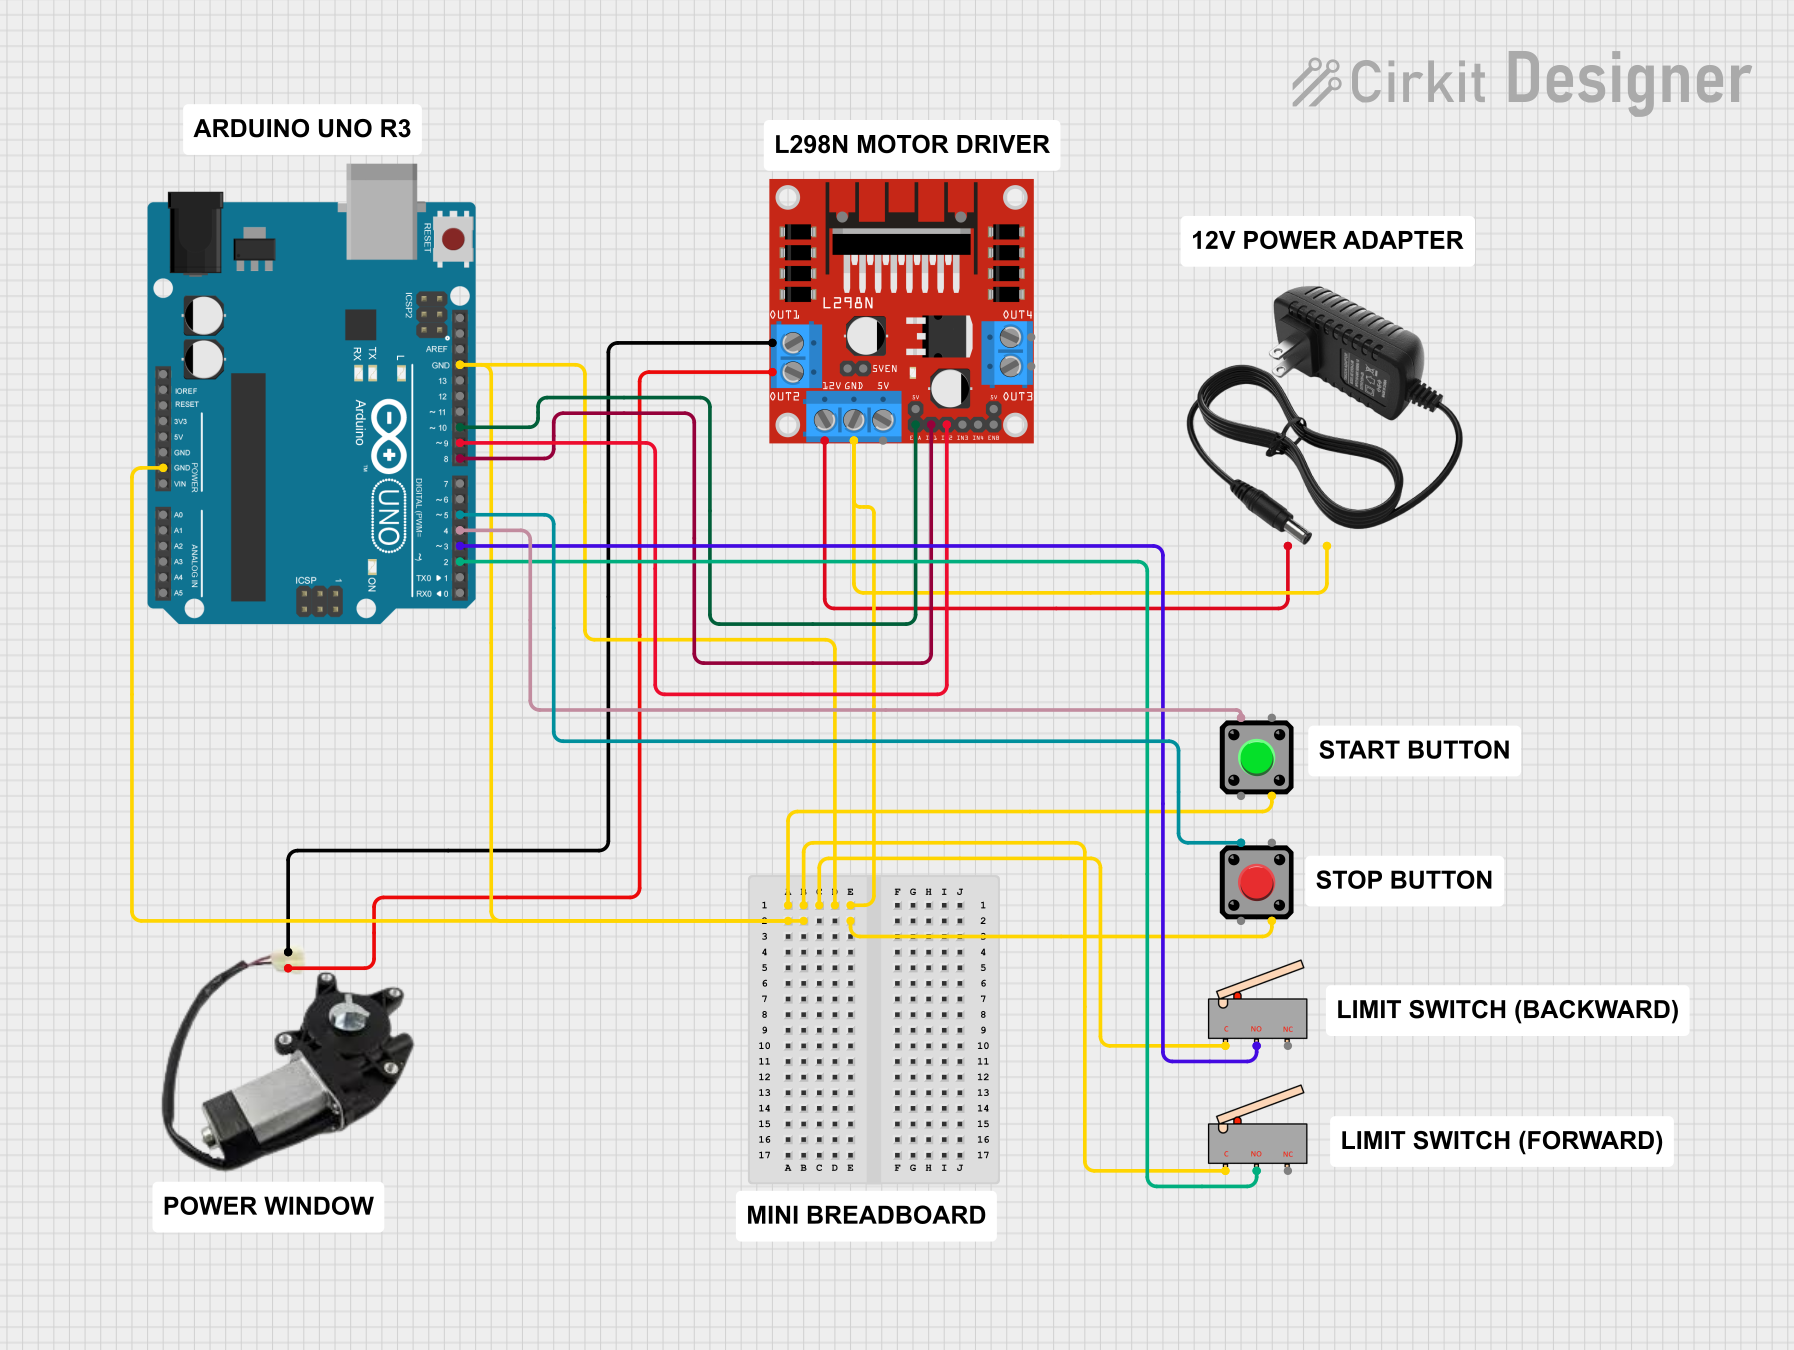
Circuit Documentation
Summary
This circuit is designed to control a power window using an Arduino UNO microcontroller and an L298N DC motor driver. The system includes limit switches to detect the end positions of the window and pushbuttons to start and stop the window movement. The Arduino UNO controls the motor driver, which in turn drives the power window motor. The circuit is powered by a 12V power supply.
Component List
Arduino UNO
- Microcontroller board based on the ATmega328P
- It has 14 digital input/output pins, 6 analog inputs, a 16 MHz quartz crystal, a USB connection, a power jack, an ICSP header, and a reset button.
L298N DC Motor Driver
- A motor driver module capable of driving two DC motors or one stepper motor.
- It has an onboard 5V regulator which can be used to power the microcontroller.
Limit Switches (x2)
- Mechanical switches that are actuated by the motion of a machine part or presence of an object.
- Used to detect the end positions of the power window.
Pushbuttons (x2)
- Simple switches to control the circuit.
- Used to start and stop the window movement.
Power Window
- A DC motor that drives the window up and down.
12V Power Supply
- Provides the necessary power to the circuit.
Wiring Details
Arduino UNO
- GND connected to the ground of the power supply, both limit switches, both pushbuttons, and the GND pin of the L298N motor driver.
- D10 connected to the ENA pin of the L298N motor driver for enabling the motor.
- D9 connected to the IN2 pin of the L298N motor driver to control motor direction.
- D8 connected to the IN1 pin of the L298N motor driver to control motor direction.
- D5 connected to the first pushbutton (start button).
- D4 connected to the second pushbutton (stop button).
- D3 connected to the first limit switch (left end).
- D2 connected to the second limit switch (right end).
L298N DC Motor Driver
- GND connected to the ground of the power supply and Arduino UNO.
- ENA connected to D10 on the Arduino UNO for PWM speed control.
- IN1 connected to D8 on the Arduino UNO.
- IN2 connected to D9 on the Arduino UNO.
- OUT1 connected to the Neutral pin of the power window.
- OUT2 connected to the Power pin of the power window.
- 12V connected to the positive terminal of the 12V power supply.
Limit Switches
- C (Common) pins connected to the ground.
- NO (Normally Open) pins connected to D3 and D2 on the Arduino UNO for detecting window end positions.
Pushbuttons
- One pin connected to the ground.
- The other pin connected to D5 and D4 on the Arduino UNO for start and stop control.
Power Window
- Neutral connected to OUT1 on the L298N motor driver.
- Power connected to OUT2 on the L298N motor driver.
12V Power Supply
- + (Positive) connected to the 12V input of the L298N motor driver.
- - (Negative) connected to the ground of the circuit.
Documented Code
// Pin Definitions
const int IN1 = 8;        // L298N IN1
const int IN2 = 9;        // L298N IN2
const int ENA = 10;       // L298N ENA (PWM)

const int limitSwitch1 = 2; // Left End Limit Switch (Home position)
const int limitSwitch2 = 3; // Right End Limit Switch

const int startButton = 4;  // Start Button
const int stopButton = 5;   // Stop Button

// State Variables
bool moving = false;
bool movingForward = true;

void setup() {
  // Initialize motor control pins
  pinMode(IN1, OUTPUT);
  pinMode(IN2, OUTPUT);
  pinMode(ENA, OUTPUT);

  // Initialize limit switches as input with internal pull-up
  pinMode(limitSwitch1, INPUT_PULLUP);
  pinMode(limitSwitch2, INPUT_PULLUP);

  // Initialize buttons as input with internal pull-up
  pinMode(startButton, INPUT_PULLUP);
  pinMode(stopButton, INPUT_PULLUP);

  // Initialize Serial Monitor for debugging (optional)
  Serial.begin(9600);

  // Stop the motor initially
  stopMotor();
}

void loop() {
  // Read button states
  bool startPressed = (digitalRead(startButton) == LOW);
  bool stopPressed = (digitalRead(stopButton) == LOW);

  // Handle Stop Button
  if (stopPressed) {
    Serial.println("Stop button pressed.");
    stopMotor();
    moving = false;
  }

  // Handle Start Button
  if (startPressed && !moving) {
    Serial.println("Start button pressed.");
    moving = true;
    movingForward = true; // Start moving forward initially
    moveMotor(movingForward);
  }

  // If motor is moving, check limit switches
  if (moving) {
    if (movingForward && digitalRead(limitSwitch1) == LOW) {
      Serial.println("Reached Limit Switch 1. Reversing direction.");
      movingForward = false;
      moveMotor(movingForward);
    }
    else if (!movingForward && digitalRead(limitSwitch2) == LOW) {
      Serial.println("Reached Limit Switch 2. Reversing direction.");
      movingForward = true;
      moveMotor(movingForward);
    }
  }

  // Small delay for stability
  delay(50);
}

// Function to move motor forward or backward
void moveMotor(bool forward) {
  if (forward) {
    digitalWrite(IN1, HIGH);
    digitalWrite(IN2, LOW);
    analogWrite(ENA, 100); // Full speed
    Serial.println("Motor moving forward.");
  } else {
    digitalWrite(IN1, LOW);
    digitalWrite(IN2, HIGH);
    analogWrite(ENA, 100); // Full speed
    Serial.println("Motor moving backward.");
  }
}

// Function to stop the motor
void stopMotor() {
  digitalWrite(IN1, LOW);
  digitalWrite(IN2, LOW);
  analogWrite(ENA, 0); // Stop the motor
  Serial.println("Motor stopped.");
}
This code is designed to run on an Arduino UNO and controls a DC motor through the L298N motor driver. It uses digital inputs to read the state of the limit switches and pushbuttons, and it controls the motor's direction and speed using digital outputs and PWM. The code includes functions for stopping the motor and moving it in either direction, as well as serial output for debugging purposes.