
Arduino UNO-Based Smart Servo Control System with Load Cell and LCD Display
View and Edit Project In Cirkit Designer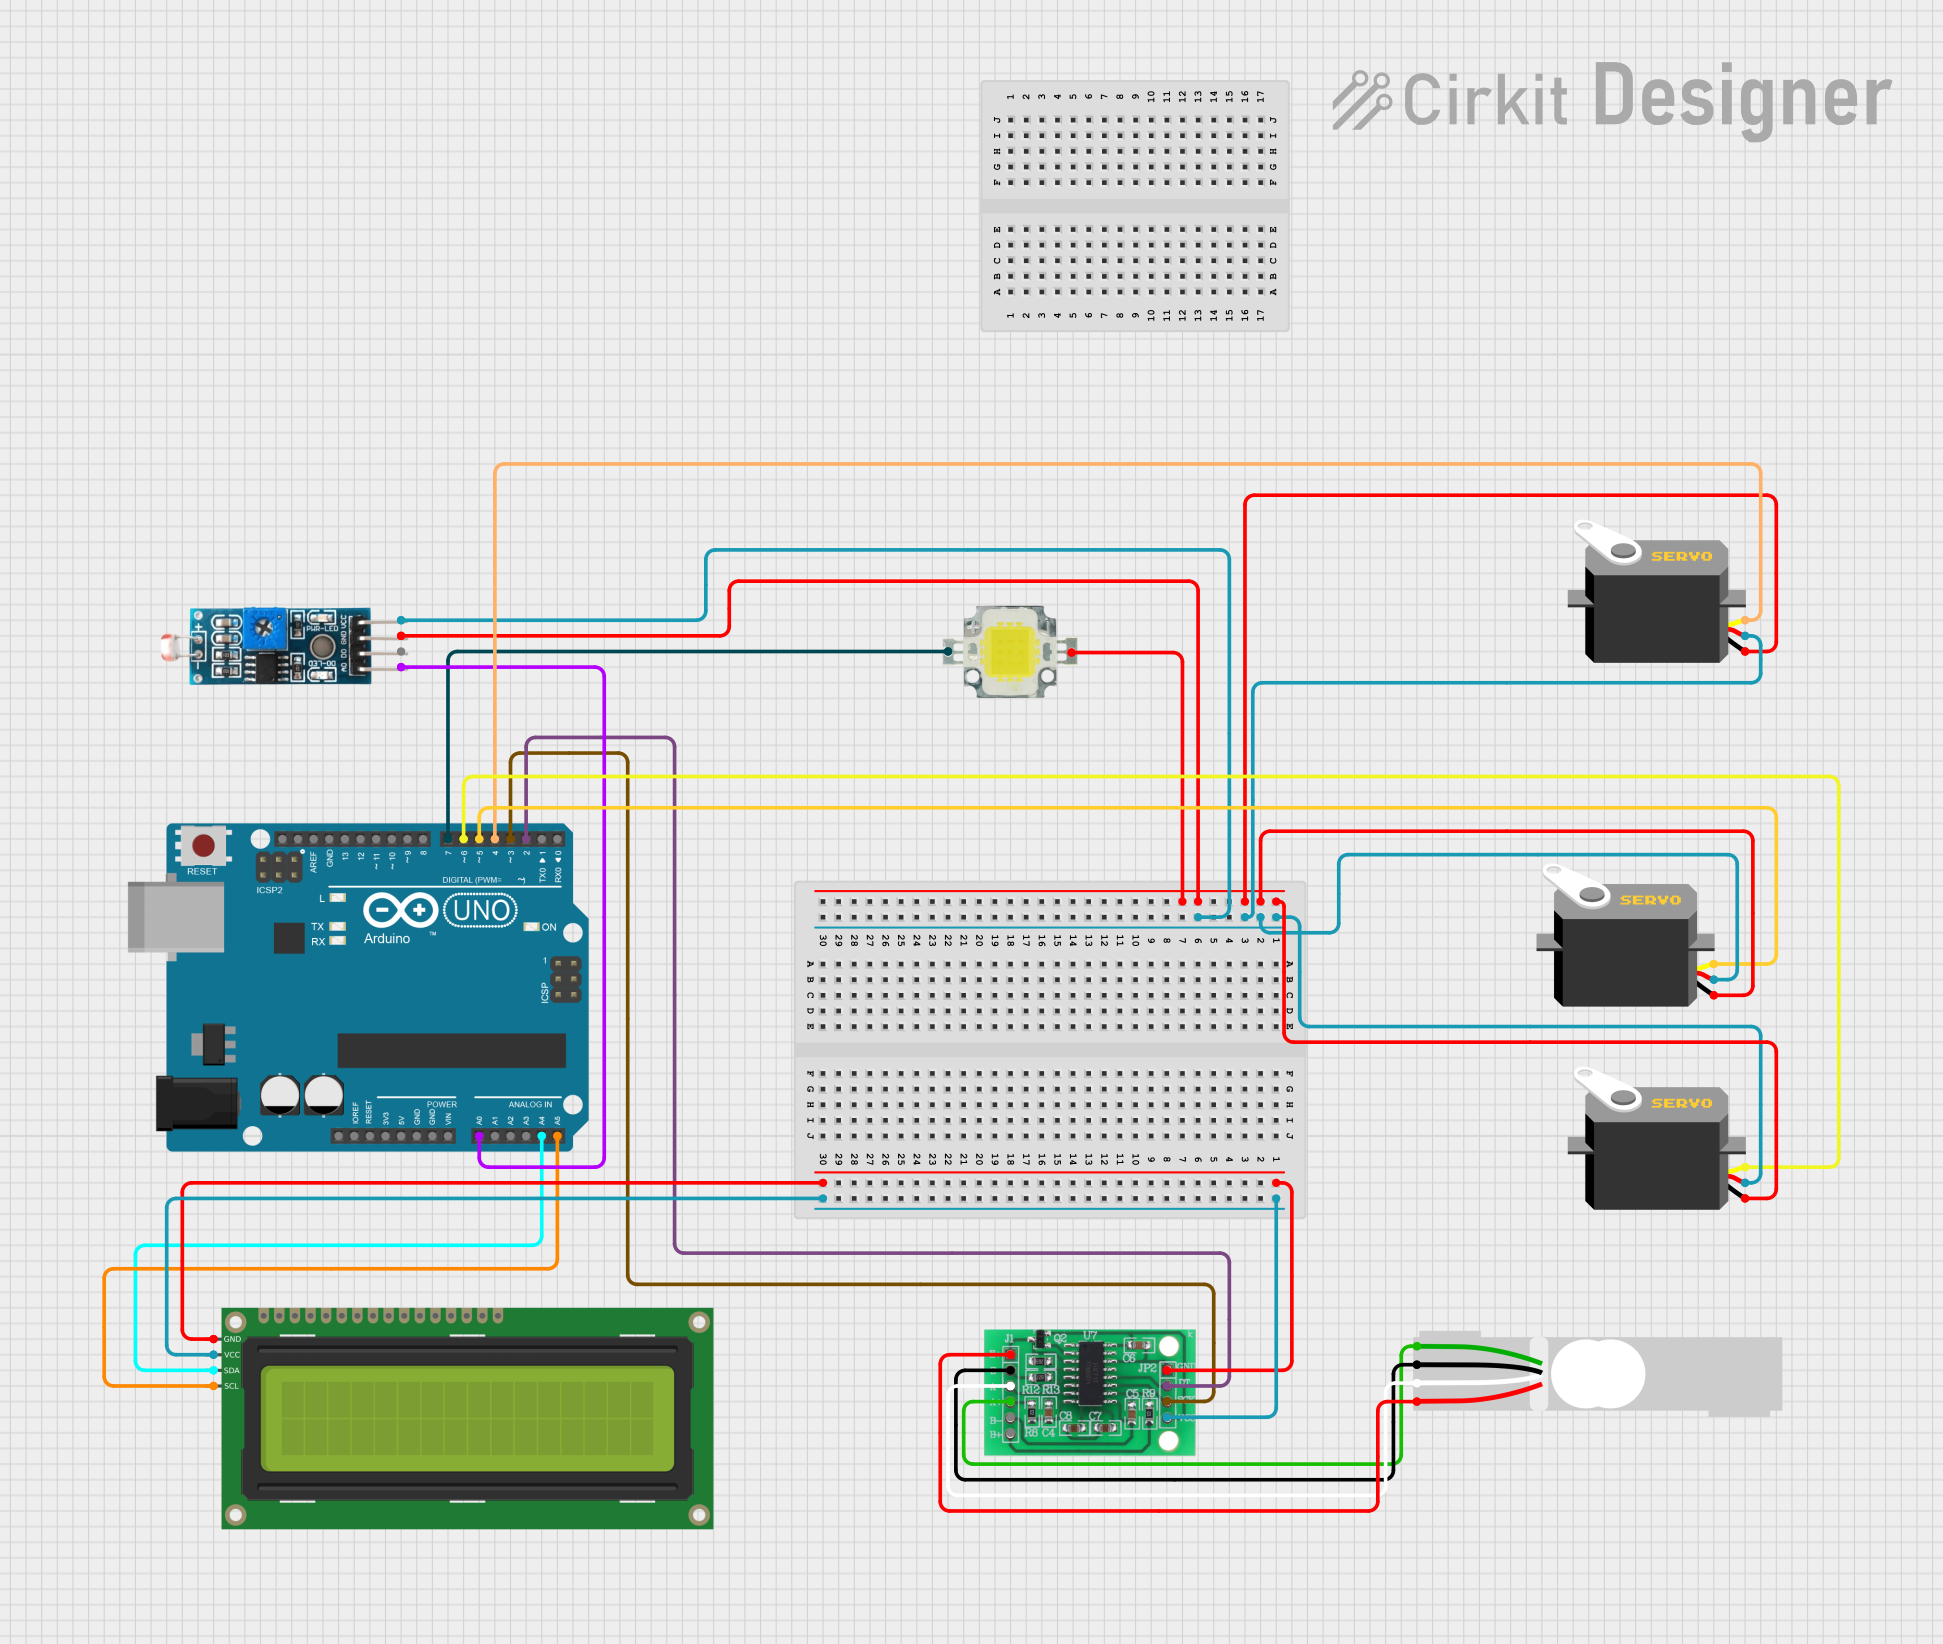
Circuit Documentation
Summary
This circuit involves an Arduino UNO microcontroller interfacing with multiple components including servos, an LDR module, an I2C LCD, a load cell, an HX711 bridge sensor interface, and a power LED. The Arduino UNO controls the servos and reads data from the sensors to display on the LCD.
Component List
Arduino UNO
- Description: A microcontroller board based on the ATmega328P.
- Pins: UNUSED, IOREF, Reset, 3.3V, 5V, GND, Vin, A0, A1, A2, A3, A4, A5, SCL, SDA, AREF, D13, D12, D11, D10, D9, D8, D7, D6, D5, D4, D3, D2, D1, D0
Servo
- Description: A motor that can be controlled to move to a specific position.
- Pins: gnd, vcc, pulse
Module LDR
- Description: A light-dependent resistor module used to detect light intensity.
- Pins: VCC, GND, DO, AO
16x2 I2C LCD
- Description: A 16x2 character LCD with I2C interface.
- Pins: GND, VCC, SDA, SCL
Load Cell - Red/white/black/green
- Description: A sensor used to measure weight or force.
- Pins: E+, A-, E-, A+
Power LED 12V 10W 0.8-0.9A
- Description: A high-power LED.
- Pins: +, -
HX711 - Bridge Sensor Interface
- Description: An interface for bridge sensors like load cells.
- Pins: E+, E-, A-, A+, B-, B+, GND - GROUND, DATA (OUT), SCK - CLOCK (IN), 3.3/3.5V Supply
Wiring Details
Arduino UNO
- A0: Connected to AO of Module LDR
- A4: Connected to SDA of 16x2 I2C LCD
- A5: Connected to SCL of 16x2 I2C LCD
- D2: Connected to DATA (OUT) of HX711 - Bridge Sensor Interface
- D3: Connected to SCK - CLOCK (IN) of HX711 - Bridge Sensor Interface
- D4: Connected to pulse of Servo
- D5: Connected to pulse of Servo
- D6: Connected to pulse of Servo
- D7: Connected to + of Power LED 12V 10W 0.8-0.9A
Servo
- gnd: Connected to GND of Module LDR and - of Power LED 12V 10W 0.8-0.9A
- vcc: Connected to VCC of Module LDR
- pulse: Connected to D4, D5, D6 of Arduino UNO
Module LDR
- VCC: Connected to vcc of Servo
- GND: Connected to gnd of Servo and - of Power LED 12V 10W 0.8-0.9A
- AO: Connected to A0 of Arduino UNO
16x2 I2C LCD
- GND: Connected to GND - GROUND of HX711 - Bridge Sensor Interface
- VCC: Connected to 3.3/3.5V Supply of HX711 - Bridge Sensor Interface
- SDA: Connected to A4 of Arduino UNO
- SCL: Connected to A5 of Arduino UNO
Load Cell - Red/white/black/green
- E+: Connected to E+ of HX711 - Bridge Sensor Interface
- A-: Connected to A- of HX711 - Bridge Sensor Interface
- E-: Connected to E- of HX711 - Bridge Sensor Interface
- A+: Connected to A+ of HX711 - Bridge Sensor Interface
Power LED 12V 10W 0.8-0.9A
- +: Connected to D7 of Arduino UNO
- -: Connected to gnd of Servo and GND of Module LDR
HX711 - Bridge Sensor Interface
- E+: Connected to E+ of Load Cell
- A-: Connected to A- of Load Cell
- E-: Connected to E- of Load Cell
- A+: Connected to A+ of Load Cell
- GND - GROUND: Connected to GND of 16x2 I2C LCD
- DATA (OUT): Connected to D2 of Arduino UNO
- SCK - CLOCK (IN): Connected to D3 of Arduino UNO
- 3.3/3.5V Supply: Connected to VCC of 16x2 I2C LCD
Documented Code
Arduino UNO Code (sketch.ino)
void setup() {
  // put your setup code here, to run once:

}

void loop() {
  // put your main code here, to run repeatedly:

}
Documentation (documentation.txt)
This documentation provides a comprehensive overview of the circuit, including a summary, detailed component list, wiring details, and the code used in the Arduino UNO microcontroller.