Cirkit Designer
Your all-in-one circuit design IDE
Home /
Project Documentation
Arduino UNO-Based Real-Time Clock with Alarm and LCD Display
Circuit Documentation
Summary
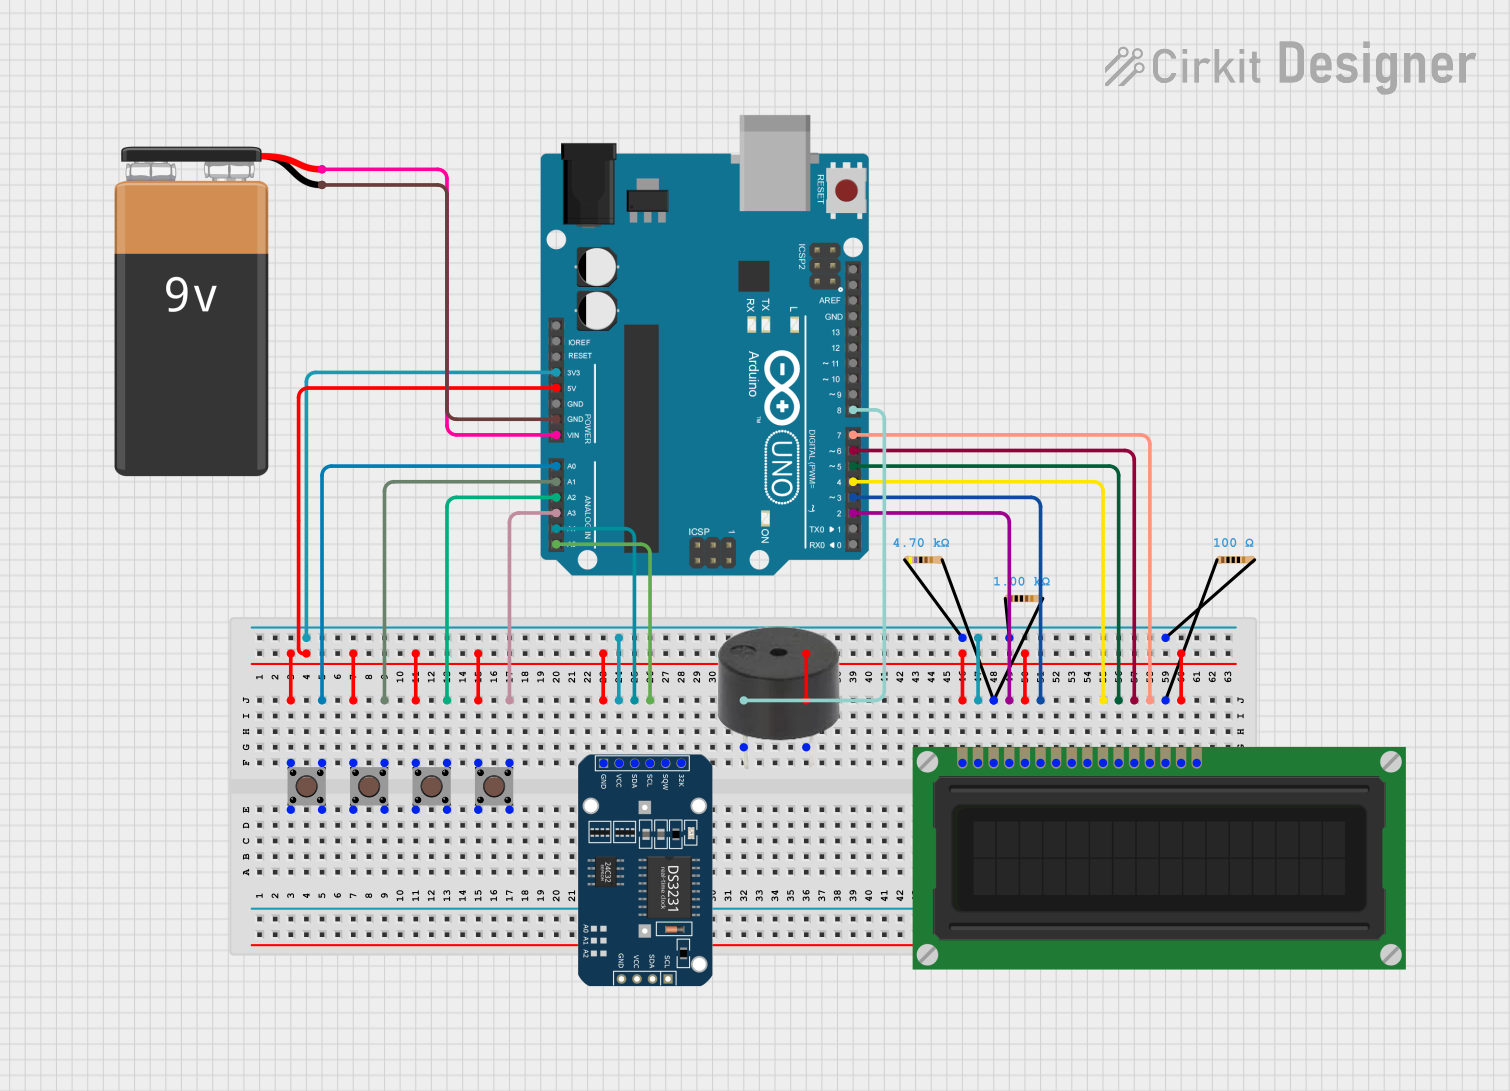
This circuit is a real-time clock (RTC) with an alarm feature, utilizing an Arduino UNO microcontroller, a DS3231 RTC module, an LCD display, multiple pushbuttons, a buzzer, and resistors. The circuit allows the user to set the time and alarm, and displays the current time and temperature on the LCD. The buzzer sounds when the alarm goes off.
Component List
Pushbutton
- Description: A simple pushbutton used for user input.
- Pins: Pin 1 (in), Pin 2 (in), Pin 3 (out), Pin 4 (out)
Arduino UNO
- Description: A microcontroller board based on the ATmega328P.
- Pins: UNUSED, IOREF, Reset, 3.3V, 5V, GND, Vin, A0, A1, A2, A3, A4, A5, SCL, SDA, AREF, D13, D12, D11, D10, D9, D8, D7, D6, D5, D4, D3, D2, D1, D0
LCD Display (16 pin)
- Description: A 16x2 character LCD display.
- Pins: VSS, VDD, VO, RS, R_W, E, DB0, DB1, DB2, DB3, DB4, DB5, DB6, DB7, A, K
DS3231 RTC
- Description: A real-time clock module with temperature sensor.
- Pins: 32K, SQW, SCL, SDA, VCC, GND
Buzzer
- Description: A simple buzzer for sound output.
- Pins: PIN, GND
Resistor (1000 Ohms)
- Description: A resistor with a resistance of 1000 Ohms.
- Pins: pin1, pin2
Resistor (4700 Ohms)
- Description: A resistor with a resistance of 4700 Ohms.
- Pins: pin1, pin2
Resistor (100 Ohms)
- Description: A resistor with a resistance of 100 Ohms.
- Pins: pin1, pin2
9V Battery
- Description: A 9V battery for power supply.
- Pins: -, +
Wiring Details
Pushbutton
- Pin 1 (in): Connected to GND (common ground with other components)
- Pin 3 (out):
- Pushbutton 1: Connected to Arduino UNO A0
- Pushbutton 2: Connected to Arduino UNO A1
- Pushbutton 3: Connected to Arduino UNO A2
- Pushbutton 4: Connected to Arduino UNO A3
Arduino UNO
- 5V: Connected to GND (common ground with other components)
- A0: Connected to Pushbutton 1 Pin 3 (out)
- A1: Connected to Pushbutton 2 Pin 3 (out)
- A2: Connected to Pushbutton 3 Pin 3 (out)
- A3: Connected to Pushbutton 4 Pin 3 (out)
- A4: Connected to DS3231 RTC SDA
- A5: Connected to DS3231 RTC SCL
- D2: Connected to LCD Display RS
- D3: Connected to LCD Display E
- D4: Connected to LCD Display DB3
- D5: Connected to LCD Display DB4
- D6: Connected to LCD Display DB5
- D7: Connected to LCD Display DB6
- D8: Connected to Buzzer PIN
- GND: Connected to 9V Battery -
- Vin: Connected to 9V Battery +
LCD Display (16 pin)
- VSS: Connected to GND (common ground with other components)
- VDD: Connected to Arduino UNO 3.3V through resistors
- VO: Connected to Resistor (1000 Ohms) pin2 and Resistor (4700 Ohms) pin2
- RS: Connected to Arduino UNO D2
- R_W: Connected to GND (common ground with other components)
- E: Connected to Arduino UNO D3
- DB3: Connected to Arduino UNO D4
- DB4: Connected to Arduino UNO D5
- DB5: Connected to Arduino UNO D6
- DB6: Connected to Arduino UNO D7
- DB7: Connected to Resistor (100 Ohms) pin1
- A: Connected to GND (common ground with other components)
DS3231 RTC
- GND: Connected to GND (common ground with other components)
- VCC: Connected to Arduino UNO 3.3V through resistors
- SDA: Connected to Arduino UNO A4
- SCL: Connected to Arduino UNO A5
Buzzer
- PIN: Connected to Arduino UNO D8
- GND: Connected to GND (common ground with other components)
Resistors
- Resistor (1000 Ohms) pin1: Connected to DS3231 RTC VCC
- Resistor (1000 Ohms) pin2: Connected to LCD Display VO
- Resistor (4700 Ohms) pin1: Connected to DS3231 RTC VCC
- Resistor (4700 Ohms) pin2: Connected to LCD Display VO
- Resistor (100 Ohms) pin1: Connected to LCD Display DB7
- Resistor (100 Ohms) pin2: Connected to Arduino UNO 3.3V
9V Battery
- -: Connected to Arduino UNO GND
- +: Connected to Arduino UNO Vin
Documented Code
Arduino UNO Code
#include <DS3231.h> // Memanggil RTC3231 Library
#include <Wire.h>  // i2C Conection Library
#include <LiquidCrystal.h> // Libraries
#include <EEPROM.h>

LiquidCrystal lcd(2, 3, 4, 5, 6, 7); // Arduino pins to lcd

#define bt_time   A0
#define bt_up     A1
#define bt_down   A2
#define bt_alarm  A3

#define buzzer 8

// Init DS3231
DS3231  rtc(SDA, SCL);

// Init a Time-data structure
Time  t; // pencacah string time()

int hh = 0, mm = 0, ss = 0, dd = 0, bb = 0, set_day;
int yy = 0;
String Day = "  ";

int AlarmHH  = 21, AlarmMM  = 22, AlarmSS  = 23, setMode = 0, setAlarm = 0, alarmMode=0;

int stop =0, mode=0, flag=0;

// Eeprom Store Variable
uint8_t HH;
uint8_t MM;

byte bell_symbol[8] = {
    B00100,
    B01110,
    B01110,
    B01110,
    B01110,
    B11111,
    B01000,
    B00100
};

byte thermometer_symbol[8] = {
    B00100,
    B01010,
    B01010,
    B01110,
    B01110,
    B11111,
    B11111,
    B01110
};

void setup() {
    // Setup Serial connection
    Serial.begin(9600);

    rtc.begin(); // memulai koneksi i2c dengan RTC

    pinMode(bt_time,  INPUT_PULLUP);
    pinMode(bt_up,    INPUT_PULLUP);
    pinMode(bt_down,  INPUT_PULLUP);
    pinMode(bt_alarm, INPUT_PULLUP);

    pinMode(buzzer, OUTPUT);

    lcd.createChar(1, thermometer_symbol);
    lcd.createChar(2, bell_symbol);

    lcd.begin(16, 2); // Configura lcd numero columnas y filas
    lcd.setCursor(0,0);  // Show "TIME" on the LCD

    lcd.setCursor (0,0);
    lcd.print(" Real Time Clock ");
    lcd.setCursor (0,1);
    lcd.print("   With Alarm ");
    delay (2000);
    lcd.clear();

    stop=EEPROM.read(50);
    if(stop==0) {
    } else {
        WriteEeprom();
    }

    EEPROM.write(50,0);

    ReadEeprom();
    // Set RTC Untuk Pertama kali
    // rtc.setDOW(2);     // Set Day-of-Week to SUNDAY
    // rtc.setTime (00, 9, 50);
    // rtc.setDate(12, 11, 2017);
}

void loop() {
    t = rtc.getTime();
    Day = rtc.getDOWStr(1);

    if (setMode == 0) {