
Arduino UNO-Based Smart Motor Control System with RFID and Ultrasonic Sensors
View and Edit Project In Cirkit Designer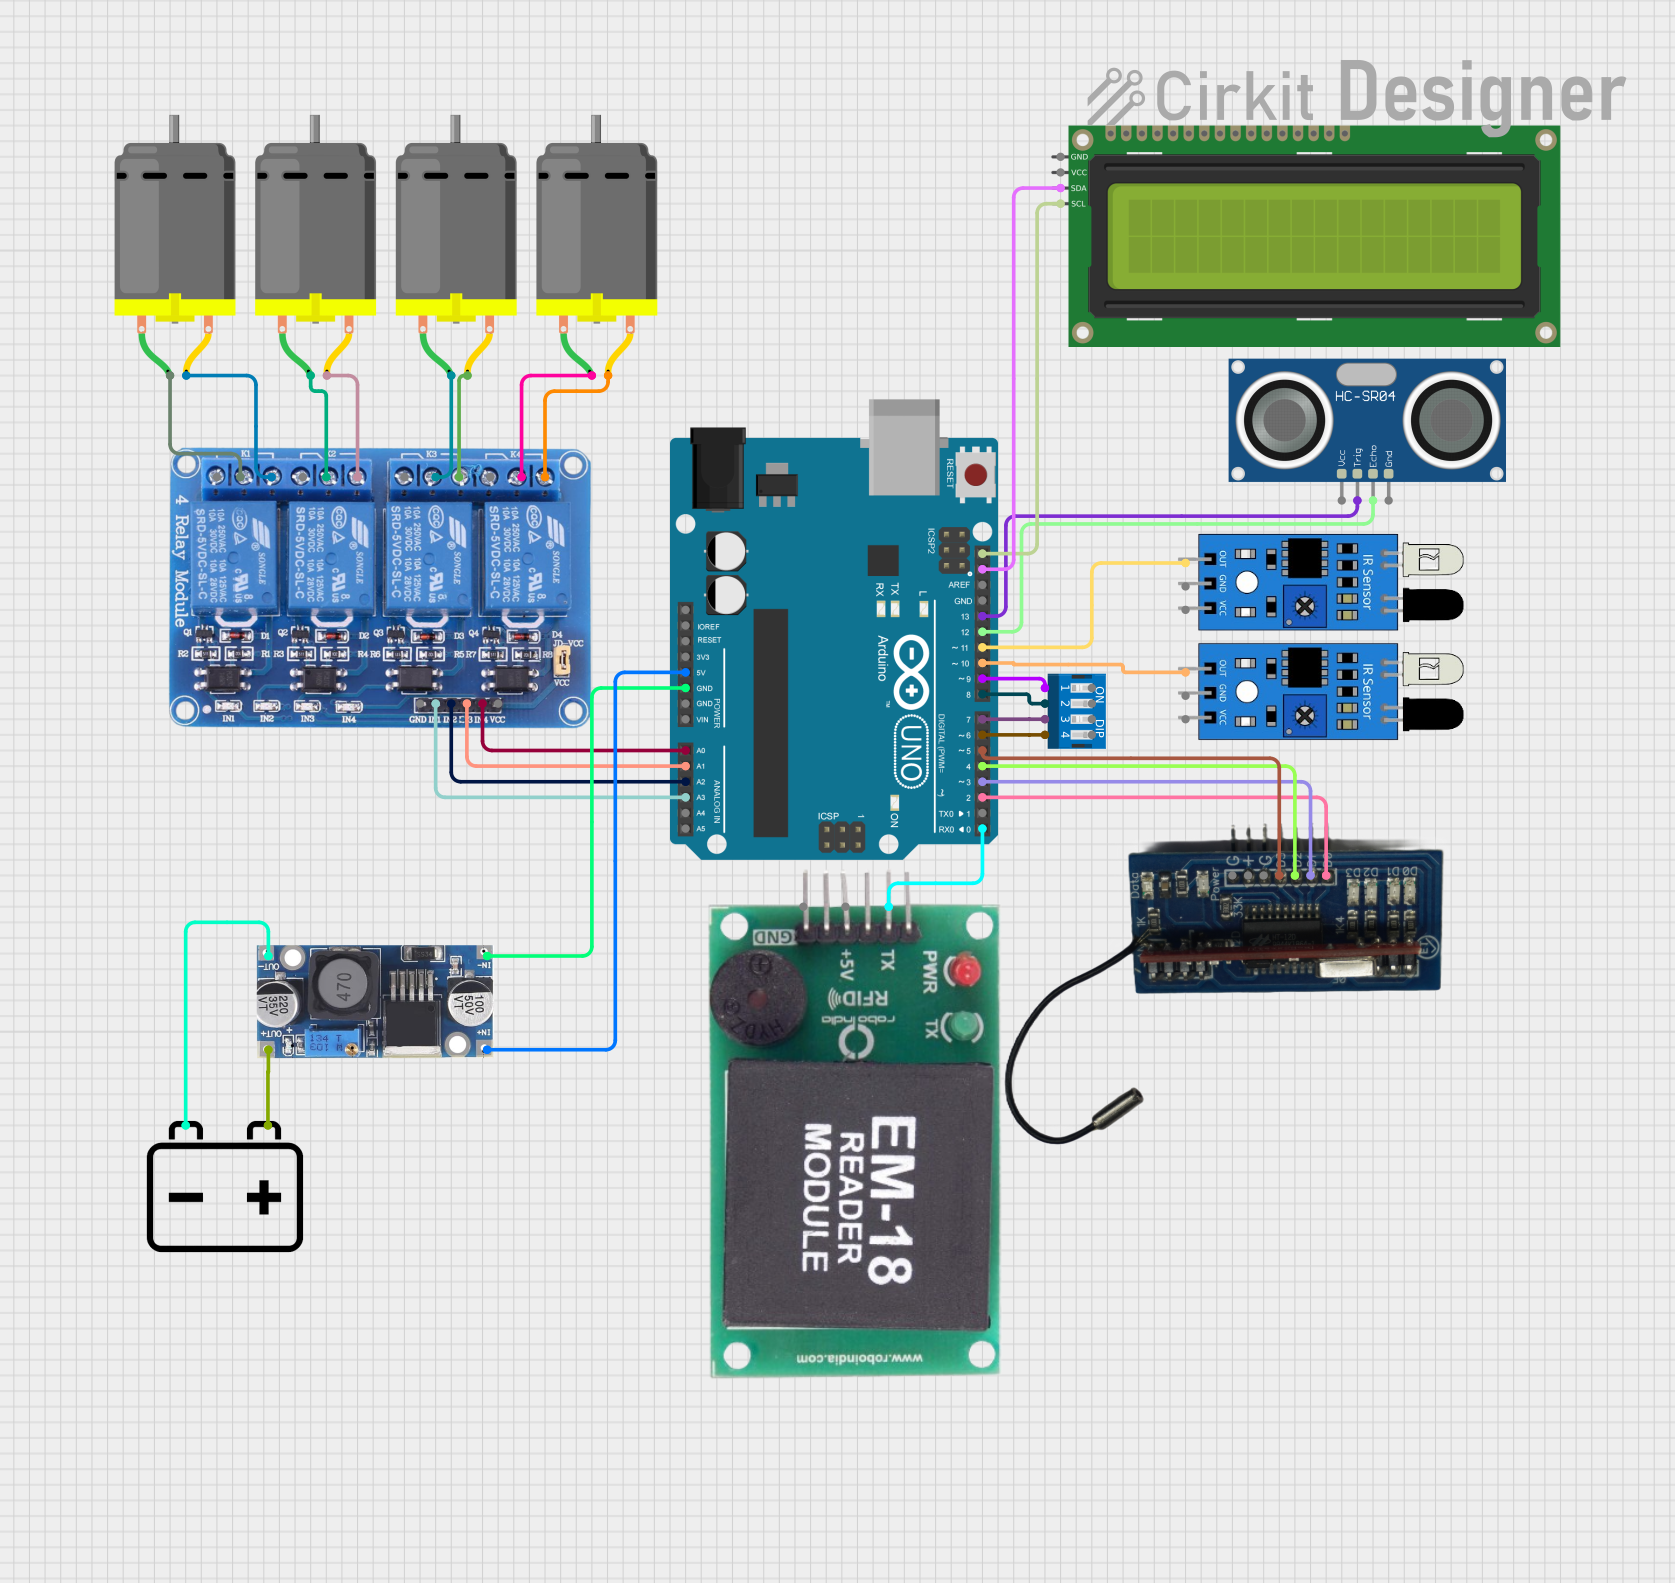
Circuit Documentation
Summary
This document provides a detailed overview of a circuit that includes an Arduino UNO microcontroller, multiple DC motors, a relay module, various sensors, an LCD display, and a power supply. The circuit is designed to control the motors and sensors through the Arduino, with the relay module acting as an intermediary for motor control. The LCD display provides a user interface, and the power supply ensures that all components receive the necessary voltage.
Component List
Arduino UNO
- Description: A microcontroller board based on the ATmega328P.
- Pins: UNUSED, IOREF, Reset, 3.3V, 5V, GND, Vin, A0, A1, A2, A3, A4, A5, SCL, SDA, AREF, D13, D12, D11, D10, D9, D8, D7, D6, D5, D4, D3, D2, D1, D0
DC Motor
- Description: A simple DC motor.
- Pins: pin 1, pin 2
Relay 4 Channel 5v
- Description: A relay module with 4 channels, operating at 5V.
- Pins: GND, IN1, IN2, IN3, IN4, VCC, COM1, COM2, COM3, COM4, NO1, NO2, NO3, NO4, NC1, NC2, NC3, NC4
EM-18 RFID Module
- Description: An RFID module for reading RFID tags.
- Pins: TX, VCC, GND
DIP Switch 4 Position
- Description: A 4-position DIP switch.
- Pins: 1, 2, 3, 4, 5, 6, 7, 8
IR Sensor
- Description: An infrared sensor for detecting objects.
- Pins: out, gnd, vcc
16x2 I2C LCD
- Description: A 16x2 character LCD display with I2C interface.
- Pins: GND, VCC, SDA, SCL
RF Receiver
- Description: A radio frequency receiver module.
- Pins: D0, D1, D2, D3, GND, VCC
HC-SR04 Ultrasonic Sensor
- Description: An ultrasonic sensor for distance measurement.
- Pins: VCC, TRIG, ECHO, GND
12V Battery
- Description: A 12V battery for power supply.
- Pins: -, +
48V to 12V Converter
- Description: A voltage converter to step down from 48V to 12V.
- Pins: out+, out--, in+, in--
Wiring Details
Arduino UNO
- 5V connected to in+ of 48V to 12V Converter
- GND connected to in-- of 48V to 12V Converter
- A0 connected to IN4 of Relay 4 Channel 5v
- A1 connected to IN3 of Relay 4 Channel 5v
- A2 connected to IN2 of Relay 4 Channel 5v
- A3 connected to IN1 of Relay 4 Channel 5v
- SCL connected to SCL of 16x2 I2C LCD
- SDA connected to SDA of 16x2 I2C LCD
- D13 connected to TRIG of HC-SR04 Ultrasonic Sensor
- D12 connected to ECHO of HC-SR04 Ultrasonic Sensor
- D11 connected to out of IR Sensor
- D10 connected to out of IR Sensor
- D9 connected to 1 of DIP Switch 4 Position
- D8 connected to 2 of DIP Switch 4 Position
- D7 connected to 3 of DIP Switch 4 Position
- D6 connected to 4 of DIP Switch 4 Position
- D5 connected to D3 of RF Receiver
- D4 connected to D2 of RF Receiver
- D3 connected to D1 of RF Receiver
- D2 connected to D0 of RF Receiver
- D0 connected to TX of EM-18 RFID Module
DC Motor
pin 1 of DC Motor connected to COM1 of Relay 4 Channel 5v
pin 2 of DC Motor connected to NO1 of Relay 4 Channel 5v
pin 1 of DC Motor connected to COM2 of Relay 4 Channel 5v
pin 2 of DC Motor connected to NO2 of Relay 4 Channel 5v
pin 1 of DC Motor connected to COM3 of Relay 4 Channel 5v
pin 2 of DC Motor connected to NO3 of Relay 4 Channel 5v
pin 1 of DC Motor connected to COM4 of Relay 4 Channel 5v
pin 2 of DC Motor connected to NO4 of Relay 4 Channel 5v
Relay 4 Channel 5v
- IN4 connected to A0 of Arduino UNO
- IN3 connected to A1 of Arduino UNO
- IN2 connected to A2 of Arduino UNO
- IN1 connected to A3 of Arduino UNO
- COM1 connected to pin 1 of DC Motor
- NO1 connected to pin 2 of DC Motor
- COM2 connected to pin 1 of DC Motor
- NO2 connected to pin 2 of DC Motor
- COM3 connected to pin 1 of DC Motor
- NO3 connected to pin 2 of DC Motor
- COM4 connected to pin 1 of DC Motor
- NO4 connected to pin 2 of DC Motor
EM-18 RFID Module
- TX connected to D0 of Arduino UNO
DIP Switch 4 Position
- 1 connected to D9 of Arduino UNO
- 2 connected to D8 of Arduino UNO
- 3 connected to D7 of Arduino UNO
- 4 connected to D6 of Arduino UNO
IR Sensor
- out connected to D11 of Arduino UNO
- out connected to D10 of Arduino UNO
16x2 I2C LCD
- SCL connected to SCL of Arduino UNO
- SDA connected to SDA of Arduino UNO
RF Receiver
- D3 connected to D5 of Arduino UNO
- D2 connected to D4 of Arduino UNO
- D1 connected to D3 of Arduino UNO
- D0 connected to D2 of Arduino UNO
HC-SR04 Ultrasonic Sensor
- TRIG connected to D13 of Arduino UNO
- ECHO connected to D12 of Arduino UNO
12V Battery
- - connected to out-- of 48V to 12V Converter
- + connected to out+ of 48V to 12V Converter
48V to 12V Converter
- in+ connected to 5V of Arduino UNO
- in-- connected to GND of Arduino UNO
- out-- connected to - of 12V Battery
- out+ connected to + of 12V Battery
Documented Code
Arduino UNO Code
void setup() {
  // put your setup code here, to run once:

}

void loop() {
  // put your main code here, to run repeatedly:

}
This code is a basic template for the Arduino UNO. The setup() function is where you initialize your components and settings, and the loop() function is where the main logic of your program runs repeatedly.
This concludes the documentation for the circuit.