
Raspberry Pi 5 and DHT11 Sensor-Based Temperature and Humidity Monitoring with LED Indicator
View and Edit Project In Cirkit Designer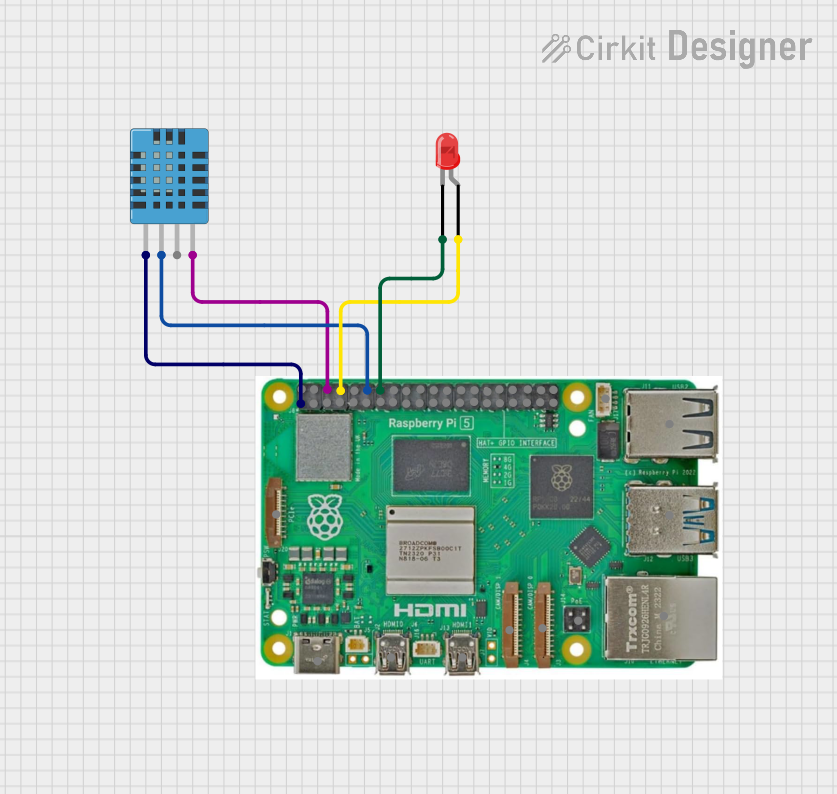
Circuit Documentation
Summary of the Circuit
This circuit integrates a Raspberry Pi 5 with a DHT11 Humidity and Temperature Sensor and a red two-pin LED. The Raspberry Pi 5 serves as the central processing unit, interfacing with the DHT11 sensor to read environmental data and controlling the LED to blink at regular intervals. The DHT11 sensor is powered by the Raspberry Pi and communicates data back to it via a GPIO pin. The LED is directly driven by another GPIO pin on the Raspberry Pi and is used to indicate the operational status of the circuit.
Component List
Raspberry Pi 5
- Description: A powerful microcomputer with a variety of I/O options including GPIO pins, USB ports, Ethernet, and more.
- Purpose: Acts as the central controller for the circuit, reading sensor data and controlling the LED.
DHT11 Humidity and Temperature Sensor
- Description: A basic, low-cost digital temperature and humidity sensor.
- Purpose: Measures the ambient temperature and humidity and sends this data to the Raspberry Pi.
LED: Two Pin (red)
- Description: A simple red LED with an anode and cathode for basic light-emitting functionality.
- Purpose: Provides a visual indication of the circuit's operation, blinking at regular intervals as controlled by the Raspberry Pi.
Wiring Details
Raspberry Pi 5
- Type-C: Not connected in this circuit.
- Micro HDMI 1 & 2: Not connected in this circuit.
- Camera 1 & 2: Not connected in this circuit.
- PoE: Not connected in this circuit.
- Fan: Not connected in this circuit.
- PCIe: Not connected in this circuit.
- USB 3.0 & USB 2.0: Not connected in this circuit.
- Ethernet: Not connected in this circuit.
- 5V: Not connected in this circuit.
- GND: Connected to the GND pin of the DHT11 sensor and the cathode of the LED.
- 3.3v: Provides power to the VDD pin of the DHT11 sensor.
- GPIO 14: Connected to the anode of the LED.
- GPIO 18: Receives data from the DATA pin of the DHT11 sensor.
- Other GPIOs: Not connected in this circuit.
DHT11 Humidity and Temperature Sensor
- VDD: Powered by the 3.3v pin of the Raspberry Pi.
- DATA: Sends data to GPIO 18 of the Raspberry Pi.
- NULL: Not connected in this circuit.
- GND: Connected to the GND pin of the Raspberry Pi.
LED: Two Pin (red)
- Anode: Connected to GPIO 14 of the Raspberry Pi.
- Cathode: Connected to the GND pin of the Raspberry Pi.
Documented Code
/*
 * This Arduino Sketch interfaces a DHT11 sensor and an LED with a Raspberry Pi.
 * The DHT11 sensor reads temperature and humidity data, which can be sent to
 * the Raspberry Pi via GPIO 18. The LED connected to GPIO 14 will blink at a
 * regular interval.
 */

#include <DHT.h>

#define DHTPIN 18 // GPIO 18 for DHT11 data pin
#define DHTTYPE DHT11 // DHT 11
#define LEDPIN 14 // GPIO 14 for LED

DHT dht(DHTPIN, DHTTYPE);

void setup() {
  pinMode(LEDPIN, OUTPUT); // Initialize the LED pin as an output
  dht.begin(); // Initialize the DHT11 sensor
  Serial.begin(9600); // Initialize serial communication
}

void loop() {
  // Blink the LED
  digitalWrite(LEDPIN, HIGH); // Turn the LED on
  delay(1000); // Wait for a second
  digitalWrite(LEDPIN, LOW); // Turn the LED off
  delay(1000); // Wait for a second

  // Read temperature and humidity from DHT11
  float h = dht.readHumidity();
  float t = dht.readTemperature();

  // Check if any reads failed and exit early (to try again).
  if (isnan(h) || isnan(t)) {
    Serial.println("Failed to read from DHT sensor!");
    return;
  }

  // Print the results to the Serial Monitor
  Serial.print("Humidity: ");
  Serial.print(h);
  Serial.print(" %\t");
  Serial.print("Temperature: ");
  Serial.print(t);
  Serial.println(" *C");
}
Note: The code provided is intended for an Arduino environment, which is not directly compatible with the Raspberry Pi. However, the logic and functionality can be adapted to the Raspberry Pi using a suitable programming language such as Python with the appropriate libraries for GPIO access and DHT11 sensor communication.