Arduino UNO Levitating Sphere Control System with Ultrasonic Sensor and LCD Display
Levitating Sphere Control System Documentation
Summary
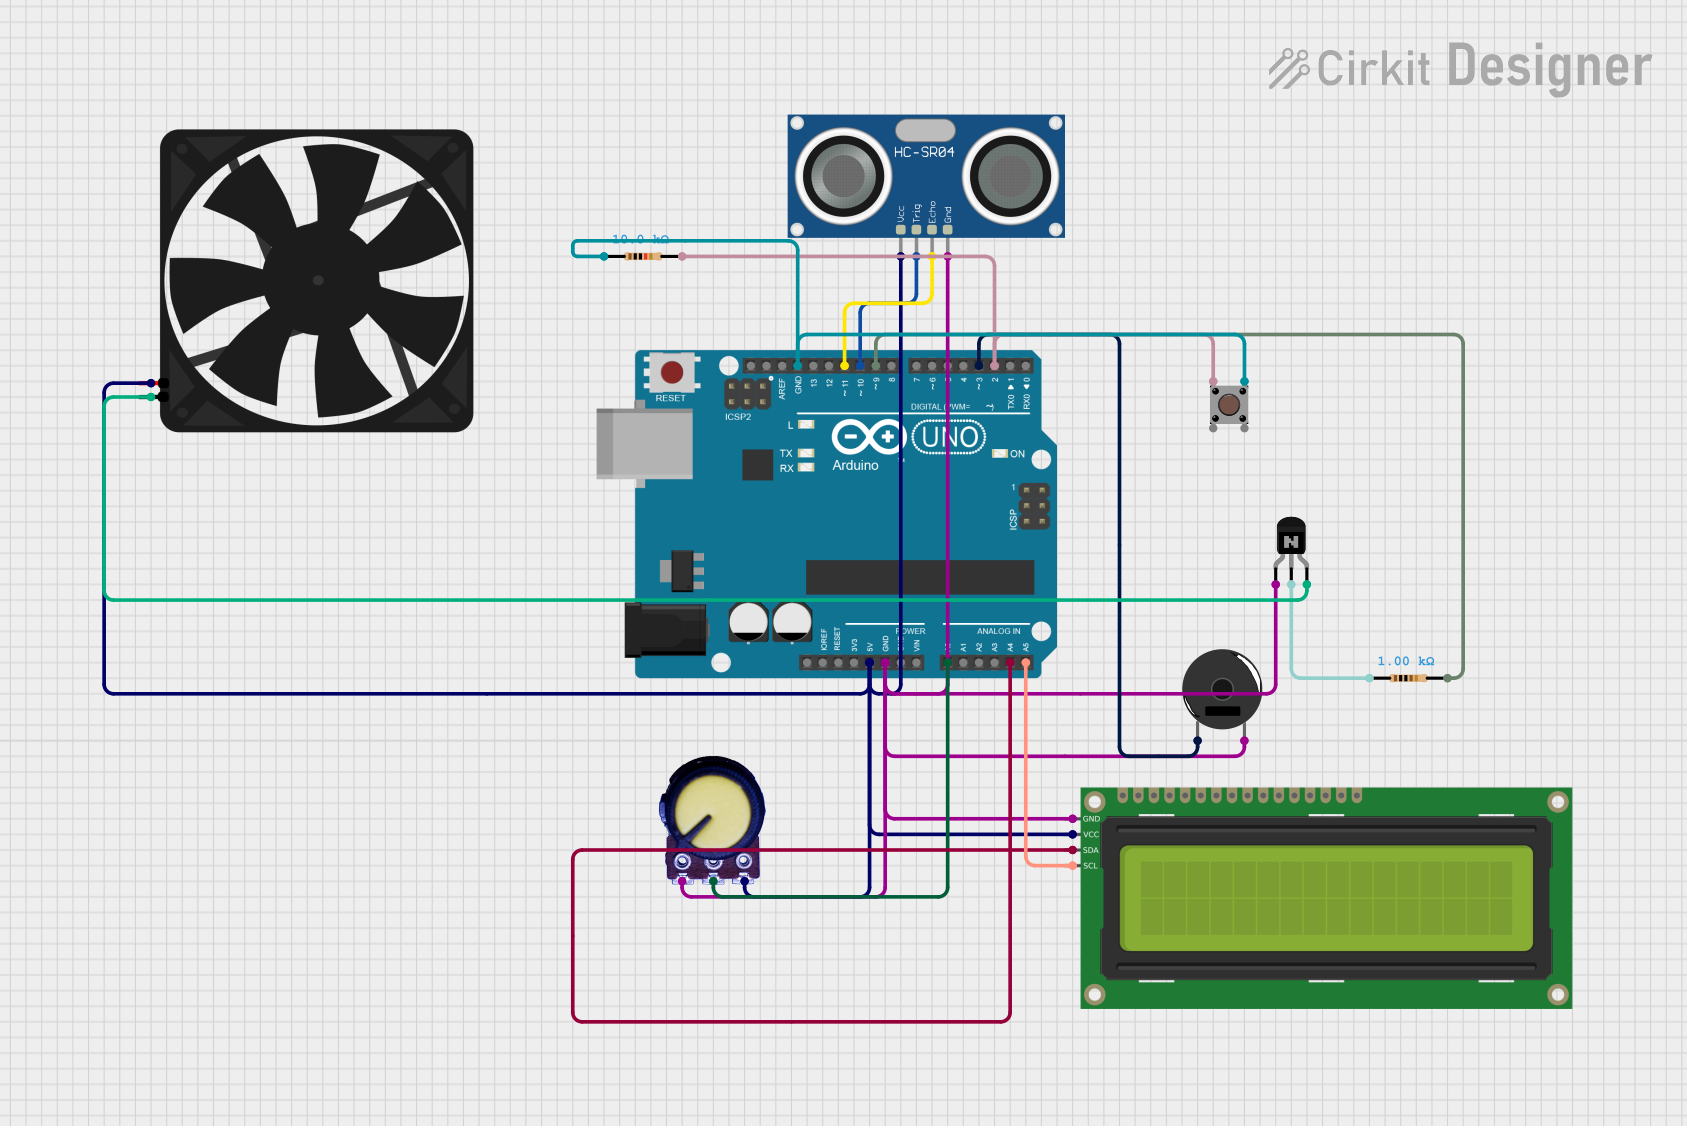
This document provides a detailed overview of the Levitating Sphere Control System. The system uses an Arduino UNO microcontroller to control a fan, ultrasonic sensor, potentiometer, pushbutton, LCD display, and a buzzer. The fan speed is controlled based on the potentiometer input, and the sphere's position is displayed on the LCD. The system can be started or stopped using a pushbutton.
Component List
Arduino UNO
- Description: Microcontroller board based on the ATmega328P.
- Pins: UNUSED, IOREF, Reset, 3.3V, 5V, GND, Vin, A0, A1, A2, A3, A4, A5, SCL, SDA, AREF, D13, D12, D11, D10, D9, D8, D7, D6, D5, D4, D3, D2, D1, D0
Pushbutton
- Description: A simple pushbutton switch.
- Pins: Pin 3 (out), Pin 4 (out), Pin 1 (in), Pin 2 (in)
NPN Transistor (EBC)
- Description: A standard NPN transistor.
- Pins: emitter, base, collector
HC-SR04 Ultrasonic Sensor
- Description: Ultrasonic distance sensor.
- Pins: VCC, TRIG, ECHO, GND
Resistor (1k Ohms)
- Description: Resistor with 1k Ohms resistance.
- Pins: pin1, pin2
Resistor (10k Ohms)
- Description: Resistor with 10k Ohms resistance.
- Pins: pin1, pin2
16x2 I2C LCD
- Description: 16x2 character LCD with I2C interface.
- Pins: GND, VCC, SDA, SCL
Potentiometer
- Description: Variable resistor.
- Pins: GND, Output, VCC
Piezo Buzzer
- Description: Simple piezoelectric buzzer.
- Pins: pin 1, pin 2
Fan
- Description: Small DC fan.
- Pins: GND, 5V
Wiring Details
Arduino UNO
- 5V: Connected to VCC of Fan, Potentiometer, 16x2 I2C LCD, and HC-SR04 Ultrasonic Sensor.
- GND: Connected to GND of Piezo Buzzer, Potentiometer, 16x2 I2C LCD, NPN Transistor (emitter), and HC-SR04 Ultrasonic Sensor.
- A0: Connected to Output of Potentiometer.
- A4: Connected to SDA of 16x2 I2C LCD.
- A5: Connected to SCL of 16x2 I2C LCD.
- D2: Connected to Pin 1 (in) of Pushbutton through a 10k Ohms Resistor.
- D3: Connected to pin 1 of Piezo Buzzer.
- D9: Connected to pin2 of 1k Ohms Resistor.
- D10: Connected to TRIG of HC-SR04 Ultrasonic Sensor.
- D11: Connected to ECHO of HC-SR04 Ultrasonic Sensor.
Pushbutton
- Pin 3 (out): Connected to pin1 of 10k Ohms Resistor.
- Pin 1 (in): Connected to D2 of Arduino UNO through a 10k Ohms Resistor.
NPN Transistor (EBC)
- emitter: Connected to GND of Arduino UNO.
- base: Connected to pin1 of 1k Ohms Resistor.
- collector: Connected to GND of Fan.
HC-SR04 Ultrasonic Sensor
- VCC: Connected to 5V of Arduino UNO.
- TRIG: Connected to D10 of Arduino UNO.
- ECHO: Connected to D11 of Arduino UNO.
- GND: Connected to GND of Arduino UNO.
Resistor (1k Ohms)
- pin1: Connected to base of NPN Transistor.
- pin2: Connected to D9 of Arduino UNO.
Resistor (10k Ohms)
- pin1: Connected to Pin 3 (out) of Pushbutton.
- pin2: Connected to D2 of Arduino UNO.
16x2 I2C LCD
- GND: Connected to GND of Arduino UNO.
- VCC: Connected to 5V of Arduino UNO.
- SDA: Connected to A4 of Arduino UNO.
- SCL: Connected to A5 of Arduino UNO.
Potentiometer
- GND: Connected to GND of Arduino UNO.
- Output: Connected to A0 of Arduino UNO.
- VCC: Connected to 5V of Arduino UNO.
Piezo Buzzer
- pin 1: Connected to D3 of Arduino UNO.
- pin 2: Connected to GND of Arduino UNO.
Fan
- GND: Connected to collector of NPN Transistor.
- 5V: Connected to 5V of Arduino UNO.
Code Documentation
// Levitating Sphere Control System
// This code controls a levitating sphere using a fan, ultrasonic sensor,
// potentiometer, pushbutton, LCD display, and a buzzer. The fan speed is
// controlled based on the potentiometer input, and the sphere's position is
// displayed on the LCD. The system can be started/stopped using a pushbutton.

#include <Wire.h>
#include <LiquidCrystal_I2C.h>
#include <Servo.h>
#include <Button.h>

// Define pin numbers
#define POT_PIN A0
#define BUZZER_PIN 3
#define START_STOP_PIN 2
#define FAN_CONTROL_PIN 9
#define TRIG_PIN 10
#define ECHO_PIN 11

// Define LCD dimensions
#define LCD_COLS 16
#define LCD_ROWS 2

// Variables
int airSpeed = 0;
int spherePosition = 0;
bool isRunning = false;

// Initialize LCD (Check the address using I2C scanner if unsure)
LiquidCrystal_I2C lcd(0x27, LCD_COLS, LCD_ROWS);
Button startStopButton(START_STOP_PIN);

void setup() {
  // Initialize serial communication
  Serial.begin(9600);

  // Initialize LCD
  lcd.begin(LCD_COLS, LCD_ROWS);
  lcd.backlight();
  lcd.setCursor(0, 0);
  lcd.print("Initializing...");

  // Set up button and buzzer
  pinMode(BUZZER_PIN, OUTPUT);
  digitalWrite(BUZZER_PIN, LOW);
  pinMode(START_STOP_PIN, INPUT_PULLUP);
  pinMode(FAN_CONTROL_PIN, OUTPUT);
  pinMode(TRIG_PIN, OUTPUT);
  pinMode(ECHO_PIN, INPUT);

  // Display ready status
  lcd.clear();
  lcd.setCursor(0, 0);
  lcd.print("Air Speed: ");
  lcd.setCursor(0, 1);
  lcd.print("Sphere Pos: ");
}

void loop() {
  // Read and map potentiometer value
  airSpeed = map(analogRead(POT_PIN), 0, 1023, 0, 255);

  // Update air speed on LCD
  lcd.setCursor(12, 0);
  lcd.print(airSpeed);
  lcd.print(" ");

  // Handle button press to toggle system state
  if (startStopButton.pressed()) {
    isRunning = !isRunning;
    digitalWrite(BUZZER_PIN, isRunning ? HIGH : LOW);
    if (!isRunning) {
      analogWrite(FAN_CONTROL_PIN, 0);
    }
    while (startStopButton.pressed()) delay(10);
  }

  if (isRunning) {
    // Control fan speed
    analogWrite(FAN_CONTROL_PIN, airSpeed);

    // Measure sphere position using ultrasonic sensor
    digitalWrite(TRIG_PIN, LOW);
    delayMicroseconds(2);
    digitalWrite(TRIG_PIN, HIGH);
    delayMicroseconds(10);
    digitalWrite(TRIG_PIN, LOW);
    long duration = pulseIn(ECHO_PIN, HIGH);
    spherePosition = duration * 0.034 / 2;

    // Update sphere position on LCD
    lcd.setCursor(12, 1);
    lcd.print(spherePosition);
    lcd.print(" cm ");
  }

  delay(100);
}
This code initializes the necessary components and continuously reads the potentiometer value to control the fan speed. It also measures the sphere's position using the ultrasonic sensor and displays the information on the LCD. The system can be toggled on and off using the pushbutton, and the buzzer indicates the system's running state.