
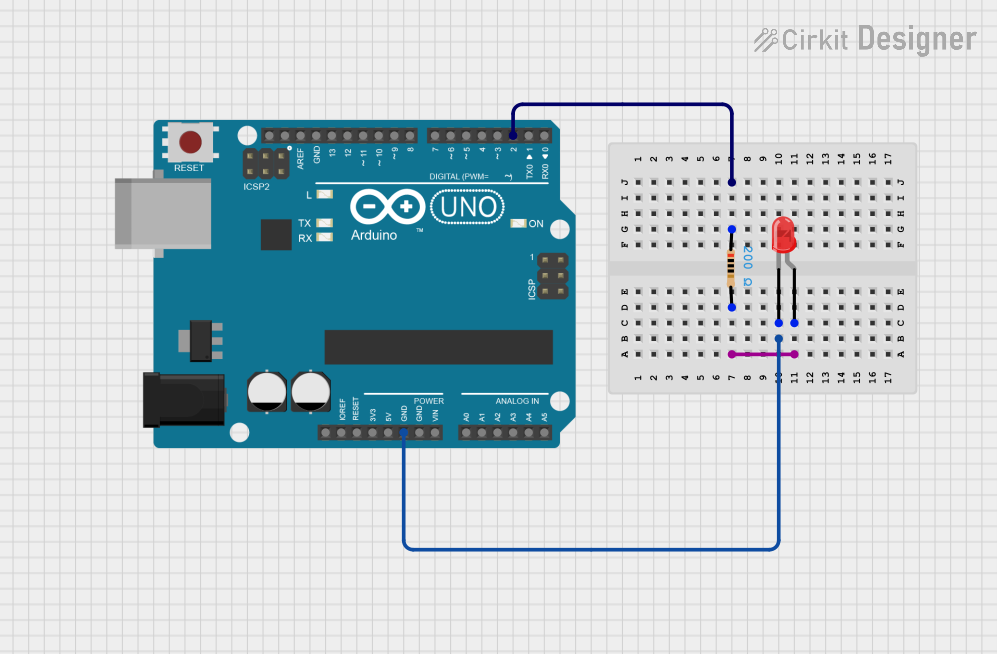
Circuit Documentation
Summary
This circuit consists of an Arduino UNO microcontroller, a resistor, and a red LED. The Arduino UNO is programmed to control the LED, turning it on by setting one of its digital pins high. The resistor is used to limit the current flowing through the LED to prevent damage.
Component List
Arduino UNO
- Description: A microcontroller board based on the ATmega328P.
- Pins: UNUSED, IOREF, Reset, 3.3V, 5V, GND, Vin, A0, A1, A2, A3, A4, A5, SCL, SDA, AREF, D13, D12, D11, D10, D9, D8, D7, D6, D5, D4, D3, D2, D1, D0
Resistor
- Description: A passive electrical component that implements electrical resistance as a circuit element.
- Pins: pin1, pin2
- Properties:
- Resistance: 200 Ohms
LED: Two Pin (red)
- Description: A light-emitting diode that emits red light.
- Pins: cathode, anode
Wiring Details
Arduino UNO
- GND: Connected to the cathode of the LED.
- D2: Connected to pin1 of the resistor.
Resistor
- pin1: Connected to D2 of the Arduino UNO.
- pin2: Connected to the anode of the LED.
LED: Two Pin (red)
- cathode: Connected to GND of the Arduino UNO.
- anode: Connected to pin2 of the resistor.
Code Documentation
Arduino UNO Code
void setup() {
  // put your setup code here, to run once:
  pinMode(2, OUTPUT);
}

void loop() {
  // put your main code here, to run repeatedly:
  digitalWrite(2, HIGH);
}
This code sets up pin 2 of the Arduino UNO as an output in the setup() function. In the loop() function, it continuously sets pin 2 to HIGH, which turns on the LED connected to this pin through the resistor.