Cirkit Designer
Your all-in-one circuit design IDE
Home /
Project Documentation
Arduino Mega 2560 and UHF RFID-Based Animal Tag Detection System with GPS
Circuit Documentation
Summary
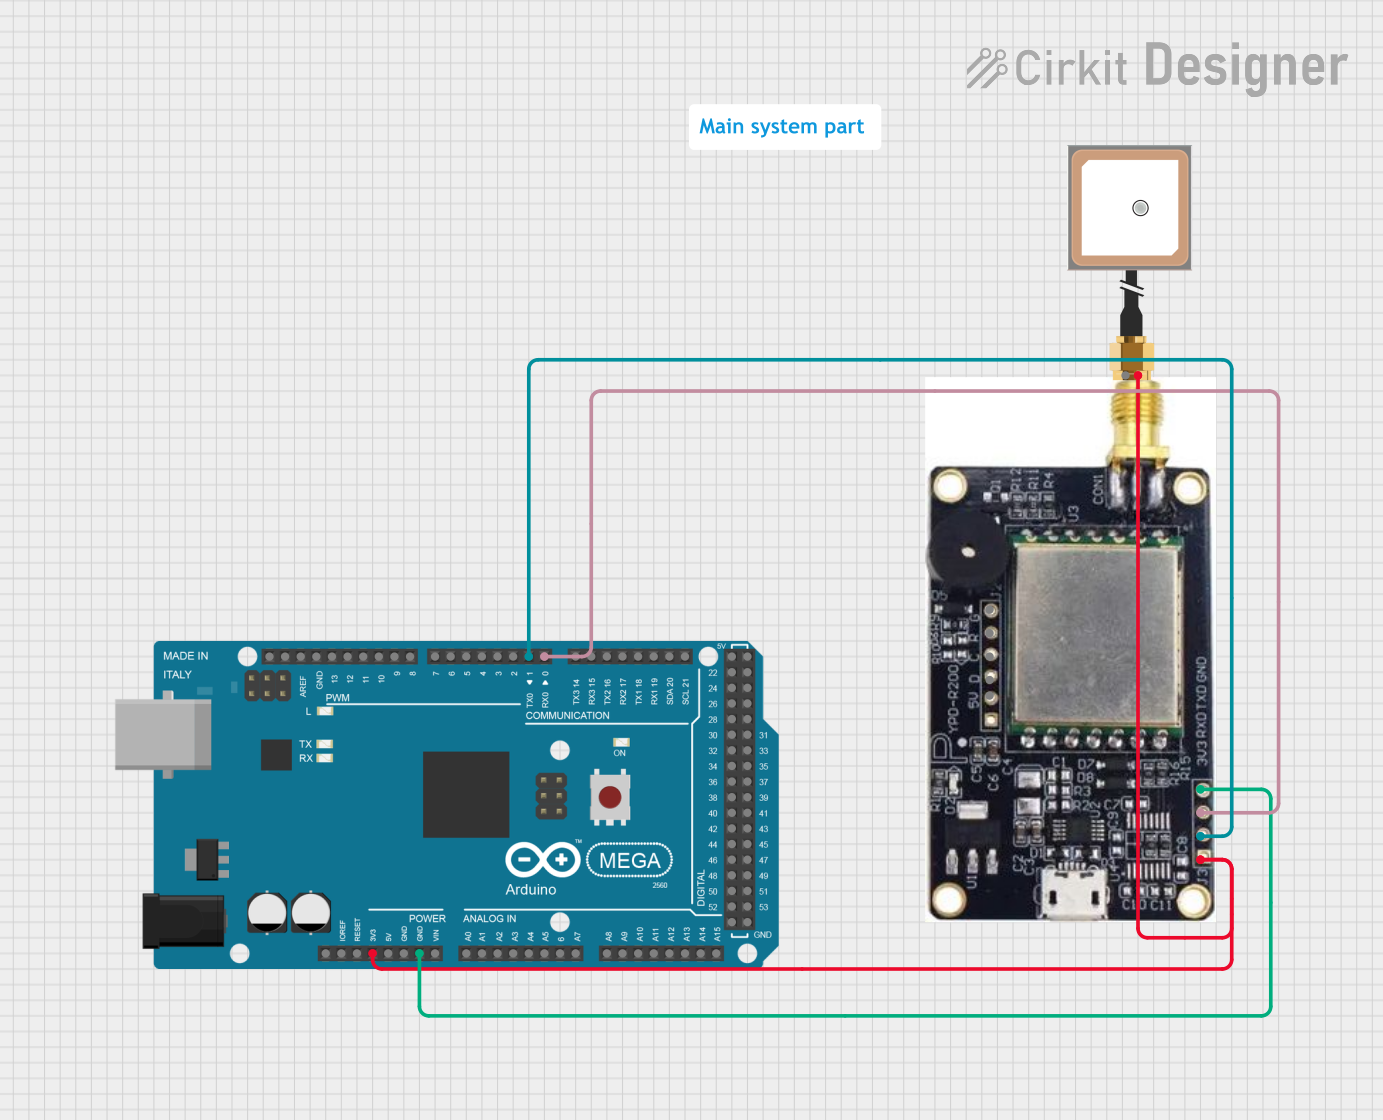
This document provides a detailed overview of a circuit designed to interface a UHF RFID module and a GPS antenna with an Arduino Mega 2560 microcontroller. The circuit is intended to read RFID tags and process GPS data. The Arduino Mega 2560 handles communication with the RFID module and processes the received data.
Component List
UHF RFID IN-R200
- Description: UHF RFID module for reading RFID tags.
- Pins: 3.3v, RXD, TXD, GND, 5v, D, C, R, G
Antenna GPS Embedded SMA
- Description: Embedded GPS antenna with SMA connector.
- Pins: VCC, GND
Arduino Mega 2560
- Description: Microcontroller board based on the ATmega2560.
- Pins: IOREF, RESET, 3V3, 5V, GND, VIN, A0-A15, D0-D53, PWM, AREF, SDA, SCL
Wiring Details
UHF RFID IN-R200
- 3.3v: Connected to Arduino Mega 2560 3V3 pin
- RXD: Connected to Arduino Mega 2560 D1 TX0 pin
- TXD: Connected to Arduino Mega 2560 D0 RX0 pin
- GND: Connected to Arduino Mega 2560 GND pin
Antenna GPS Embedded SMA
- VCC: Connected to Arduino Mega 2560 3V3 pin
- GND: Connected to Arduino Mega 2560 GND pin
Arduino Mega 2560
- 3V3: Connected to UHF RFID IN-R200 3.3v pin and Antenna GPS Embedded SMA VCC pin
- D1 TX0: Connected to UHF RFID IN-R200 RXD pin
- D0 RX0: Connected to UHF RFID IN-R200 TXD pin
- GND: Connected to UHF RFID IN-R200 GND pin and Antenna GPS Embedded SMA GND pin
Documented Code
UHF RFID IN-R200 Code
// Define the serial port for communication with UHF RFID IN-R200
#define RFID_SERIAL Serial1 // Arduino Mega has Serial1, Serial2, and Serial3

void setup() {
  // Initialize Serial Monitor
  Serial.begin(9600);
  while (!Serial) {
    ; // Wait for the Serial Monitor to be ready
  }

  // Initialize RFID module communication
  RFID_SERIAL.begin(9600); // Set baud rate (adjust if necessary for your module)
  Serial.println("RFID module communication initialized.");
}

void loop() {
  // Check if there is any data coming from the RFID module
  if (RFID_SERIAL.available()) {
    // Read the data from the RFID module
    String rfidData = "";
    while (RFID_SERIAL.available()) {
      char c = RFID_SERIAL.read();
      rfidData += c; // Append the character to the string
    }

    // Print the received data to the Serial Monitor
    Serial.print("RFID Data Received: ");
    Serial.println(rfidData);
  }

  // You can also send data to the RFID module if required
  // Uncomment the next lines to send commands to the RFID module
  /*
  if (Serial.available()) {
    String command = Serial.readString();
    RFID_SERIAL.print(command); // Send the command to the RFID module
    Serial.println("Command sent to RFID module.");
  }
  */

  delay(100); // Small delay to prevent flooding the Serial Monitor
}
Arduino Mega 2560 Code
/*
 * Arduino Sketch for RFID tag detection and processing.
 * Handles RFID module communication, reconstructs fragmented tag data, and matches it with predefined tags.
 */

// Define the serial port for communication with UHF RFID
#define RFID_SERIAL Serial1 // Arduino Mega uses Serial1 for additional serial communication

// Define the six tags for one animal
String animalTags[] = {
"E280689400004013F153B843",
"E280689400004013F153E443",
"E280689400005013F1539443",
"E280689400005013F153F843",
"E280689400004013F153CC43",
"E280689400004013F1539C43"

};

// Array to track detected tags
bool detectedTags[6] = {false, false, false, false, false, false};

// Buffer to store incoming RFID data
String tagBuffer = "";

// Expected tag length (adjust this if needed)
const int TAG_LENGTH = 24;

void setup() {
  // Initialize Serial Monitor
  Serial.begin(115200);
  while (!Serial) {
    ; // Wait for Serial Monitor to initialize
  }
  Serial.println("Serial Monitor Initialized");

  // Initialize RFID module communication
  RFID_SERIAL.begin(115200); // Adjust the baud rate if necessary
  Serial.println("RFID module communication initialized.");
}

void loop() {
  // Read incoming data from the RFID module
  while (RFID_SERIAL.available()) {
    char c = RFID_SERIAL.read(); // Read one character at a time

    if (isPrintable(c)) { // Only process printable characters
      tagBuffer += c; // Append character to the buffer

      // If the buffer length matches the tag length, process the tag
      if (tagBuffer.length() == TAG_LENGTH) {
        Serial.print("RFID Data Received: ");
        Serial.println(tagBuffer);

        processTag(tagBuffer); // Process the tag
        tagBuffer = "";        // Clear the buffer for the next tag
      }
    }
  }
}

// Function to process the received RFID tag
void processTag(String tag) {
  for (int i = 0; i < 6; i++) {
    if (tag == animalTags[i] && !detectedTags[i]) {
      detectedTags[i] = true;
      Serial.print("Tag ");
      Serial.print(i + 1);
      Serial.println(" detected!");
    }
  }

  // Check if all tags are detected
  if (allTagsDetected()) {
    showAnimalStory();
    resetDetectedTags();
  }
}

// Function to check if all tags are detected
bool allTagsDetected() {
  for (int i = 0; i < 6; i++) {
    if (!detectedTags[i]) {
      return false;
    }
  }
  return true;
}

// Function to display the story for the detected animal
void showAnimalStory() {
  Serial.println("All tags detected!");
  Serial.println("This is the Lion. Lions are the kings of the jungle!");
}

// Function to reset the detected tags for a new round
void resetDetectedTags() {
  for (int i = 0; i < 6; i++) {
    detectedTags[i] = false;
  }
  Serial.println("Ready for a new roll!");
}
This documentation provides a comprehensive overview of the circuit, including the components used, their wiring details, and the code running on the microcontrollers.