
Arduino UNO Based Alcohol and Motion Detection System with Buzzer Alert
View and Edit Project In Cirkit Designer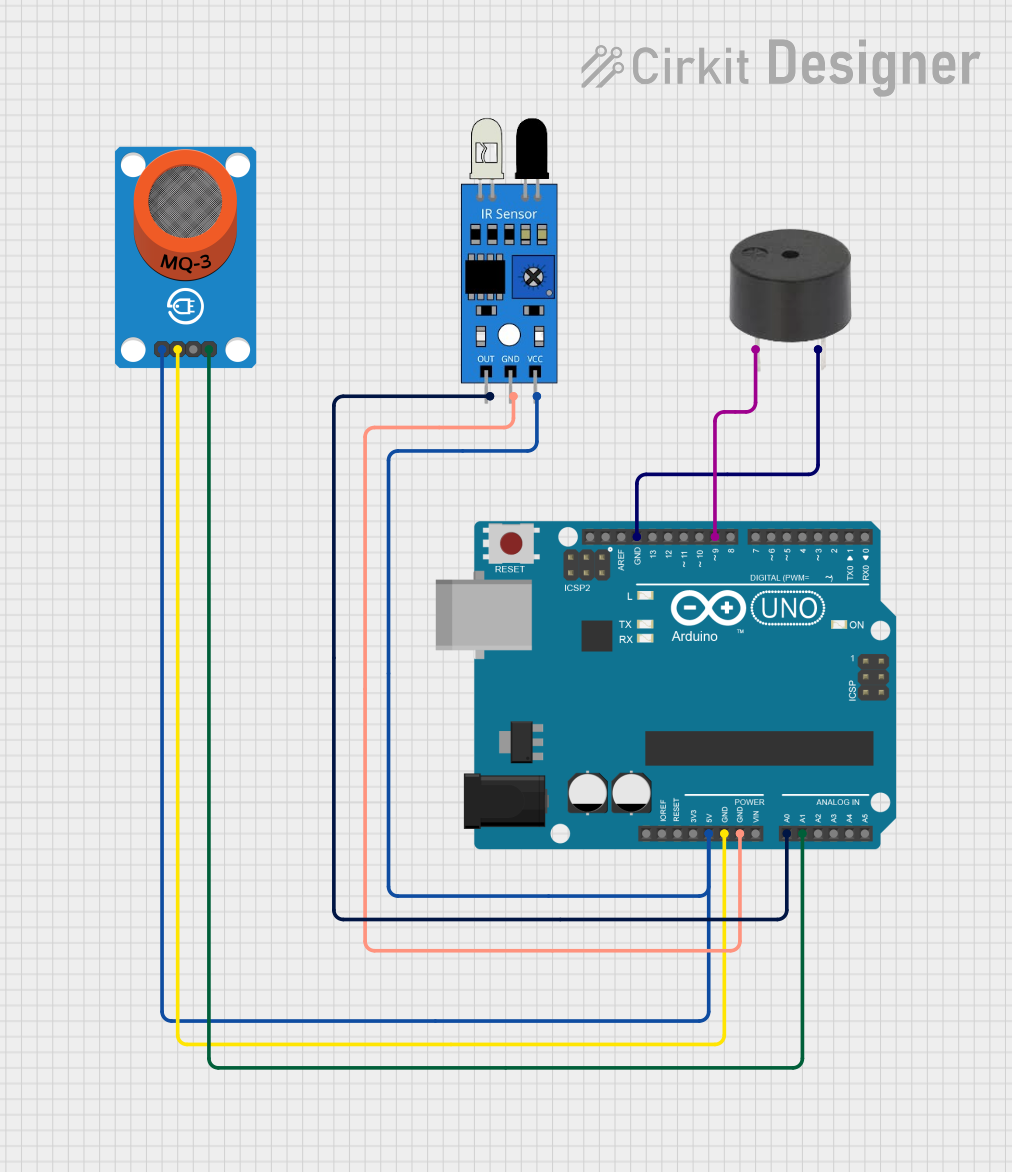
Circuit Documentation
Summary of the Circuit
This circuit is designed around the Arduino UNO platform, interfacing with an MQ-3 alcohol sensor, an infrared (IR) sensor, and a buzzer. The Arduino UNO serves as the central processing unit, reading sensor inputs and controlling the buzzer based on predefined conditions. The MQ-3 sensor provides analog readings related to alcohol concentration, while the IR sensor detects the presence of objects or motion. The buzzer can be activated to provide an audible alert.
Component List
Arduino UNO
- Description: A microcontroller board based on the ATmega328P.
- Purpose: Acts as the central controller for the circuit, reading sensor data and controlling the buzzer.
MQ-3 Breakout
- Description: A breakout board for the MQ-3 alcohol sensor.
- Purpose: Provides analog data related to alcohol concentration in the air.
IR Sensor
- Description: An infrared sensor capable of detecting objects and motion.
- Purpose: Provides a digital output when an object is detected.
Buzzer
- Description: An electromechanical component that emits sound when powered.
- Purpose: Used to provide an audible alert or indication.
Wiring Details
Arduino UNO
- 5V: Supplies power to the MQ-3 Breakout and the IR sensor.
- GND: Common ground for the MQ-3 Breakout, IR sensor, and buzzer.
- A0: Connected to the IR sensor output.
- A1: Connected to the MQ-3 Breakout analog output.
- D9: Connected to the buzzer pin.
MQ-3 Breakout
- VCC: Connected to the 5V output from the Arduino UNO.
- GND: Connected to the ground (GND) on the Arduino UNO.
- AO: Analog output connected to the A1 pin on the Arduino UNO.
IR Sensor
- VCC: Connected to the 5V output from the Arduino UNO.
- GND: Connected to the ground (GND) on the Arduino UNO.
- OUT: Digital output connected to the A0 pin on the Arduino UNO.
Buzzer
- PIN: Connected to the D9 pin on the Arduino UNO.
- GND: Connected to the ground (GND) on the Arduino UNO.
Documented Code
void setup() {
  // put your setup code here, to run once:

}

void loop() {
  // put your main code here, to run repeatedly:

}
The provided code is a template with empty setup() and loop() functions. The setup() function is intended for initialization code that runs once when the Arduino is powered on or reset. The loop() function contains the main logic of the program, which runs continuously as long as the Arduino is powered.
Further implementation details should be added to the setup() and loop() functions to initialize the sensor readings, process the data, and control the buzzer based on the sensor inputs.