
Circuit Documentation
Summary
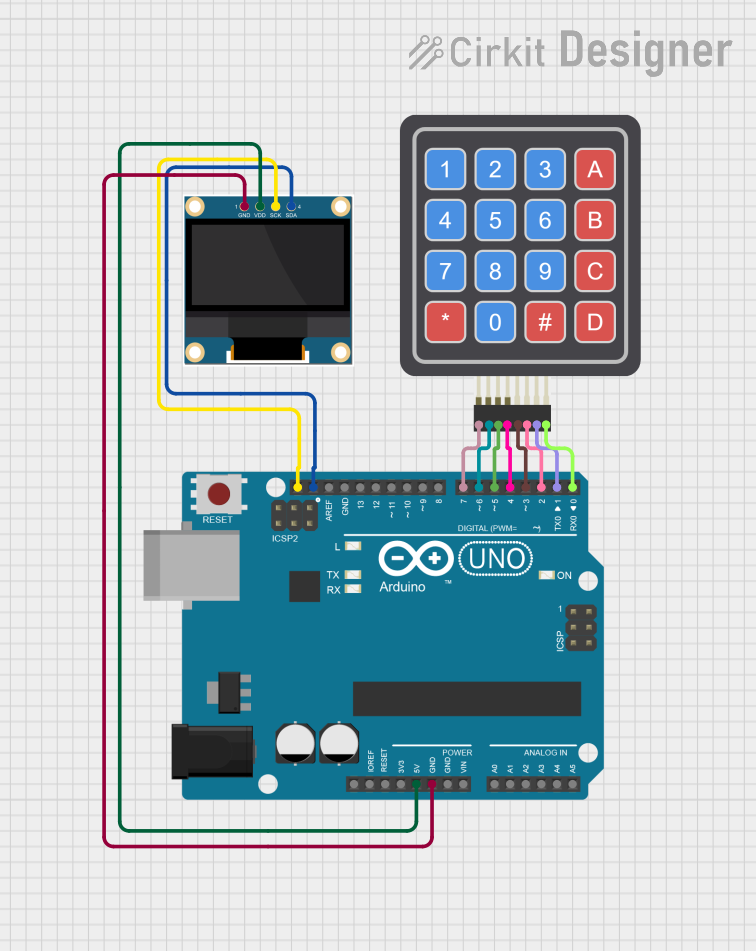
This document describes a simple math puzzle gamified device built using an Arduino UNO, a 0.96" OLED display, and a 4x4 keypad. The device presents a math problem on the OLED display, and the user inputs the answer using the keypad. The device checks the answer and provides feedback.
Component List
Arduino UNO
- Description: A microcontroller board based on the ATmega328P.
- Pins: UNUSED, IOREF, Reset, 3.3V, 5V, GND, Vin, A0, A1, A2, A3, A4, A5, SCL, SDA, AREF, D13, D12, D11, D10, D9, D8, D7, D6, D5, D4, D3, D2, D1, D0
0.96" OLED Display
- Description: A small OLED display module.
- Pins: GND, VDD, SCK, SDA
4x4 Keypad (Simulator)
- Description: A 4x4 matrix keypad.
- Pins: R1, C4, R2, C2, R3, R4, C1, C3
Wiring Details
Arduino UNO
- 5V: Connected to VDD of the 0.96" OLED Display
- GND: Connected to GND of the 0.96" OLED Display
- SCL: Connected to SCK of the 0.96" OLED Display
- SDA: Connected to SDA of the 0.96" OLED Display
- D7: Connected to R1 of the 4x4 Keypad
- D6: Connected to R2 of the 4x4 Keypad
- D5: Connected to R3 of the 4x4 Keypad
- D4: Connected to R4 of the 4x4 Keypad
- D3: Connected to C1 of the 4x4 Keypad
- D2: Connected to C2 of the 4x4 Keypad
- D1: Connected to C3 of the 4x4 Keypad
- D0: Connected to C4 of the 4x4 Keypad
0.96" OLED Display
- VDD: Connected to 5V of the Arduino UNO
- GND: Connected to GND of the Arduino UNO
- SCK: Connected to SCL of the Arduino UNO
- SDA: Connected to SDA of the Arduino UNO
4x4 Keypad (Simulator)
- R1: Connected to D7 of the Arduino UNO
- R2: Connected to D6 of the Arduino UNO
- R3: Connected to D5 of the Arduino UNO
- R4: Connected to D4 of the Arduino UNO
- C1: Connected to D3 of the Arduino UNO
- C2: Connected to D2 of the Arduino UNO
- C3: Connected to D1 of the Arduino UNO
- C4: Connected to D0 of the Arduino UNO
Code Documentation
/*
 * Simple Maths Puzzle Gamified Device
 * Components: Arduino UNO, 0.96" OLED Display, 4x4 Keypad
 * Description: This code implements a simple math puzzle game. The user is
 * presented with a math problem on the OLED display and inputs the answer
 * using the 4x4 keypad. The device checks the answer and provides feedback.
 */

#include <Wire.h>
#include <Adafruit_GFX.h>
#include <Adafruit_SSD1306.h>
#include <Keypad.h>

#define SCREEN_WIDTH 128
#define SCREEN_HEIGHT 64
#define OLED_RESET -1
Adafruit_SSD1306 display(SCREEN_WIDTH, SCREEN_HEIGHT, &Wire, OLED_RESET);

const byte ROWS = 4; // four rows
const byte COLS = 4; // four columns
char keys[ROWS][COLS] = {
  {'1','2','3','A'},
  {'4','5','6','B'},
  {'7','8','9','C'},
  {'*','0','#','D'}
};
byte rowPins[ROWS] = {7, 6, 5, 4}; // connect to the row pinouts of the keypad
byte colPins[COLS] = {3, 2, 1, 0}; // connect to the column pinouts of the keypad
Keypad keypad = Keypad(makeKeymap(keys), rowPins, colPins, ROWS, COLS);

int num1, num2, answer;
char operatorChar;
String userInput = "";

void setup() {
  Serial.begin(9600);
  if(!display.begin(SSD1306_SWITCHCAPVCC, 0x3C)) {
    Serial.println(F("SSD1306 allocation failed"));
    for(;;);
  }
  display.clearDisplay();
  display.setTextSize(1);
  display.setTextColor(SSD1306_WHITE);
  display.setCursor(0,0);
  display.display();
  generateProblem();
}

void loop() {
  char key = keypad.getKey();
  if (key) {
    if (key == '#') {
      checkAnswer();
    } else if (key == '*') {
      userInput = "";
      displayProblem();
    } else {
      userInput += key;
      displayUserInput();
    }
  }
}

void generateProblem() {
  num1 = random(1, 10);
  num2 = random(1, 10);
  int operatorIndex = random(0, 3);
  switch (operatorIndex) {
    case 0: operatorChar = '+'; answer = num1 + num2; break;
    case 1: operatorChar = '-'; answer = num1 - num2; break;
    case 2: operatorChar = '*'; answer = num1 * num2; break;
  }
  displayProblem();
}

void displayProblem() {
  display.clearDisplay();
  display.setCursor(0,0);
  display.print(num1);
  display.print(" ");
  display.print(operatorChar);
  display.print(" ");
  display.print(num2);
  display.print(" = ");
  display.display();
}

void displayUserInput() {
  display.setCursor(0, 10);
  display.print(userInput);
  display.display();
}

void checkAnswer() {
  if (userInput.toInt() == answer) {
    display.clearDisplay();
    display.setCursor(0,0);
    display.print("Correct!");
    display.display();
  } else {
    display.clearDisplay();
    display.setCursor(0,0);
    display.print("Wrong!");
    display.display();
  }
  delay(2000);
  userInput = "";
  generateProblem();
}
This code initializes the OLED display and keypad, generates random math problems, and checks the user's input for correctness. The user can reset their input with the '*' key and submit their answer with the '#' key.