
Arduino-Based Ultrasonic Sensor and Motor Control System with Servo Integration
View and Edit Project In Cirkit Designer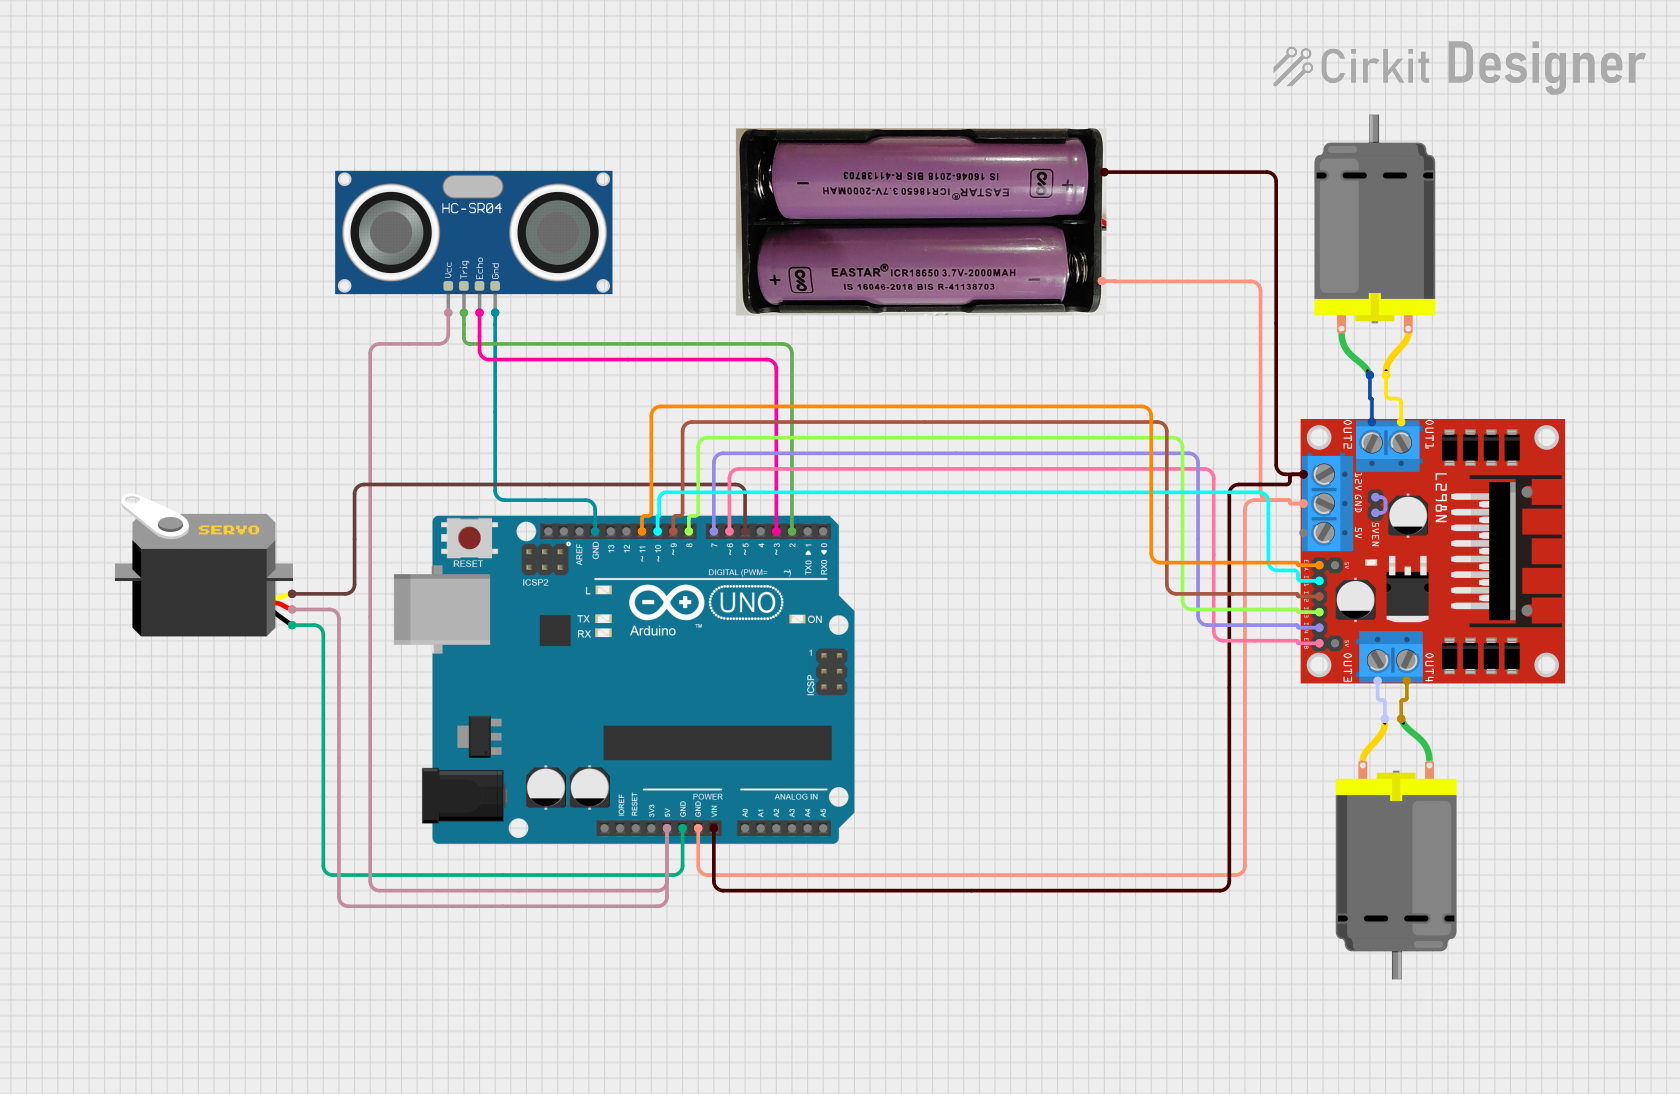
Circuit Documentation
Summary
This circuit integrates an Arduino UNO microcontroller, an HC-SR04 Ultrasonic Sensor, an L298N DC motor driver, two DC motors, and a servo motor. The Arduino UNO controls the ultrasonic sensor to measure distance and blinks an LED based on the measured distance. The L298N motor driver is used to control the two DC motors, and the servo motor is also controlled by the Arduino.
Component List
HC-SR04 Ultrasonic Sensor
- Pins: VCC, TRIG, ECHO, GND
- Description: Ultrasonic distance sensor used to measure the distance to an object.
- Purpose in Circuit: Measures distance and sends the data to the Arduino.
L298N DC Motor Driver
- Pins: OUT1, OUT2, 12V, GND, 5V, OUT3, OUT4, 5V-ENA-JMP-I, 5V-ENA-JMP-O, +5V-J1, +5V-J2, ENA, IN1, IN2, IN3, IN4, ENB
- Description: Dual H-Bridge motor driver used to control the speed and direction of two DC motors.
- Purpose in Circuit: Controls the two DC motors based on signals from the Arduino.
Arduino UNO
- Pins: UNUSED, IOREF, Reset, 3.3V, 5V, GND, Vin, A0, A1, A2, A3, A4, A5, SCL, SDA, AREF, D13, D12, D11, D10, D9, D8, D7, D6, D5, D4, D3, D2, D1, D0
- Description: Microcontroller board based on the ATmega328P.
- Purpose in Circuit: Central control unit that processes data from the ultrasonic sensor and controls the motors and servo.
Servo
- Pins: gnd, vcc, pulse
- Description: Servo motor used for precise control of angular position.
- Purpose in Circuit: Controlled by the Arduino to perform specific movements.
DC Motor (Motor 1)
- Pins: pin 1, pin 2
- Description: Standard DC motor.
- Purpose in Circuit: Controlled by the L298N motor driver to perform rotational movements.
DC Motor (Motor 2)
- Pins: pin 1, pin 2
- Description: Standard DC motor.
- Purpose in Circuit: Controlled by the L298N motor driver to perform rotational movements.
7.4v Battery
- Pins: +, -
- Description: Power source for the circuit.
- Purpose in Circuit: Provides power to the Arduino and other components.
Wiring Details
HC-SR04 Ultrasonic Sensor
- VCC connected to 5V on Arduino UNO.
- TRIG connected to D2 on Arduino UNO.
- ECHO connected to D3 on Arduino UNO.
- GND connected to GND on Arduino UNO.
L298N DC Motor Driver
- OUT1 connected to pin 2 on DC Motor 2.
- OUT2 connected to pin 1 on DC Motor 2.
- 12V connected to Vin on Arduino UNO and + on 7.4v Battery.
- GND connected to GND on Arduino UNO and - on 7.4v Battery.
- OUT3 connected to pin 2 on DC Motor 1.
- OUT4 connected to pin 1 on DC Motor 1.
- 5V-ENA-JMP-I connected to 5V-ENA-JMP-O on L298N DC Motor Driver.
- ENA connected to D11 on Arduino UNO.
- IN1 connected to D10 on Arduino UNO.
- IN2 connected to D9 on Arduino UNO.
- IN3 connected to D8 on Arduino UNO.
- IN4 connected to D7 on Arduino UNO.
- ENB connected to D6 on Arduino UNO.
Arduino UNO
- Vin connected to 12V on L298N DC Motor Driver and + on 7.4v Battery.
- GND connected to GND on L298N DC Motor Driver, - on 7.4v Battery, gnd on Servo, and GND on HC-SR04 Ultrasonic Sensor.
- 5V connected to vcc on Servo and VCC on HC-SR04 Ultrasonic Sensor.
- D2 connected to TRIG on HC-SR04 Ultrasonic Sensor.
- D3 connected to ECHO on HC-SR04 Ultrasonic Sensor.
- D5 connected to pulse on Servo.
- D6 connected to ENB on L298N DC Motor Driver.
- D7 connected to IN4 on L298N DC Motor Driver.
- D8 connected to IN3 on L298N DC Motor Driver.
- D9 connected to IN2 on L298N DC Motor Driver.
- D10 connected to IN1 on L298N DC Motor Driver.
- D11 connected to ENA on L298N DC Motor Driver.
Servo
- gnd connected to GND on Arduino UNO.
- vcc connected to 5V on Arduino UNO.
- pulse connected to D5 on Arduino UNO.
DC Motor (Motor 1)
- pin 1 connected to OUT4 on L298N DC Motor Driver.
- pin 2 connected to OUT3 on L298N DC Motor Driver.
DC Motor (Motor 2)
- pin 1 connected to OUT2 on L298N DC Motor Driver.
- pin 2 connected to OUT1 on L298N DC Motor Driver.
7.4v Battery
- + connected to Vin on Arduino UNO and 12V on L298N DC Motor Driver.
- - connected to GND on Arduino UNO and GND on L298N DC Motor Driver.
Code Documentation
/*
 * Arduino Sketch for Ultrasonic Sensor and LED Blinking
 * This sketch controls an ultrasonic sensor and an LED. The LED blinks
 * based on the distance measured by the ultrasonic sensor. If the distance
 * is between 3 cm and 5 cm, the LED blinks 5 times. If the distance is
 * between 10 cm and 20 cm, the LED blinks 10 times. The distance is also
 * printed to the Serial Monitor.
 */

// Pin definitions
const int trigPin = 9;     // TRIG pin for ultrasonic sensor
const int echoPin = 8;     // ECHO pin for ultrasonic sensor
const int ledPin = 13;     // LED pin

void setup() {
  // Initialize sensor and LED pins
  pinMode(trigPin, OUTPUT);
  pinMode(echoPin, INPUT);
  pinMode(ledPin, OUTPUT);

  // Initialize Serial Monitor
  Serial.begin(9600);
}

void loop() {
  // Measure distance using ultrasonic sensor
  long duration, distance;
  digitalWrite(trigPin, LOW);
  delayMicroseconds(2);
  digitalWrite(trigPin, HIGH);
  delayMicroseconds(10);
  digitalWrite(trigPin, LOW);
  duration = pulseIn(echoPin, HIGH);
  distance = (duration / 2) / 29.1;

  // Print distance to Serial Monitor
  Serial.print("Distance: ");
  Serial.print(distance);
  Serial.println(" cm");

  // Control LED based on distance
  if (distance >= 3 && distance <= 5) {
    blinkLED(5);
  } else if (distance >= 10 && distance <= 20) {
    blinkLED(10);
  }

  delay(1000); // Wait for 1 second before next measurement
}

void blinkLED(int times) {
  for (int i = 0; i < times; i++) {
    digitalWrite(ledPin, HIGH);
    delay(500);
    digitalWrite(ledPin, LOW);
    delay(500);
  }
}
This code initializes the ultrasonic sensor and an LED. It measures the distance using the ultrasonic sensor and blinks the LED based on the measured distance. The distance is also printed to the Serial Monitor.