Arduino UNO Controlled LED with Pushbutton
Circuit Documentation
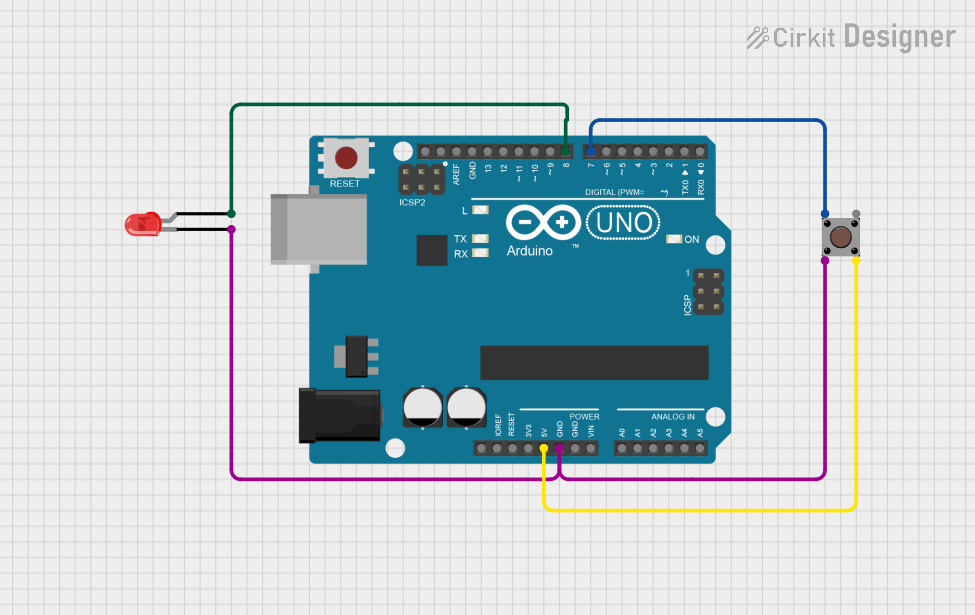
Summary of the Circuit
This circuit is designed around an Arduino UNO microcontroller and includes a pushbutton and a red two-pin LED. The functionality of the circuit is straightforward: when the pushbutton is pressed, the LED is turned on; when the button is released, the LED turns off. The Arduino UNO is programmed to monitor the state of the pushbutton and control the LED accordingly.
Component List
Arduino UNO
- Description: A microcontroller board based on the ATmega328P.
- Purpose: Acts as the central processing unit of the circuit, monitoring inputs and controlling outputs.
- Pins: UNUSED, IOREF, Reset, 3.3V, 5V, GND, Vin, A0-A5, SCL, SDA, AREF, D0-D13.
LED: Two Pin (red)
- Description: A basic red light-emitting diode.
- Purpose: Serves as an indicator light that is controlled by the Arduino UNO.
- Pins: cathode, anode.
Pushbutton
- Description: A simple push-to-make button.
- Purpose: Provides a user interface to control the LED.
- Pins: Pin 1 (in), Pin 2 (in), Pin 3 (out), Pin 4 (out).
Wiring Details
Arduino UNO
- 5V: Connected to Pushbutton Pin 4 (out).
- GND: Connected to LED cathode and Pushbutton Pin 2 (in).
- D8: Connected to LED anode.
- D7: Connected to Pushbutton Pin 1 (in).
LED: Two Pin (red)
- Cathode: Connected to Arduino UNO GND.
- Anode: Connected to Arduino UNO D8.
Pushbutton
- Pin 1 (in): Connected to Arduino UNO D7.
- Pin 2 (in): Connected to Arduino UNO GND.
- Pin 3 (out): Not connected in this circuit.
- Pin 4 (out): Connected to Arduino UNO 5V.
Documented Code
#define LED_PIN 8
#define BUTTON_PIN 7

void setup() {
  pinMode(LED_PIN, OUTPUT);
  pinMode(BUTTON_PIN, INPUT);
}

void loop() {
  if (digitalRead(BUTTON_PIN) == HIGH) {
    digitalWrite(LED_PIN, HIGH);
  }
  else {
    digitalWrite(LED_PIN, LOW);
  }
}
File Name: sketch.ino
Description: This Arduino sketch is written to control an LED using a pushbutton. The LED is connected to pin D8, and the pushbutton is connected to pin D7. In the setup() function, the LED pin is set as an output, and the button pin is set as an input. The loop() function continuously checks the state of the button. If the button is pressed (logic HIGH), the LED is turned on; otherwise, the LED is turned off.