
Arduino Nano-Based Battery-Powered Robotic System with IR Sensors and DC Motors
View and Edit Project In Cirkit Designer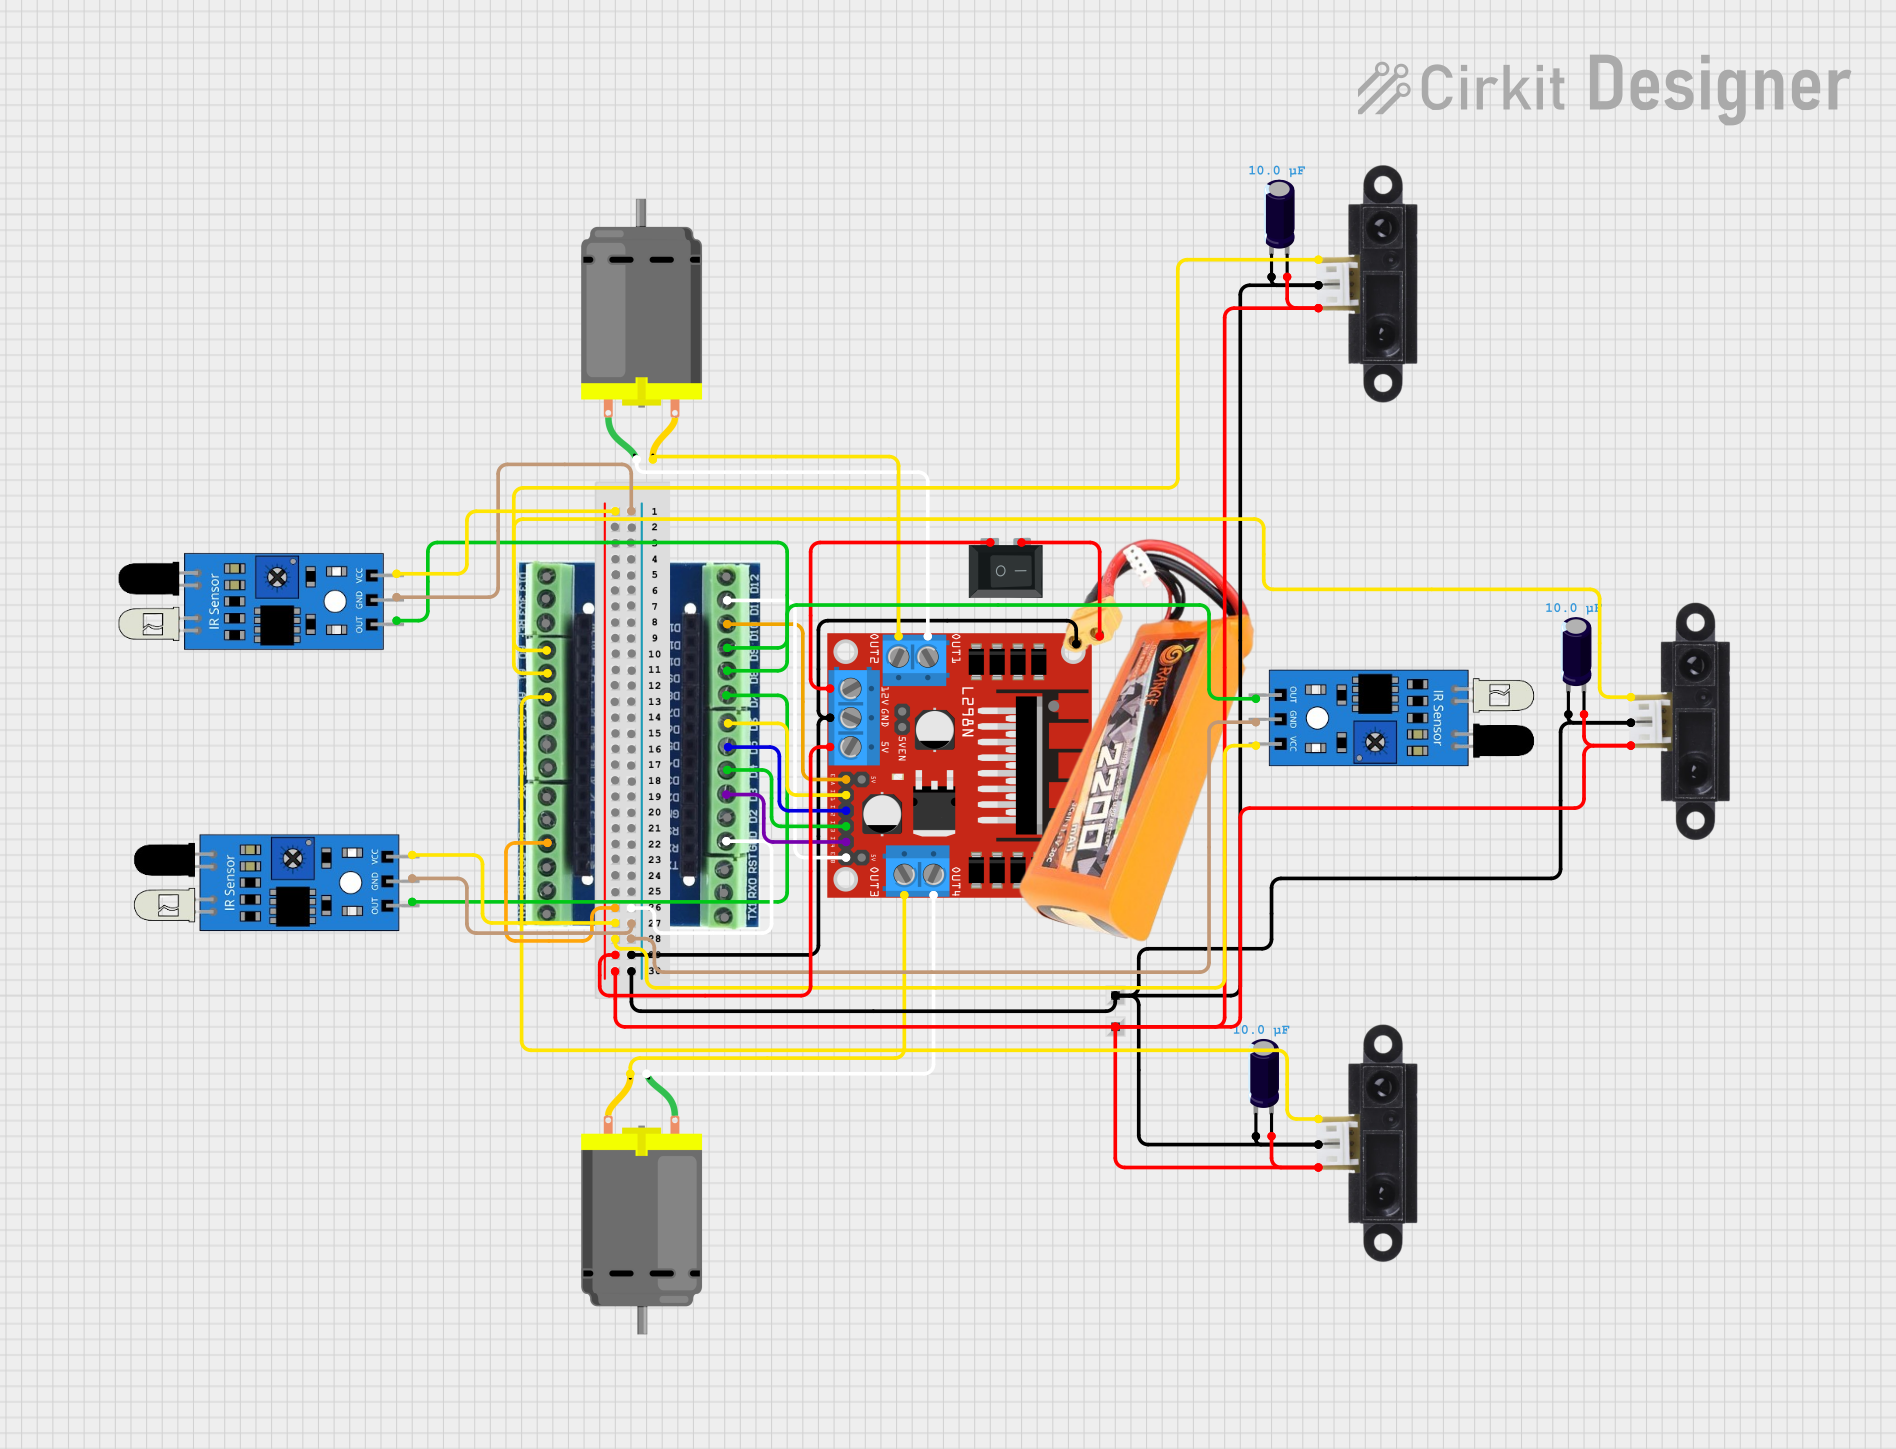
Circuit Documentation
Summary
This document provides a detailed overview of a circuit that includes various sensors, motors, a motor driver, a microcontroller, and other components. The circuit is designed to interface with an Arduino Nano microcontroller to control DC motors and read data from IR sensors and Sharp IR sensors. The power is supplied by a LiPo battery, and the circuit includes capacitors for stabilization.
Component List
Sharp IR Sensor
- Pins: VCC, GND, Pin
- Description: Infrared distance sensor for detecting objects.
- Purpose: Used to measure distance to objects.
IR Sensor
- Pins: out, gnd, vcc
- Description: Infrared sensor for detecting objects.
- Purpose: Used to detect the presence of objects.
DC Motor
- Pins: pin 1, pin 2
- Description: Direct current motor.
- Purpose: Used for mechanical movement.
Rocker Switch (SPST)
- Pins: 1, 2
- Description: Single pole single throw switch.
- Purpose: Used to control the power supply.
Electrolytic Capacitor
- Pins: -, +
- Description: Capacitor with a capacitance of 0.00001 Farads.
- Purpose: Used for power stabilization.
L298N DC Motor Driver
- Pins: OUT1, OUT2, 12V, GND, 5V, OUT3, OUT4, 5V-ENA-JMP-I, 5V-ENA-JMP-O, +5V-J1, +5V-J2, ENA, IN1, IN2, IN3, IN4, ENB
- Description: Dual H-Bridge motor driver.
- Purpose: Used to control the DC motors.
Arduino Nano
- Pins: D1/TX, D0/RX, RESET, GND, D2, D3, D4, D5, D6, D7, D8, D9, D10, D11/MOSI, D12/MISO, VIN, 5V, A7, A6, A5, A4, A3, A2, A1, A0, AREF, 3V3, D13/SCK
- Description: Microcontroller board.
- Purpose: Used to control the entire circuit.
Arduino Nano Terminal Adapter
- Pins: TX, RX, RESET, GND, D2, D3, D4, D5, D6, D7, D8, D9, D10, D11, D12, VIN, 5V, A7, A6, A5, A4, A3, A2, A1, A0, D13, 3.3V, AREF
- Description: Adapter for Arduino Nano.
- Purpose: Used to facilitate connections to the Arduino Nano.
Power Rail
- Pins: +, -
- Description: Power distribution rail.
- Purpose: Used to distribute power to various components.
Daisy Chain
- Pins: Connector
- Description: Connector for daisy chaining components.
- Purpose: Used to connect multiple components in series.
LiPo Battery 2200mAH 30C
- Pins: VCC, GND
- Description: Lithium polymer battery.
- Purpose: Used to power the circuit.
Wiring Details
Sharp IR Sensor
- VCC connected to Power Rail (+)
- GND connected to Power Rail (-)
- Pin connected to Arduino Nano Terminal Adapter (A2)
IR Sensor
- out connected to Arduino Nano Terminal Adapter (D7)
- gnd connected to Power Rail (-)
- vcc connected to Power Rail (+)
DC Motor
- pin 1 connected to L298N DC Motor Driver (OUT1)
- pin 2 connected to L298N DC Motor Driver (OUT2)
Rocker Switch (SPST)
- 1 connected to L298N DC Motor Driver (12V)
- 2 connected to LiPo Battery 2200mAH 30C (VCC)
Electrolytic Capacitor
- + connected to Power Rail (+)
- - connected to Power Rail (-)
L298N DC Motor Driver
- IN4 connected to Arduino Nano Terminal Adapter (D3)
- IN3 connected to Arduino Nano Terminal Adapter (D4)
- IN2 connected to Arduino Nano Terminal Adapter (D5)
- IN1 connected to Arduino Nano Terminal Adapter (D6)
- ENA connected to Arduino Nano Terminal Adapter (D10)
- ENB connected to Arduino Nano Terminal Adapter (D11)
- OUT1 connected to DC Motor (pin 1)
- OUT2 connected to DC Motor (pin 2)
- OUT3 connected to DC Motor (pin 2)
- OUT4 connected to DC Motor (pin 1)
- 12V connected to Rocker Switch (1)
- GND connected to Power Rail (-)
- 5V connected to Power Rail (+)
Arduino Nano
- GND connected to Power Rail (-)
- 5V connected to Power Rail (+)
Arduino Nano Terminal Adapter
- GND connected to Power Rail (-)
- 5V connected to Power Rail (+)
- D3 connected to L298N DC Motor Driver (IN4)
- D4 connected to L298N DC Motor Driver (IN3)
- D5 connected to L298N DC Motor Driver (IN2)
- D6 connected to L298N DC Motor Driver (IN1)
- D7 connected to IR Sensor (out)
- D8 connected to IR Sensor (out)
- D9 connected to IR Sensor (out)
- D10 connected to L298N DC Motor Driver (ENA)
- D11 connected to L298N DC Motor Driver (ENB)
- A2 connected to Sharp IR Sensor (Pin)
- A1 connected to Sharp IR Sensor (Pin)
- A0 connected to Sharp IR Sensor (Pin)
Power Rail
- + connected to LiPo Battery 2200mAH 30C (VCC)
- - connected to LiPo Battery 2200mAH 30C (GND)
Daisy Chain
- Connector connected to Sharp IR Sensor (VCC)
- Connector connected to Sharp IR Sensor (GND)
LiPo Battery 2200mAH 30C
- VCC connected to Rocker Switch (2)
- GND connected to Power Rail (-)
Documented Code
Arduino Nano Code
void setup() {
  // put your setup code here, to run once:

}

void loop() {
  // put your main code here, to run repeatedly:

}
This code is a basic template for the Arduino Nano. The setup() function is used to initialize any settings, and the loop() function contains the main code that runs repeatedly.