
Circuit Documentation
Summary
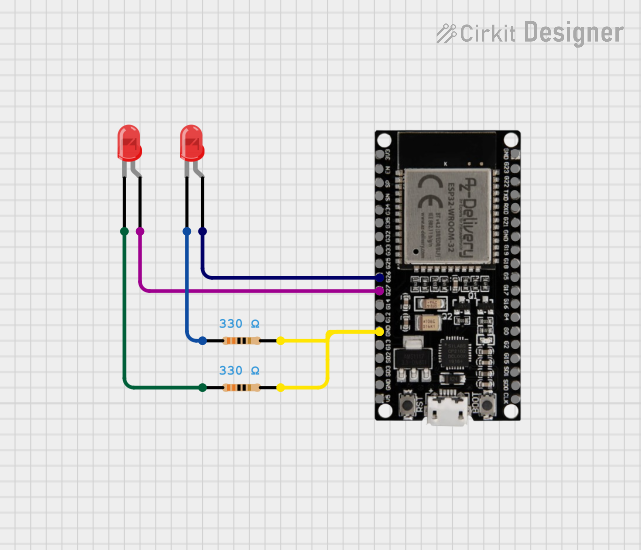
This circuit is designed around the ESP32 microcontroller, which is a versatile and powerful chip with Wi-Fi capabilities. The circuit includes two red LEDs, each with a corresponding current-limiting resistor. The ESP32 controls the LEDs, allowing them to be turned on or off. The microcontroller is programmed to serve as a web server, enabling control of the LEDs via HTTP requests. This setup could be used for simple home automation projects, educational purposes, or as a demonstration of IoT (Internet of Things) principles.
Component List
ESP32 38 PINS
- Description: A microcontroller with Wi-Fi capabilities, featuring a wide range of GPIO pins.
- Purpose: Acts as the central processing unit of the circuit, controlling the LEDs and hosting a web server for remote control.
LED: Two Pin (red)
- Description: A basic red LED for indicating status or for use as a visual output.
- Purpose: Provides visual feedback when activated by the ESP32.
Resistor
- Description: A 330 Ohm resistor.
- Purpose: Limits the current to the LEDs to prevent damage.
Wiring Details
ESP32 38 PINS
- G26: Connected to the anode of one red LED.
- G27: Connected to the anode of the second red LED.
- GND: Connected to the cathodes of both red LEDs through 330 Ohm resistors.
LED: Two Pin (red)
- Anode: Connected to ESP32 GPIO pins (G26 or G27).
- Cathode: Connected to one end of a 330 Ohm resistor.
Resistor
- Pin1: Connected to the cathode of a red LED.
- Pin2: Connected to the GND pin on the ESP32.
Documented Code
/*********
  Rui Santos
  Complete project details at https://randomnerdtutorials.com
*********/

// Load Wi-Fi library
#include <WiFi.h>

// Replace with your network credentials
const char* ssid     = "ESP32-Access-Point";
const char* password = "123456789";

// Set web server port number to 80
WiFiServer server(80);

// Variable to store the HTTP request
String header;

// Auxiliar variables to store the current output state
String output26State = "off";
String output27State = "off";

// Assign output variables to GPIO pins
const int output26 = 26;
const int output27 = 27;

void setup() {
  Serial.begin(115200);
  // Initialize the output variables as outputs
  pinMode(output26, OUTPUT);
  pinMode(output27, OUTPUT);
  // Set outputs to LOW
  digitalWrite(output26, LOW);
  digitalWrite(output27, LOW);

  // Connect to Wi-Fi network with SSID and password
  Serial.print("Setting AP (Access Point)…");
  // Remove the password parameter, if you want the AP (Access Point) to be open
  WiFi.softAP(ssid, password);

  IPAddress IP = WiFi.softAPIP();
  Serial.print("AP IP address: ");
  Serial.println(IP);

  server.begin();
}

void loop(){
  WiFiClient client = server.available();   // Listen for incoming clients

  if (client) {                             // If a new client connects,
    Serial.println("New Client.");          // print a message out in the serial port
    String currentLine = "";                // make a String to hold incoming data from the client
    while (client.connected()) {            // loop while the client's connected
      if (client.available()) {             // if there's bytes to read from the client,
        char c = client.read();             // read a byte, then
        Serial.write(c);                    // print it out the serial monitor
        header += c;
        if (c == '\n') {                    // if the byte is a newline character
          // if the current line is blank, you got two newline characters in a row.
          // that's the end of the client HTTP request, so send a response:
          if (currentLine.length() == 0) {
            // HTTP headers always start with a response code (e.g. HTTP/1.1 200 OK)
            // and a content-type so the client knows what's coming, then a blank line:
            client.println("HTTP/1.1 200 OK");
            client.println("Content-type:text/html");
            client.println("Connection: close");
            client.println();

            // turns the GPIOs on and off
            if (header.indexOf("GET /26/on") >= 0) {
              Serial.println("GPIO 26 on");
              output26State = "on";
              digitalWrite(output26, HIGH);
            } else if (header.indexOf("GET /26/off") >= 0) {
              Serial.println("GPIO 26 off");
              output26State = "off";
              digitalWrite(output26, LOW);
            } else if (header.indexOf("GET /27/on") >= 0) {
              Serial.println("GPIO 27 on");
              output27State = "on";
              digitalWrite(output27, HIGH);
            } else if (header.indexOf("GET /27/off") >= 0) {
              Serial.println("GPIO 27 off");
              output27State = "off";
              digitalWrite(output27, LOW);
            }

            // Display the HTML web page
            client.println("<!DOCTYPE html><html>");
            client.println("<head><meta name=\"viewport\" content=\"width=device-width, initial-scale=1\">");
            client.println("<link rel=\"icon\" href=\"data:,\">");
            // CSS to style the on/off buttons
            // Feel free to change the background-color and font-size attributes to fit your preferences
            client.println("<style>html { font-family: Helvetica; display: inline-block; margin: 0px auto; text-align: center;}");
            client.println(".button { background-color: #4CAF50; border: none; color: white; padding: 16px 40px;");
            client.println("text-decoration: none; font-size: 30px; margin: 2px; cursor: pointer;}");
            client.println(".button2 {background-color: #555555;}</style></head>");

            // Web Page Heading
            client.println("<body><h1>ESP32 Web Server</h1>");

            // Display current state, and ON/OFF buttons for GPIO 26
            client.println("<p>GPIO 26 - State " + output26State + "</p>");
            // If the output26State is off, it displays the ON button
            if (output26State=="off") {
              client.println("<p><a href=\"/26/on\"><button class=\"button\">ON</button></a></p>");
            } else {
              client.println("<p><a href=\"/26/off\"><button class=\"button button2\">OFF</button></a></p>");
            }

            // Display current state, and ON/OFF buttons for GPIO 27
            client.println("<p>GPIO 27 - State " + output27State + "</p>");
            // If the output27State is off, it displays the ON button
            if (output27State=="off") {
              client.println("<p><a href=\"/27/on\"><button class=\"button\">ON</button></a></p>");
            } else {
              client.println("<p><a href=\"/27/off\"><button class=\"button button2\">OFF</button></a></p>");
            }
            client.println("</body></html>");

            // The HTTP response ends with another blank line
            client.println();
            // Break out of the while loop
            break;
          } else { // if you got a newline, then clear currentLine
            currentLine = "";
          }
        } else if (c != '\r') {  // if you got anything else but a carriage return character,
          currentLine += c;      // add it to the end of the currentLine
        }
      }
    }
    // Clear the header variable
    header = "";
    // Close the connection
    client.stop();
    Serial.println("Client disconnected.");
    Serial.println("");
  }
}
This code sets up the ESP32 as a Wi-Fi access point and starts a web server that listens for HTTP GET requests to control the state of two GPIO pins connected to LEDs. When a client connects and sends a request to turn an LED on or off, the ESP32 responds by changing the state of the corresponding GPIO pin and sends back an HTML page that reflects the new state of the LEDs.