
Arduino UNO and 16x2 I2C LCD Display Interface for Real-Time Data Visualization
View and Edit Project In Cirkit Designer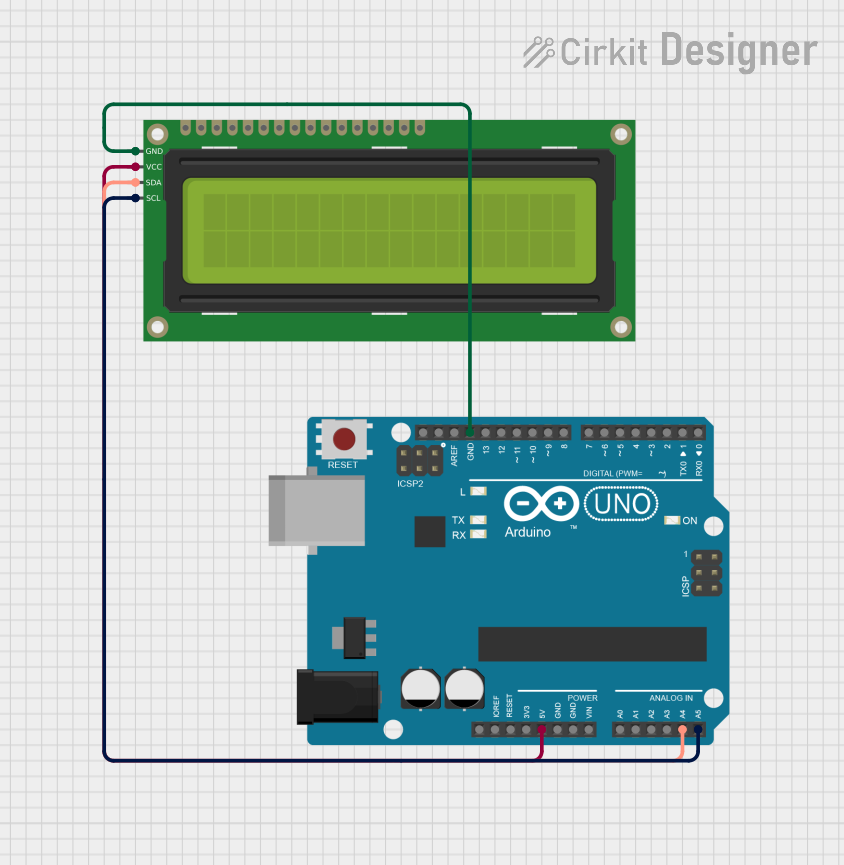
Circuit Documentation
Summary
This document provides a detailed overview of a simple circuit involving an Arduino UNO microcontroller and a 16x2 I2C LCD display. The Arduino UNO serves as the main controller, while the 16x2 I2C LCD is used to display information. The components are interconnected using I2C communication protocol.
Component List
16x2 I2C LCD
- Description: A 16x2 character LCD display with I2C interface.
- Pins: GND, VCC, SDA, SCL
- Purpose in Circuit: Display information sent from the Arduino UNO.
Arduino UNO
- Description: A microcontroller board based on the ATmega328P.
- Pins: UNUSED, IOREF, Reset, 3.3V, 5V, GND, Vin, A0, A1, A2, A3, A4, A5, SCL, SDA, AREF, D13, D12, D11, D10, D9, D8, D7, D6, D5, D4, D3, D2, D1, D0
- Purpose in Circuit: Main controller to process data and communicate with the 16x2 I2C LCD.
Wiring Details
16x2 I2C LCD
- GND: Connected to GND on Arduino UNO
- VCC: Connected to 5V on Arduino UNO
- SDA: Connected to A4 on Arduino UNO
- SCL: Connected to A5 on Arduino UNO
Arduino UNO
- GND: Connected to GND on 16x2 I2C LCD
- 5V: Connected to VCC on 16x2 I2C LCD
- A4: Connected to SDA on 16x2 I2C LCD
- A5: Connected to SCL on 16x2 I2C LCD
Documented Code
Arduino UNO Code
void setup() {
  // put your setup code here, to run once:

}

void loop() {
  // put your main code here, to run repeatedly:

}
16x2 I2C LCD Code
void setup() {
  // put your setup code here, to run once:

}

void loop() {
  // put your main code here, to run repeatedly:

}
This document provides a comprehensive overview of the circuit, including the components used, their wiring details, and the code for the microcontrollers.