Cirkit Designer
Your all-in-one circuit design IDE
Home /
Project Documentation
I2C LCD and LED Control via BlynkGate with MakerEDU Shield
Circuit Documentation
Summary
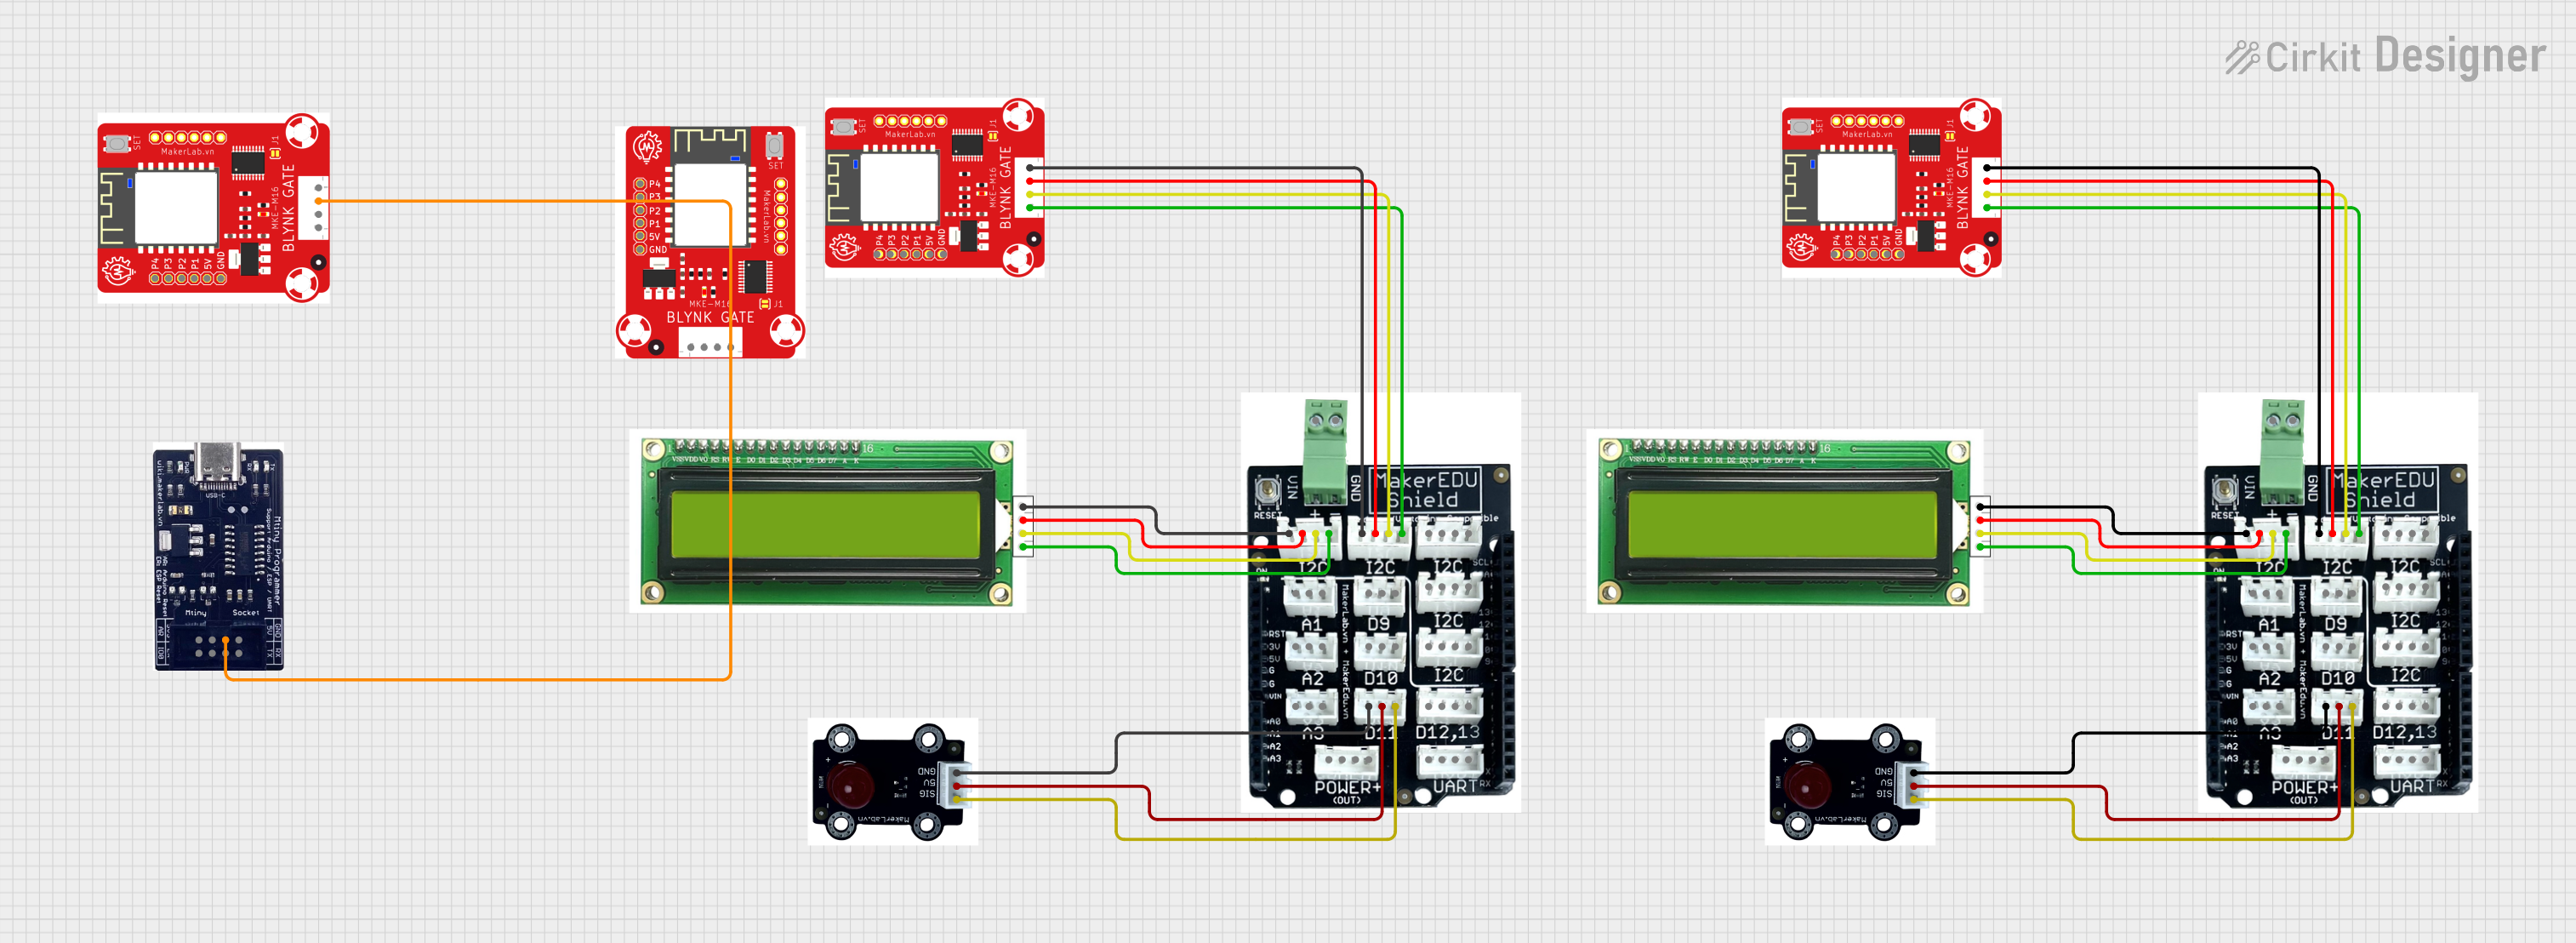
The circuit is designed to interface an MKE-M01 LED Module and an MKE-M07 LCD1602 I2C display with a MakerEDU Shield, which is presumably mounted on a compatible microcontroller platform. The shield facilitates the connection of various peripherals and modules, including the BlynkGate module for IoT connectivity. The circuit is powered by a 5V supply and uses I2C communication protocol for the LCD display. The LED module is controlled via a digital signal line.
Component List
MKE-M07 LCD1602 I2C
- Description: A 16x2 character LCD display module with an I2C interface.
- Pins: GND, 5V, SDA, SCL
MakerEDU Shield
- Description: An expansion shield that provides easy connection points for sensors, actuators, and communication modules.
- Pins: GND, 5V, SDA, SCL, A1, D9, D10, A2, A3, D11, D12, D13, TX, RX, 3V3, VIN
MKE-M01 LED Module
- Description: A module with an LED that can be turned on or off using a digital signal.
- Pins: GND, 5V, SIG
BlynkGate
- Description: A module designed for IoT applications, allowing devices to connect to the internet and be controlled remotely.
- Pins: GND, 5V, P1, P2, P3, P4, SCL, SDA
MTiny Programmer
- Description: A programming tool used for uploading firmware to microcontrollers.
- Pins: IO0, 3V3, 5V, GND, RX, TX, ER, AR
Wiring Details
MKE-M07 LCD1602 I2C
- GND: Connected to MakerEDU Shield GND
- 5V: Connected to MakerEDU Shield 5V
- SDA: Connected to MakerEDU Shield SDA
- SCL: Connected to MakerEDU Shield SCL
MakerEDU Shield
- GND: Common ground for all components
- 5V: Power supply for 5V components
- SDA/SCL: I2C communication lines connected to BlynkGate and LCD1602 I2C
MKE-M01 LED Module
- GND: Connected to MakerEDU Shield GND
- 5V: Connected to MakerEDU Shield 5V
- SIG: Connected to MakerEDU Shield D11 (Digital Signal)
BlynkGate
- GND: Connected to MakerEDU Shield GND
- 5V: Connected to MakerEDU Shield 5V
- SCL: Connected to MakerEDU Shield SCL
- SDA: Connected to MakerEDU Shield SDA
MTiny Programmer
- 5V: Connected to BlynkGate 5V
Documented Code
sketch.ino
#define BLYNK_TEMPLATE_ID "Copy_BLYNK_TEMPLATE_ID_From_BlynkCloud"
#define BLYNK_TEMPLATE_NAME "Copy_BLYNK_TEMPLATE_NAME_From_BlynkCloud"
#define BLYNK_AUTH_TOKEN "Copy_BLYNK_AUTH_TOKEN_From_BlynkCloud"

// Thêm bộ thư viện
// Add the library.
#include <LiquidCrystal_I2C.h>
#include "BlynkGate.h"

// Khởi tạo LCD
// LCD config
LiquidCrystal_I2C lcd(0x27, 16, 2);

// Khai báo module.
// Declare module.
char auth[] = BLYNK_AUTH_TOKEN;
char ssid[] = "MakerLab.vn";  // Key in your wifi name (Bandwidth 2.4Ghz). You can check with your smart phone for your wifi name
char pass[] = "";             // Key in your wifi password.

void setup() {
  // put your setup code here, to run once:
  // Khởi động LCD
  // LCD start
  lcd.init();
  lcd.backlight();

  // Khởi động kết nối Serial UART ở tốc độ 115200 để truyền dữ liệu lên máy tính.
  // Start the Serial UART connection at 115200 to transfer data to the computer.
  Serial.begin(115200);
  Serial.println("Start");

  // Khởi tạo module
  // init module
  Blynk.begin(auth, ssid, pass);
}

void loop() {
  // put your main code here, to run repeatedly:
  Blynk.run();
  // DO NOT using delay
}

BLYNK_WRITE_DEFAULT() {
  // double myDouble = param.asFloat();
  // String myString = param.asString();
  int myInt = param.asInt();


  // Hiển thị giá trị của module lên máy tính.
  // Show the module value on Arduno Serial Monitor
  Serial.print("input V");
  Serial.print(request.pin);
  Serial.print(": ");
  Serial.println(myInt);

  //Gửi giá trị module lên LCD
  //Show the module value on LCD
  lcd.setCursor(0,0);
  lcd.print("input V");
  lcd.print(request.pin);
  lcd.setCursor(0,1);
  lcd.print("value:");
  lcd.print(myInt);
  lcd.print("     ");

}
documentation.txt
#include <BlynkGate.h>
This code snippet appears to be a part of the documentation or a separate file that includes the BlynkGate library, which is essential for the IoT functionality of the circuit.