
Circuit Documentation
Summary of the Circuit
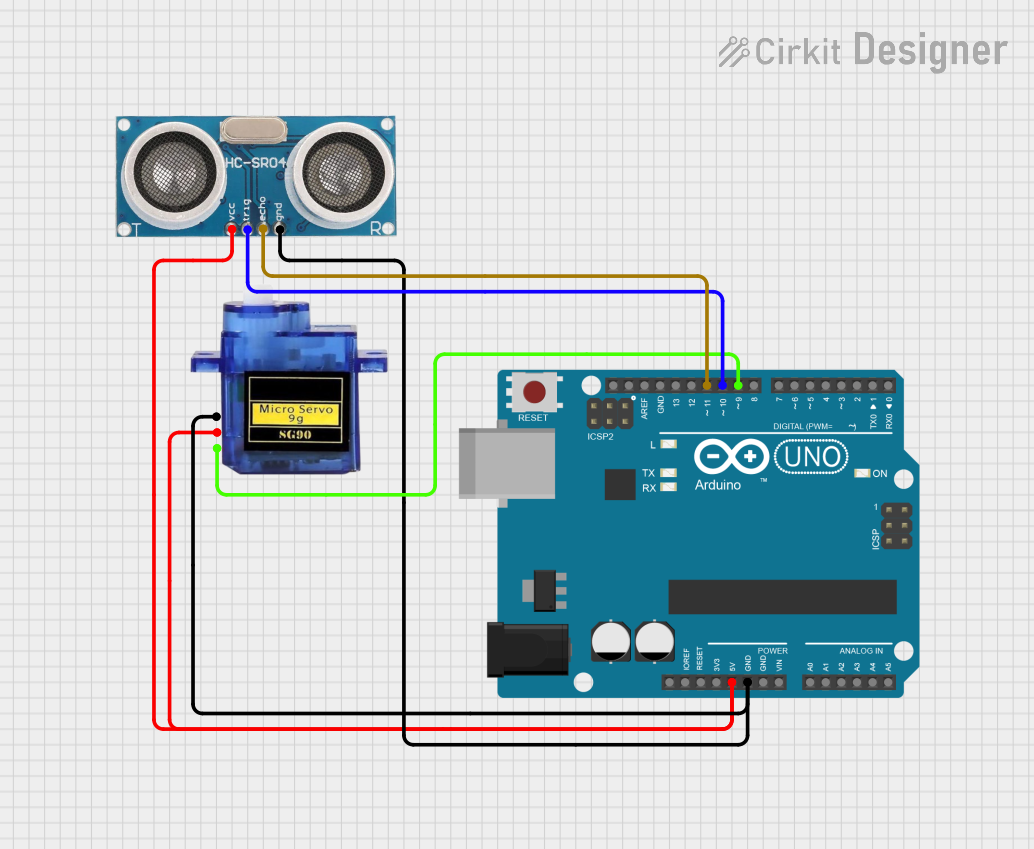
This circuit integrates an ultrasonic sensor, an Arduino UNO microcontroller, and a micro servo 9G to form a system capable of distance measurement and actuation based on the measured values. The ultrasonic sensor is used to measure distances by emitting ultrasonic waves and receiving the echo. The Arduino UNO processes this information and controls the micro servo 9G accordingly. The servo can be used to point towards or move objects based on the distance data. This setup is commonly used in robotics, automated systems, and DIY projects where distance-based interactions are required.
Component List
Ultrasonic Sensor
- Description: A sensor that measures distance by emitting ultrasonic waves and detecting the reflected echo.
- Pins: +VCC, Trigger, Echo, GND
Arduino UNO
- Description: A microcontroller board based on the ATmega328P, widely used for building digital devices and interactive objects that can sense and control objects in the physical and digital world.
- Pins: UNUSED, IOREF, Reset, 3.3V, 5V, GND, Vin, A0-A5, SCL, SDA, AREF, D0-D13
Micro servo 9G
- Description: A small and lightweight servo motor suitable for projects that require simple motion or positioning.
- Pins: GND, +5V, PWM
Wiring Details
Ultrasonic Sensor
- +VCC: Connected to the 5V output on the Arduino UNO.
- Trigger: Connected to digital pin D10 on the Arduino UNO.
- Echo: Connected to digital pin D11 on the Arduino UNO.
- GND: Connected to the ground (GND) on the Arduino UNO.
Arduino UNO
- 5V: Provides power to the Ultrasonic Sensor and Micro servo 9G.
- D10: Sends trigger signal to the Ultrasonic Sensor.
- D11: Receives echo signal from the Ultrasonic Sensor.
- D9: Sends PWM signal to control the Micro servo 9G.
- GND: Common ground for the circuit.
Micro servo 9G
- +5V: Powered by the 5V output from the Arduino UNO.
- PWM: Receives PWM control signal from digital pin D9 on the Arduino UNO.
- GND: Connected to the ground (GND) on the Arduino UNO.
Documented Code
The code for the Arduino UNO is structured with a setup() function that runs once at the start and a loop() function that runs continuously. Currently, the code is a template with no specific logic implemented.
void setup() {
  // put your setup code here, to run once:

}

void loop() {
  // put your main code here, to run repeatedly:

}
The code file is named sketch.ino, which is the default naming convention for Arduino sketches. There is also an additional text file named documentation.txt, but it does not contain any code or information.
Note: The actual functionality of the circuit will be determined by the code that is written and uploaded to the Arduino UNO. The provided code is a starting point and will need to be developed further to interact with the ultrasonic sensor and control the micro servo based on the sensor's readings.