
PicoW-Based Wi-Fi Controlled Dual DC Motor Robot with IR Sensors
View and Edit Project In Cirkit Designer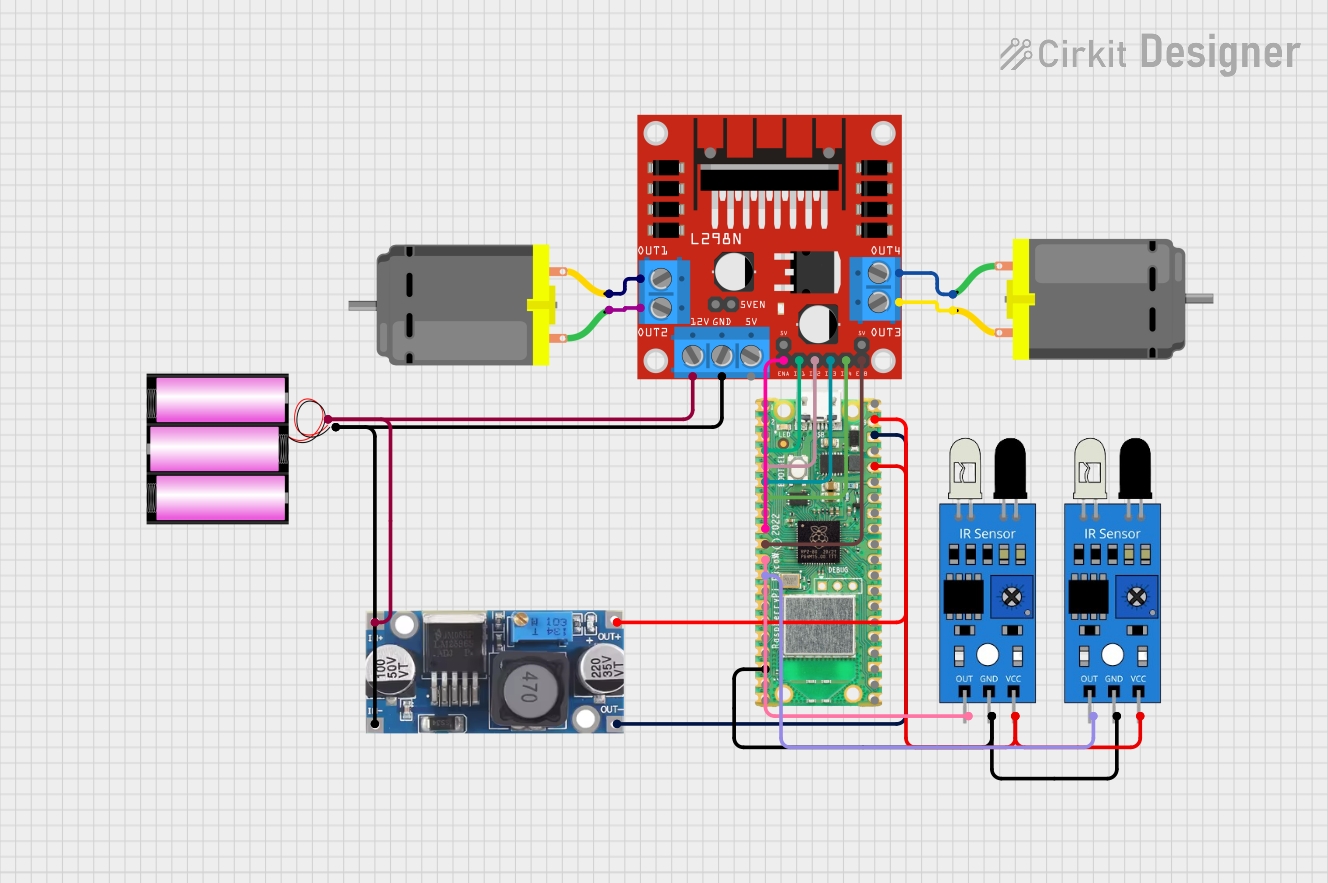
Circuit Documentation
Summary
This document provides a detailed overview of a circuit designed to control two DC motors using a Raspberry Pi Pico W microcontroller and an L298N motor driver. The circuit also includes two IR sensors for obstacle detection and a step-down buck converter to regulate the power supply from a 12V battery.
Component List
Raspberry Pi Pico W
- Description: A microcontroller board based on the Raspberry Pi RP2040 microcontroller chip.
- Pins: GP0, GP1, GP2, GP3, GP4, GP5, GP6, GP7, GP8, GP9, GP10, GP11, GP12, GP13, GP14, GP15, GP16, GP17, GP18, GP19, GP20, GP21, GP22, GP26, GP27, GP28, GND, 3V3 OUT, 3V3_EN, VSYS, VBUS, RUN
L298N DC Motor Driver
- Description: A dual H-Bridge motor driver that allows control of two DC motors.
- Pins: OUT1, OUT2, 12V, GND, 5V, OUT3, OUT4, 5V-ENA-JMP-I, 5V-ENA-JMP-O, +5V-J1, +5V-J2, ENA, IN1, IN2, IN3, IN4, ENB
DC Motor (Motor 1)
- Description: A standard DC motor.
- Pins: pin 1, pin 2
DC Motor (Motor 2)
- Description: A standard DC motor.
- Pins: pin 1, pin 2
Battery 12V
- Description: A 12V battery used as the power source.
- Pins: +, -
Step Down Buck Converter
- Description: A DC-DC converter that steps down voltage from 12V to 5V.
- Pins: IN +, IN - GND, OUT +, OUT - GND
IR Sensor (Sensor 1)
- Description: An infrared sensor used for obstacle detection.
- Pins: out, gnd, vcc
IR Sensor (Sensor 2)
- Description: An infrared sensor used for obstacle detection.
- Pins: out, gnd, vcc
Wiring Details
Raspberry Pi Pico W
- 3V3 OUT connected to vcc of both IR sensors.
- GND connected to OUT - GND of the Step Down Buck Converter and gnd of both IR sensors.
- VSYS connected to OUT + of the Step Down Buck Converter.
- GP9 connected to out of IR Sensor 2.
- GP8 connected to out of IR Sensor 1.
- GP7 connected to ENB of the L298N DC Motor Driver.
- GP6 connected to ENA of the L298N DC Motor Driver.
- GP5 connected to IN4 of the L298N DC Motor Driver.
- GP4 connected to IN3 of the L298N DC Motor Driver.
- GP3 connected to IN2 of the L298N DC Motor Driver.
- GP2 connected to IN1 of the L298N DC Motor Driver.
L298N DC Motor Driver
- OUT1 connected to pin 2 of DC Motor 1.
- OUT2 connected to pin 1 of DC Motor 1.
- OUT3 connected to pin 2 of DC Motor 2.
- OUT4 connected to pin 1 of DC Motor 2.
- 12V connected to IN + of the Step Down Buck Converter and + of the 12V Battery.
- GND connected to IN - GND of the Step Down Buck Converter and - of the 12V Battery.
DC Motor 1
- pin 1 connected to OUT2 of the L298N DC Motor Driver.
- pin 2 connected to OUT1 of the L298N DC Motor Driver.
DC Motor 2
- pin 1 connected to OUT4 of the L298N DC Motor Driver.
- pin 2 connected to OUT3 of the L298N DC Motor Driver.
Battery 12V
- + connected to 12V of the L298N DC Motor Driver and IN + of the Step Down Buck Converter.
- - connected to GND of the L298N DC Motor Driver and IN - GND of the Step Down Buck Converter.
Step Down Buck Converter
- IN + connected to 12V of the L298N DC Motor Driver and + of the 12V Battery.
- IN - GND connected to GND of the L298N DC Motor Driver and - of the 12V Battery.
- OUT + connected to VSYS of the Raspberry Pi Pico W.
- OUT - GND connected to GND of the Raspberry Pi Pico W.
IR Sensor 1
- vcc connected to 3V3 OUT of the Raspberry Pi Pico W.
- gnd connected to GND of the Raspberry Pi Pico W.
- out connected to GP8 of the Raspberry Pi Pico W.
IR Sensor 2
- vcc connected to 3V3 OUT of the Raspberry Pi Pico W.
- gnd connected to GND of the Raspberry Pi Pico W.
- out connected to GP9 of the Raspberry Pi Pico W.
Code
No code is provided for this circuit.