
Arduino UNO-Based Smart Irrigation System with Wi-Fi and Solar Power
View and Edit Project In Cirkit Designer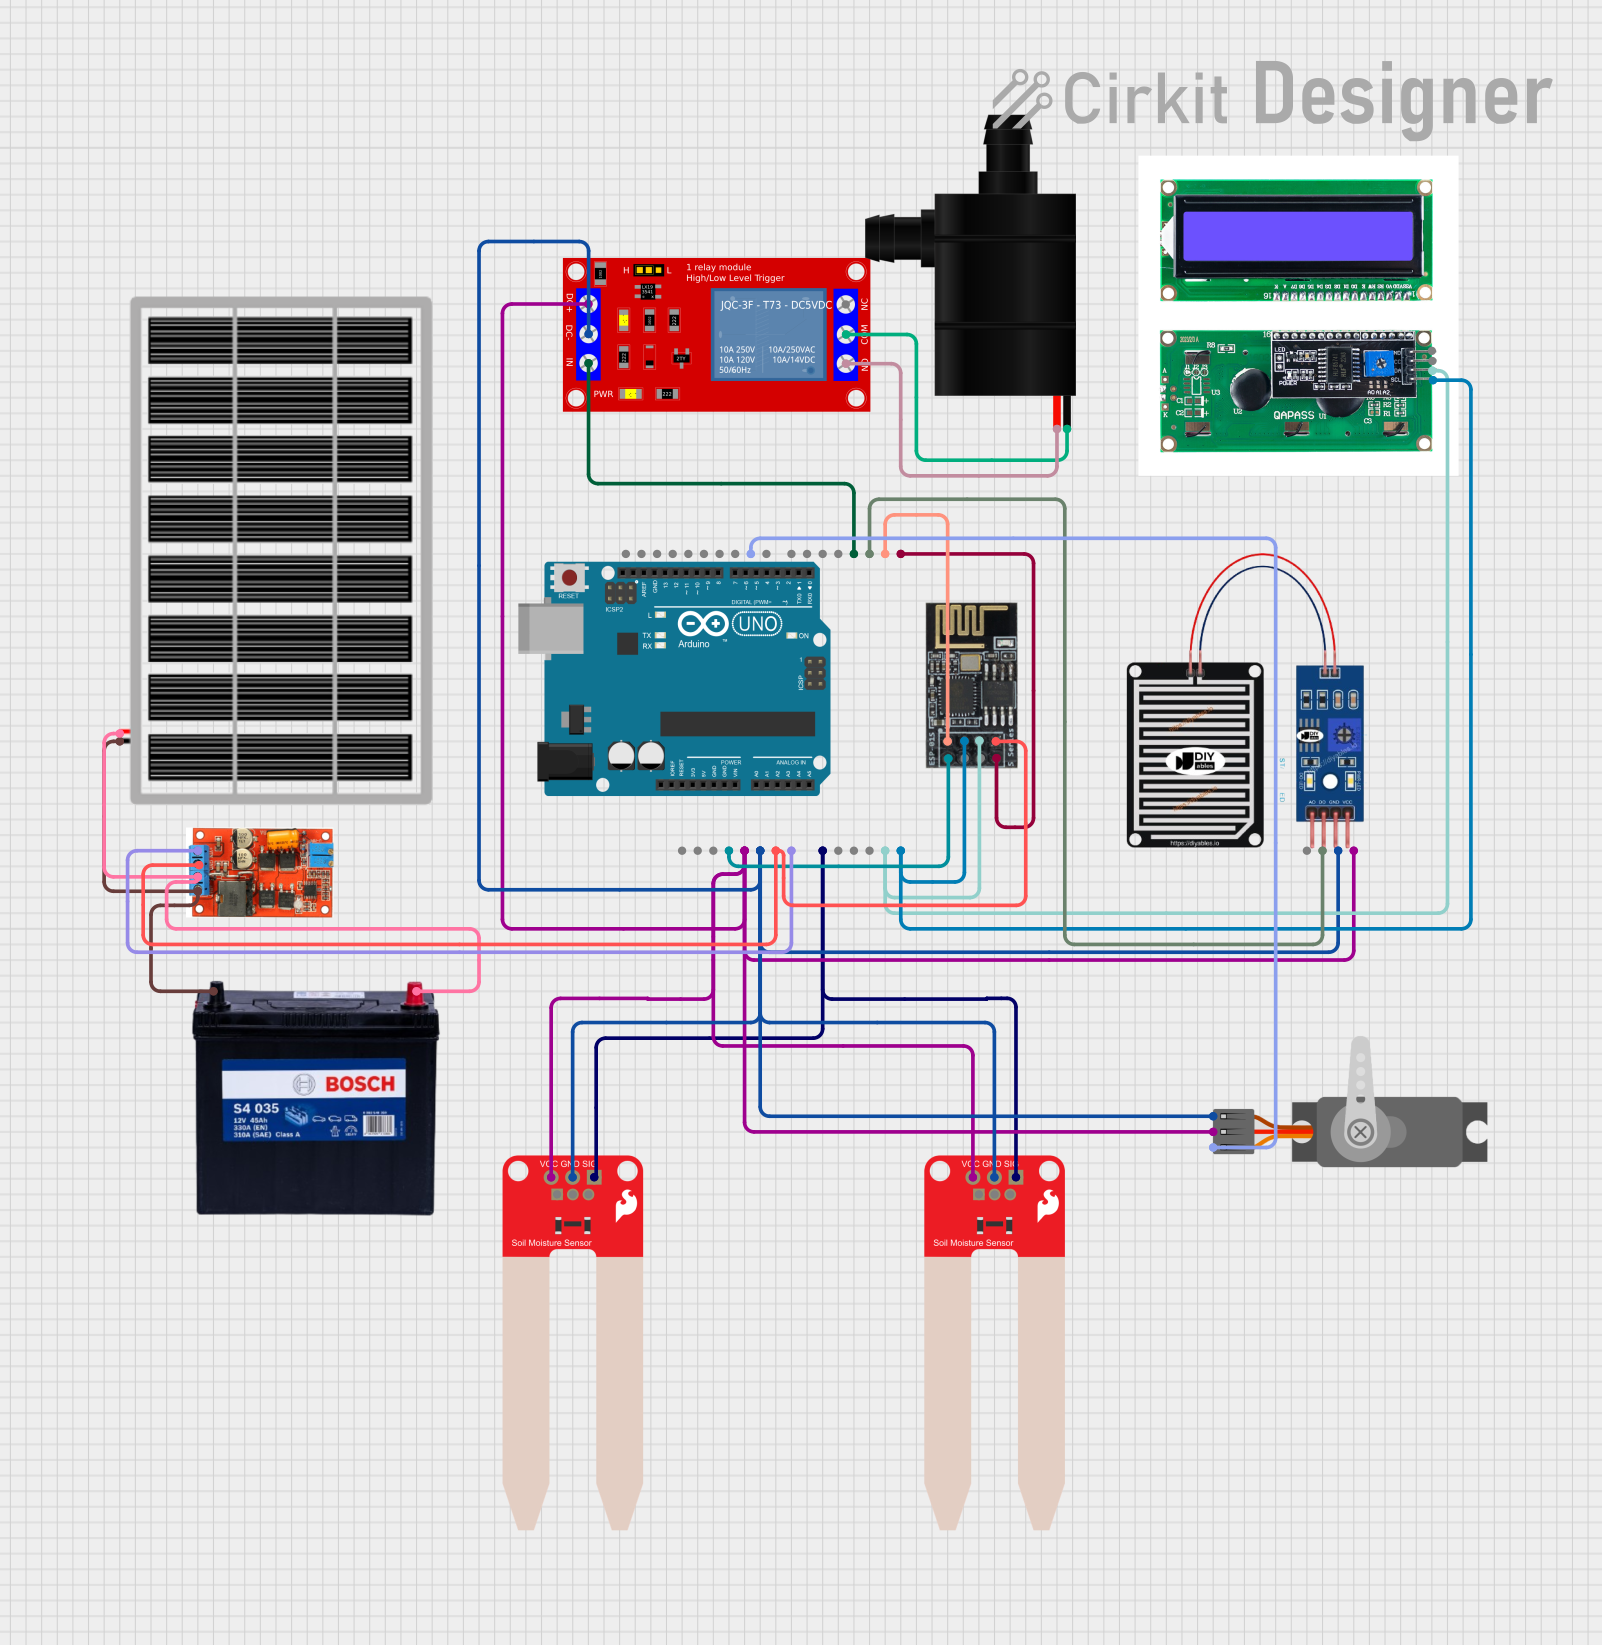
Circuit Documentation
Summary
This circuit is designed for an automated irrigation system that monitors soil moisture and rain conditions to control a water pump. The system uses an Arduino UNO as the main microcontroller, interfaced with various sensors and modules including soil moisture sensors, a rain sensor, a relay module, a servo motor, an LCD display, and a WiFi module. The system is powered by a solar panel and a 12V battery, regulated by a solar panel regulator.
Component List
Arduino UNO
- Description: Main microcontroller
- Pins: UNUSED, IOREF, Reset, 3.3V, 5V, GND, Vin, A0, A1, A2, A3, A4, A5, SCL, SDA, AREF, D13, D12, D11, D10, D9, D8, D7, D6, D5, D4, D3, D2, D1, D0
SparkFun Soil Moisture Sensor (2 units)
- Description: Measures soil moisture level
- Pins: VCC, GND, SIG
1 Channel 5V Relay Module
- Description: Controls the water pump
- Pins: VCC+, VCC- (GND), IN, N.O., COM, N.C.
lcdi2c
- Description: I2C LCD display
- Pins: GND, VCC, SDA, SCL
RAIN SENSOR
- Description: Detects rain
- Pins: AO, DO, GRD, VCC
Water Pump
- Description: Pumps water for irrigation
- Pins: VCC, GND
Wifi module ESP8266-01
- Description: Provides WiFi connectivity
- Pins: RX, GPIO0, GPIO2, GND, +3V3, Reset, CH-PD Chip power down, TX
Solar Panel
- Description: Provides power to the system
- Pins: gnd, vcc
Solar Panel Regulator 5A MPPT Controller Battery Charging 9V/12V/24V/Auto Switch
- Description: Regulates power from the solar panel
- Pins: +Vin, Ground, battery (-), battery(+)
12V 200Ah Battery
- Description: Stores power for the system
- Pins: GND, 12V
Servo (Wokwi Compatible)
- Description: Controls mechanical movements
- Pins: GND, V+, PWM
Wiring Details
Arduino UNO
- 3.3V: Connected to +3V3 of Wifi module ESP8266-01
- 5V: Connected to VCC of RAIN SENSOR, Servo (Wokwi Compatible), 1 Channel 5V Relay Module, and both SparkFun Soil Moisture Sensors
- GND: Connected to GND of RAIN SENSOR, Servo (Wokwi Compatible), 1 Channel 5V Relay Module, both SparkFun Soil Moisture Sensors, and Wifi module ESP8266-01
- Vin: Connected to +Vin of Solar Panel Regulator
- A0: Connected to SIG of both SparkFun Soil Moisture Sensors
- A4: Connected to GPIO2 of Wifi module ESP8266-01 and SDA of lcdi2c
- A5: Connected to GPIO0 of Wifi module ESP8266-01 and SCL of lcdi2c
- D9: Connected to PWM of Servo (Wokwi Compatible)
- D3: Connected to IN of 1 Channel 5V Relay Module
- D2: Connected to DO of RAIN SENSOR
- D1: Connected to RX of Wifi module ESP8266-01
- D0: Connected to TX of Wifi module ESP8266-01
SparkFun Soil Moisture Sensor (2 units)
- VCC: Connected to 5V of Arduino UNO
- GND: Connected to GND of Arduino UNO
- SIG: Connected to A0 of Arduino UNO
1 Channel 5V Relay Module
- VCC+: Connected to 5V of Arduino UNO
- VCC- (GND): Connected to GND of Arduino UNO
- IN: Connected to D3 of Arduino UNO
- N.O.: Connected to VCC of Water Pump
- COM: Connected to GND of Water Pump
lcdi2c
- GND: Connected to GND of Arduino UNO
- VCC: Connected to 5V of Arduino UNO
- SDA: Connected to A4 of Arduino UNO
- SCL: Connected to A5 of Arduino UNO
RAIN SENSOR
- VCC: Connected to 5V of Arduino UNO
- GRD: Connected to GND of Arduino UNO
- DO: Connected to D2 of Arduino UNO
Water Pump
- VCC: Connected to N.O. of 1 Channel 5V Relay Module
- GND: Connected to COM of 1 Channel 5V Relay Module
Wifi module ESP8266-01
- +3V3: Connected to 3.3V of Arduino UNO
- GND: Connected to GND of Arduino UNO
- GPIO2: Connected to A4 of Arduino UNO
- GPIO0: Connected to A5 of Arduino UNO
- RX: Connected to D1 of Arduino UNO
- TX: Connected to D0 of Arduino UNO
Solar Panel
- gnd: Connected to battery (-) of Solar Panel Regulator
- vcc: Connected to battery(+) of Solar Panel Regulator
Solar Panel Regulator 5A MPPT Controller Battery Charging 9V/12V/24V/Auto Switch
- +Vin: Connected to Vin of Arduino UNO
- Ground: Connected to GND of Arduino UNO
- battery (-): Connected to GND of 12V 200Ah Battery
- battery(+): Connected to 12V of 12V 200Ah Battery
12V 200Ah Battery
- GND: Connected to battery (-) of Solar Panel Regulator
- 12V: Connected to battery(+) of Solar Panel Regulator
Servo (Wokwi Compatible)
- GND: Connected to GND of Arduino UNO
- V+: Connected to 5V of Arduino UNO
- PWM: Connected to D9 of Arduino UNO
Documented Code
#include <ESP8266WiFi.h>
#include <Wire.h>
#include <LiquidCrystal_I2C.h>

const int moistureSensorPin = A0;
const int rainSensorPin = D2;
const int relayPin = D3;
const int buzzerPin = D4;

int moistureThreshold = 500; // Example threshold value for moisture level

// WiFi configuration
const char* ssid = "YourWiFiSSID";
const char* password = "YourWiFiPassword";

// Initialize LCD
LiquidCrystal_I2C lcd(0x27, 16, 2); // I2C address and size

void setup() {
  Serial.begin(115200);

  // Set pin modes
  pinMode(moistureSensorPin, INPUT);
  pinMode(rainSensorPin, INPUT);
  pinMode(relayPin, OUTPUT);
  pinMode(buzzerPin, OUTPUT);

  // Start LCD and Wi-Fi
  lcd.begin();
  lcd.print("System Starting...");

  WiFi.begin(ssid, password);
  while (WiFi.status() != WL_CONNECTED) {
    delay(1000);
  }

  lcd.clear();
  lcd.print("WiFi Connected");
  delay(2000);
}

void loop() {
  int moistureLevel = analogRead(moistureSensorPin);
  int rainStatus = digitalRead(rainSensorPin);

  // Display current soil moisture on LCD
  lcd.setCursor(0, 0);
  lcd.print("Moisture: ");
  lcd.print(moistureLevel);

  // Check moisture level
  if (moistureLevel < moistureThreshold && rainStatus == LOW) {
    digitalWrite(relayPin, HIGH); // Turn on pump
    lcd.setCursor(0, 1);
    lcd.print("Irrigation ON");
  } else {
    digitalWrite(relayPin, LOW); // Turn off pump
    lcd.setCursor(0, 1);
    lcd.print("Irrigation OFF");
  }

  // Rain detection - suspend watering if raining
  if (rainStatus == HIGH) {
    digitalWrite(relayPin, LOW); // Turn off pump
    lcd.setCursor(0, 1);
    lcd.print("Rain Detected");
  }

  // Optional: send real-time updates via Wi-Fi to mobile or web interface
  // Implement Wi-Fi communication here (e.g., send HTTP request to server)

  delay(2000); // Update every 2 seconds
}
This code initializes