
Circuit Documentation
Summary
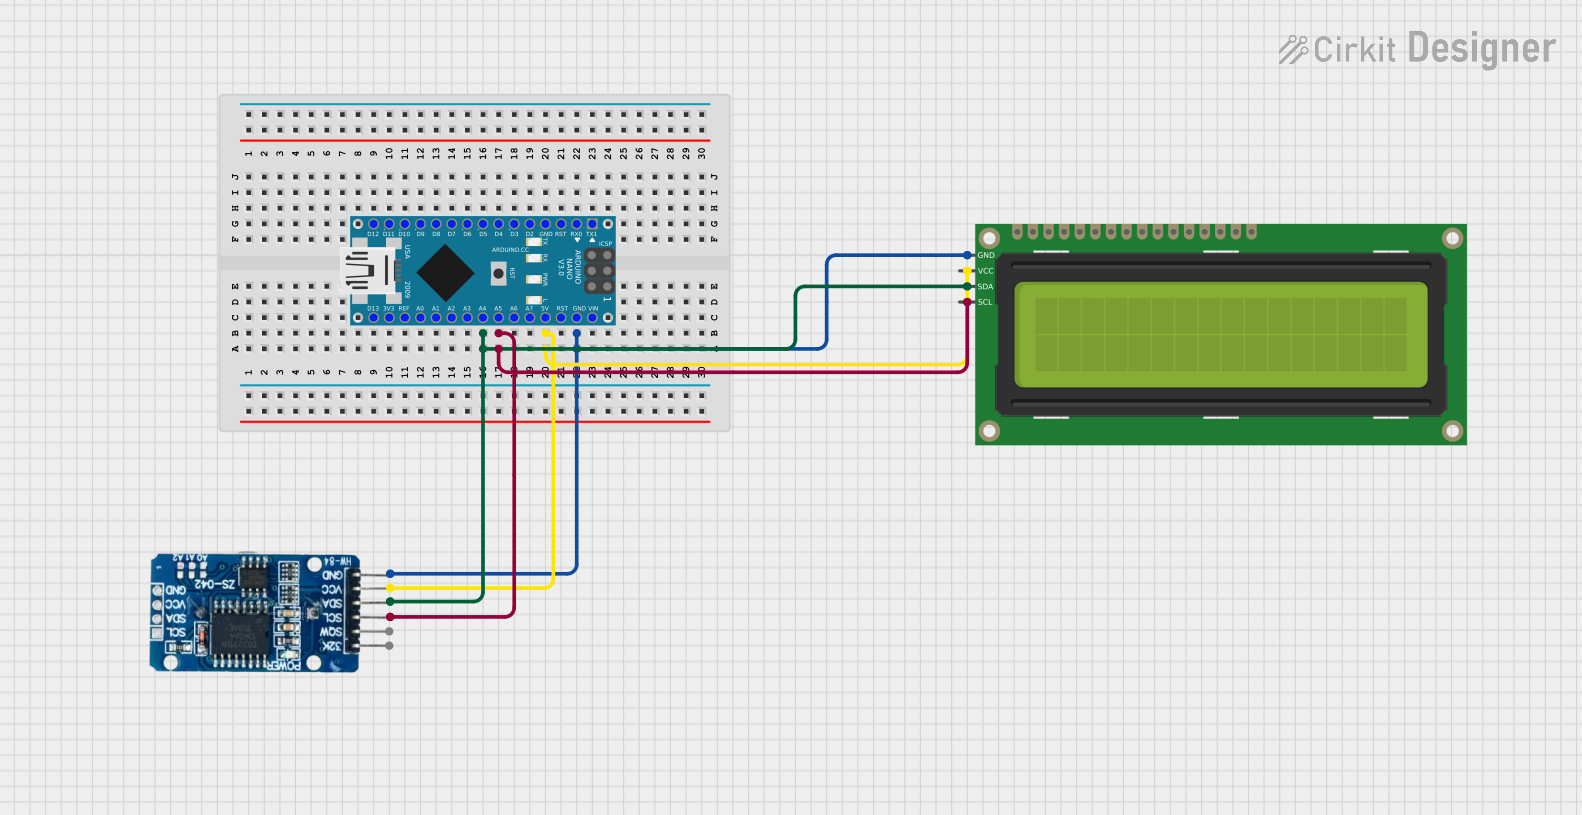
This circuit integrates an Arduino Nano microcontroller with a 16x2 I2C LCD and a Real-Time Clock (RTC) module DS3231. The Arduino Nano serves as the central processing unit, controlling the LCD to display information and managing time tracking with the RTC. The I2C communication protocol is used to interface the Arduino with both the LCD and the RTC, minimizing the wiring complexity and pin usage. The circuit is powered through the Arduino Nano's 5V output, which supplies power to both the LCD and the RTC. Ground connections are shared across all components to complete the circuit.
Component List
Arduino Nano
- Description: A compact microcontroller board based on the ATmega328P.
- Pins: D1/TX, D0/RX, RESET, GND, D2, D3, D4, D5, D6, D7, D8, D9, D10, D11/MOSI, D12/MISO, VIN, 5V, A7, A6, A5, A4, A3, A2, A1, A0, AREF, 3V3, D13/SCK.
16x2 I2C LCD
- Description: A 16-character by 2-line display with an I2C interface.
- Pins: GND, VCC, SDA, SCL.
RTC DS3231
- Description: A highly accurate I2C real-time clock with an integrated temperature-compensated crystal oscillator (TCXO) and crystal.
- Pins: 32K, SQW, SCL, SDA, VCC, GND.
Wiring Details
Arduino Nano
- A4 (SDA): Connected to the SDA pin of the 16x2 I2C LCD and the SDA pin of the RTC DS3231 for I2C data communication.
- A5 (SCL): Connected to the SCL pin of the 16x2 I2C LCD and the SCL pin of the RTC DS3231 for I2C clock communication.
- 5V: Provides power to the VCC pin of the 16x2 I2C LCD and the VCC pin of the RTC DS3231.
- GND: Connected to the GND pin of the 16x2 I2C LCD and the GND pin of the RTC DS3231 to complete the power circuit.
16x2 I2C LCD
- SDA: Connected to the A4 (SDA) pin of the Arduino Nano.
- SCL: Connected to the A5 (SCL) pin of the Arduino Nano.
- VCC: Powered by the 5V pin of the Arduino Nano.
- GND: Connected to the GND pin of the Arduino Nano.
RTC DS3231
- SDA: Connected to the A4 (SDA) pin of the Arduino Nano.
- SCL: Connected to the A5 (SCL) pin of the Arduino Nano.
- VCC: Powered by the 5V pin of the Arduino Nano.
- GND: Connected to the GND pin of the Arduino Nano.
Documented Code
Arduino Nano Code (sketch.ino)
void setup() {
  // put your setup code here, to run once:

}

void loop() {
  // put your main code here, to run repeatedly:

}
Note: The provided code is a template and does not include specific functionality. It is expected that the user will add the necessary code to initialize the I2C communication and to interact with the LCD and RTC modules.