
Arduino UNO RFID Access Control with LED and Buzzer Indicators
View and Edit Project In Cirkit Designer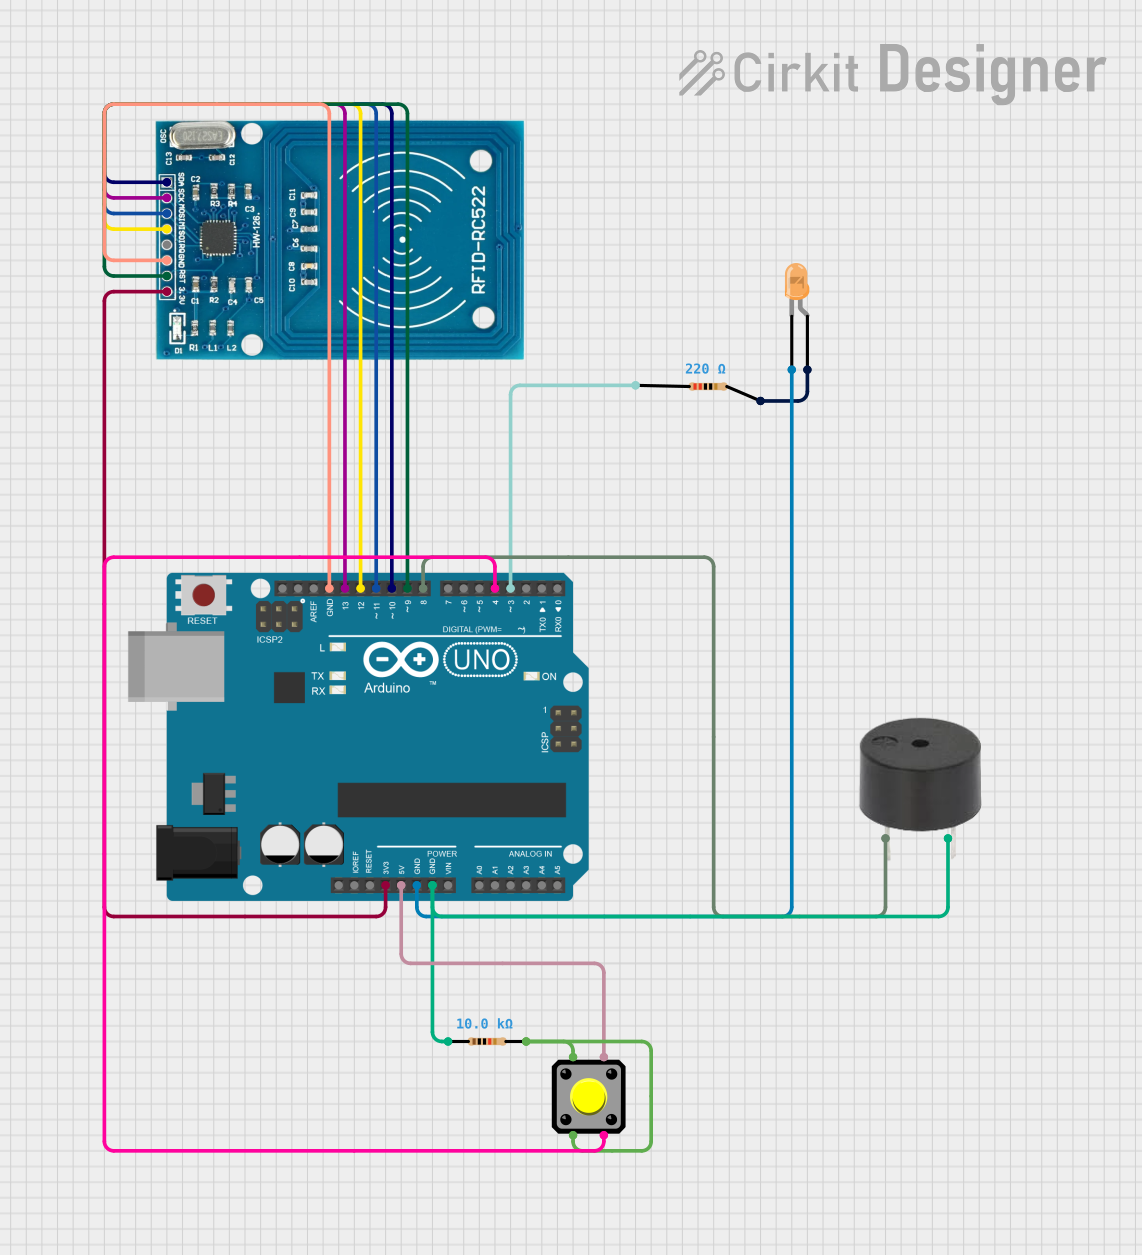
Circuit Documentation
Summary
This circuit is designed to utilize an Arduino UNO as the central microcontroller to interface with an RFID-RC522 module for RFID card reading, control an LED and a buzzer for visual and audible feedback, and use a pushbutton to manually reset the system. The RFID reader checks for authorized tags and activates the LED and buzzer when a match is found. The pushbutton allows for manual deactivation of the LED and buzzer.
Component List
Arduino UNO
- Microcontroller board based on the ATmega328P
- It has 14 digital input/output pins, 6 analog inputs, a 16 MHz quartz crystal, a USB connection, a power jack, an ICSP header, and a reset button.
RFID-RC522
- An RFID reader/writer module
- Operates at 13.56 MHz frequency
- Interfaces with the Arduino via SPI
Buzzer
- An electromechanical component that produces sound
- Typically used for audible alerts or alarms
LED: Two Pin (orange)
- A basic light-emitting diode
- Emits orange light when powered
Resistor (220 Ohms)
- A passive two-terminal electrical component
- Implements electrical resistance as a circuit element
Resistor (10k Ohms)
- Another resistor with a higher resistance value
- Often used for pull-up or pull-down applications
Pushbutton
- A simple switch mechanism for controlling some aspect of a machine or a process
- Usually provides a way to manually open or close an electrical circuit
Wiring Details
Arduino UNO
3.3Vconnected to RFID-RC522 VCC (3.3V)5Vconnected to Pushbutton Pin 4GNDconnected to LED cathode, Resistor (10k Ohms) pin1, Buzzer GND, and RFID-RC522 GNDD13connected to RFID-RC522 SCKD12connected to RFID-RC522 MISOD11connected to RFID-RC522 MOSID10connected to RFID-RC522 SDAD9connected to RFID-RC522 RSTD8connected to Buzzer PIND4connected to Pushbutton Pin 3D3connected to Resistor (220 Ohms) pin1
RFID-RC522
VCC (3.3V)connected to Arduino UNO 3.3VRSTconnected to Arduino UNO D9GNDconnected to Arduino UNO GNDIRQnot connectedMISOconnected to Arduino UNO D12MOSIconnected to Arduino UNO D11SCKconnected to Arduino UNO D13SDAconnected to Arduino UNO D10
Buzzer
PINconnected to Arduino UNO D8GNDconnected to Arduino UNO GND
LED: Two Pin (orange)
cathodeconnected to Arduino UNO GNDanodeconnected to Resistor (220 Ohms) pin2
Resistor (220 Ohms)
pin1connected to Arduino UNO D3pin2connected to LED anode
Resistor (10k Ohms)
pin1connected to Arduino UNO GNDpin2connected to Pushbutton Pin 2 and Pin 1
Pushbutton
Pin 4connected to Arduino UNO 5VPin 3connected to Arduino UNO D4Pin 2connected to Resistor (10k Ohms) pin2Pin 1connected to Resistor (10k Ohms) pin2
Documented Code
#include <SPI.h>
#include <MFRC522.h>

#define RST_PIN 9     // Reset pin for RFID
#define SS_PIN 10     // SDA/SS pin for RFID
#define LED_PIN 3     // LED connected to pin 3
#define BUZZER_PIN 8  // Buzzer connected to pin 8
#define BUTTON_PIN 4  // Button to turn off LED and buzzer

MFRC522 rfid(SS_PIN, RST_PIN);

boolean isSystemActive = false; // Keeps track if LED and Buzzer are on

// Replace with the UID of your RFID tag (4 bytes)
byte authorizedUID[4] = {0xAB, 0xCD, 0x12, 0x34};

void setup() {
  // Initialize serial communication
  Serial.begin(9600);

  // Initialize RFID module
  SPI.begin();
  rfid.PCD_Init();

  // Set pin modes
  pinMode(LED_PIN, OUTPUT);
  pinMode(BUZZER_PIN, OUTPUT);
  pinMode(BUTTON_PIN, INPUT_PULLUP);  // Use internal pull-up resistor for the button

  // Start with LED and buzzer off
  digitalWrite(LED_PIN, LOW);
  digitalWrite(BUZZER_PIN, LOW);
}

void loop() {
  // Check if the button is pressed (LOW because of pull-up resistor)
  if (digitalRead(BUTTON_PIN) == LOW && isSystemActive) {
    // Turn off the LED and buzzer manually
    digitalWrite(LED_PIN, LOW);
    digitalWrite(BUZZER_PIN, LOW);
    isSystemActive = false;  // Reset system state
    delay(500);  // Debouncing
  }

  // Look for RFID cards
  if (!rfid.PICC_IsNewCardPresent() || !rfid.PICC_ReadCardSerial()) {
    return;
  }

  // Check if the UID matches the authorized one
  if (checkUID(rfid.uid.uidByte)) {
    // Turn on LED and buzzer
    digitalWrite(LED_PIN, HIGH);
    digitalWrite(BUZZER_PIN, HIGH);
    isSystemActive = true;  // Set system to active state
  }

  // Halt the PICC and stop reading
  rfid.PICC_HaltA();
  rfid.PCD_StopCrypto1();
}

// Function to compare the scanned UID with the authorized one
boolean checkUID(byte *uid) {
  for (byte i = 0; i < 4; i++) {
    if (uid[i] != authorizedUID[i]) {
      return false;
    }
  }
  return true;
}
This code is designed to run on the Arduino UNO and interfaces with the RFID-RC522 module to read RFID tags. When an authorized tag is detected, the LED and buzzer are activated. The pushbutton allows the user to reset the system, turning off the LED and buzzer. The code includes setup and loop functions, as well as a helper function checkUID to compare the scanned UID with the authorized one.