Cirkit Designer
Your all-in-one circuit design IDE
Home /
Project Documentation
Arduino and ESP8266 Wi-Fi Enabled Load Cell Weighing System
Circuit Documentation
Summary
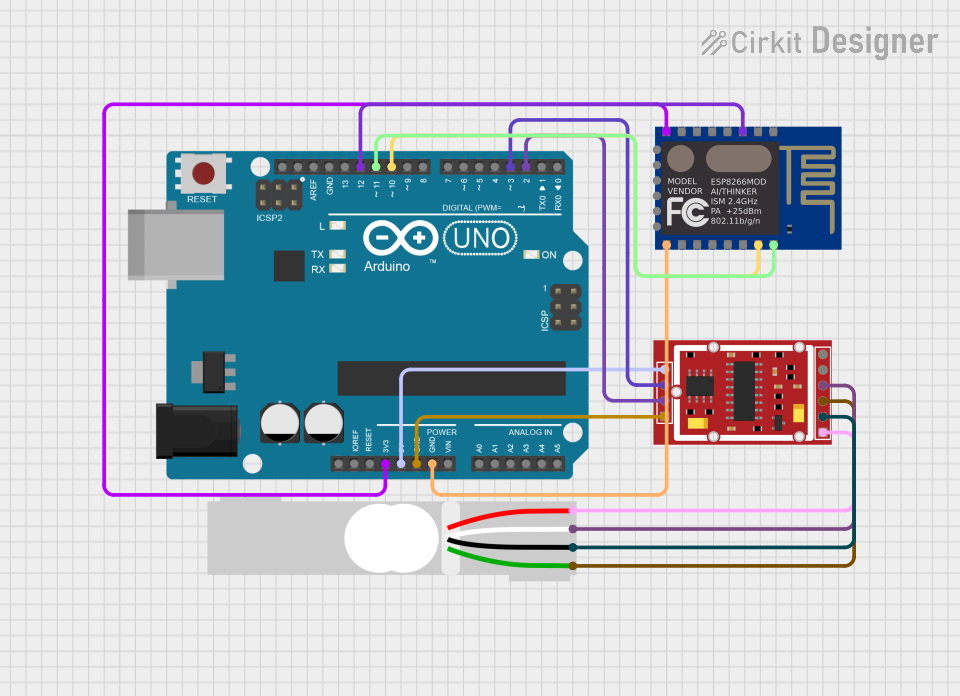
This circuit integrates an Arduino UNO microcontroller with an HX711 Weighing Sensor Module and an ESP8266 ESP-12E WiFi Module to create a smart weighing system. The system measures the weight of an object using a Load Cell and communicates the data wirelessly via the ESP8266 module. The Arduino UNO is used to process the data from the HX711 module and control the data flow to the ESP8266 for wireless transmission.
Component List
Arduino UNO
- Microcontroller board based on the ATmega328P
- It has 14 digital input/output pins, 6 analog inputs, a 16 MHz quartz crystal, a USB connection, a power jack, an ICSP header, and a reset button.
Load Cell - Red/white/black/green
- A transducer that converts force into an electrical signal.
- It has four pins: Excitation+ (E+), Excitation- (E-), Amplifier+ (A+), and Amplifier- (A-).
HX711 Weighing Sensor Module
- A precision 24-bit analog-to-digital converter (ADC) designed for weigh scales and industrial control applications to interface directly with a bridge sensor.
- It has ten pins: B-, B+, A-, A+, E-, E+, VCC, CK/TX, DO/RX, GND.
ESP8266 ESP-12E WiFi Module
- A self-contained SOC with integrated TCP/IP protocol stack that can give any microcontroller access to your WiFi network.
- It has multiple GPIOs, ADC, power inputs, and serial communication pins.
Wiring Details
Arduino UNO
- 3.3V supplies power to the ESP8266 ESP-12E WiFi Module.
- 5V supplies power to the HX711 Weighing Sensor Module.
- GND is connected to the ground pins of both the HX711 and ESP8266 modules.
- D12 is connected to the CH_PD pin of the ESP8266 to enable/disable the module.
- D11 (TX) is connected to the RXD pin of the ESP8266 for serial communication.
- D10 (RX) is connected to the TXD pin of the ESP8266 for serial communication.
- D3 is connected to the CK/TX pin of the HX711 for clock input.
- D2 is connected to the DO/RX pin of the HX711 for data output.
Load Cell - Red/white/black/green
- E+ and E- are connected to the corresponding E+ and E- pins of the HX711 for excitation voltage.
- A+ and A- are connected to the corresponding A+ and A- pins of the HX711 for signal output.
HX711 Weighing Sensor Module
- VCC receives power from the Arduino's 5V output.
- GND is connected to the Arduino's ground.
- CK/TX and DO/RX are connected to the Arduino's D3 and D2 pins, respectively, for data communication.
- A+, A-, E+, and E- are connected to the corresponding pins of the Load Cell.
ESP8266 ESP-12E WiFi Module
- VCC receives power from the Arduino's 3.3V output.
- GND is connected to the Arduino's ground.
- CH_PD is connected to the Arduino's D12 pin for enabling the module.
- TXD and RXD are connected to the Arduino's D10 and D11 pins, respectively, for serial communication.
Documented Code
#include "HX711.h"
#include <SoftwareSerial.h>

// HX711 circuit wiring
const int LOADCELL_DOUT_PIN = 2;
const int LOADCELL_SCK_PIN = 3;

// ESP8266 communication pins
const int ESP8266_RX_PIN = 10;
const int ESP8266_TX_PIN = 11;

HX711 scale;
SoftwareSerial esp8266(ESP8266_RX_PIN, ESP8266_TX_PIN); // RX, TX

float initialWeight = 0;
float tareWeight = 0;
bool isTared = false;
bool isInitialWeightRecorded = false;

void setup() {
  Serial.begin(9600);
  esp8266.begin(115200); // Initialize SoftwareSerial for ESP8266

  scale.begin(LOADCELL_DOUT_PIN, LOADCELL_SCK_PIN);

  // Wait for the scale to stabilize
  delay(1000);

  // Tare the scale (set the current weight as zero)
  if (scale.is_ready()) {
    scale.set_scale();
    scale.tare();
    tareWeight = scale.get_units();
    isTared = true;
    Serial.println("Scale tared successfully.");
  } else {
    Serial.println("Error: HX711 not ready for taring.");
  }

  // Record the initial weight after taring
  if (isTared) {
    Serial.println("Place the filled container on the load cell...");
    delay(5000); // Wait for 5 seconds to place the container

    if (scale.is_ready()) {
      initialWeight = scale.get_units();
      isInitialWeightRecorded = true;
      Serial.print("Initial Weight (with water): ");
      Serial.println(initialWeight);
    } else {
      Serial.println("Error: HX711 not ready for initial weight measurement.");
    }
  }
}

void loop() {
  if (isTared && isInitialWeightRecorded) {
    if (scale.is_ready()) {
      float currentWeight = scale.get_units();
      float waterConsumed = initialWeight - currentWeight;

      Serial.print("Current Weight: ");
      Serial.println(currentWeight);
      Serial.print("Water Consumed: ");
      Serial.println(waterConsumed);

      // Send water consumption data to ESP8266
      esp8266.print("Water Consumed: ");
      esp8266.println(waterConsumed);
    } else {
      Serial.println("Error: HX711 not ready for weight measurement.");
    }
  } else {
    Serial.println("Error: Scale not properly initialized.");
  }
  delay(1000);
}
This code is designed to run on the Arduino UNO and manages the interaction between the HX711 weighing sensor, the load cell, and the ESP8266 WiFi module. It initializes the scale, tares it to zero, records the initial weight, and then continuously measures and transmits the weight data wirelessly.