
Arduino UNO-Based Solar-Powered Sensor Suite with Servo Control and LCD Feedback
View and Edit Project In Cirkit Designer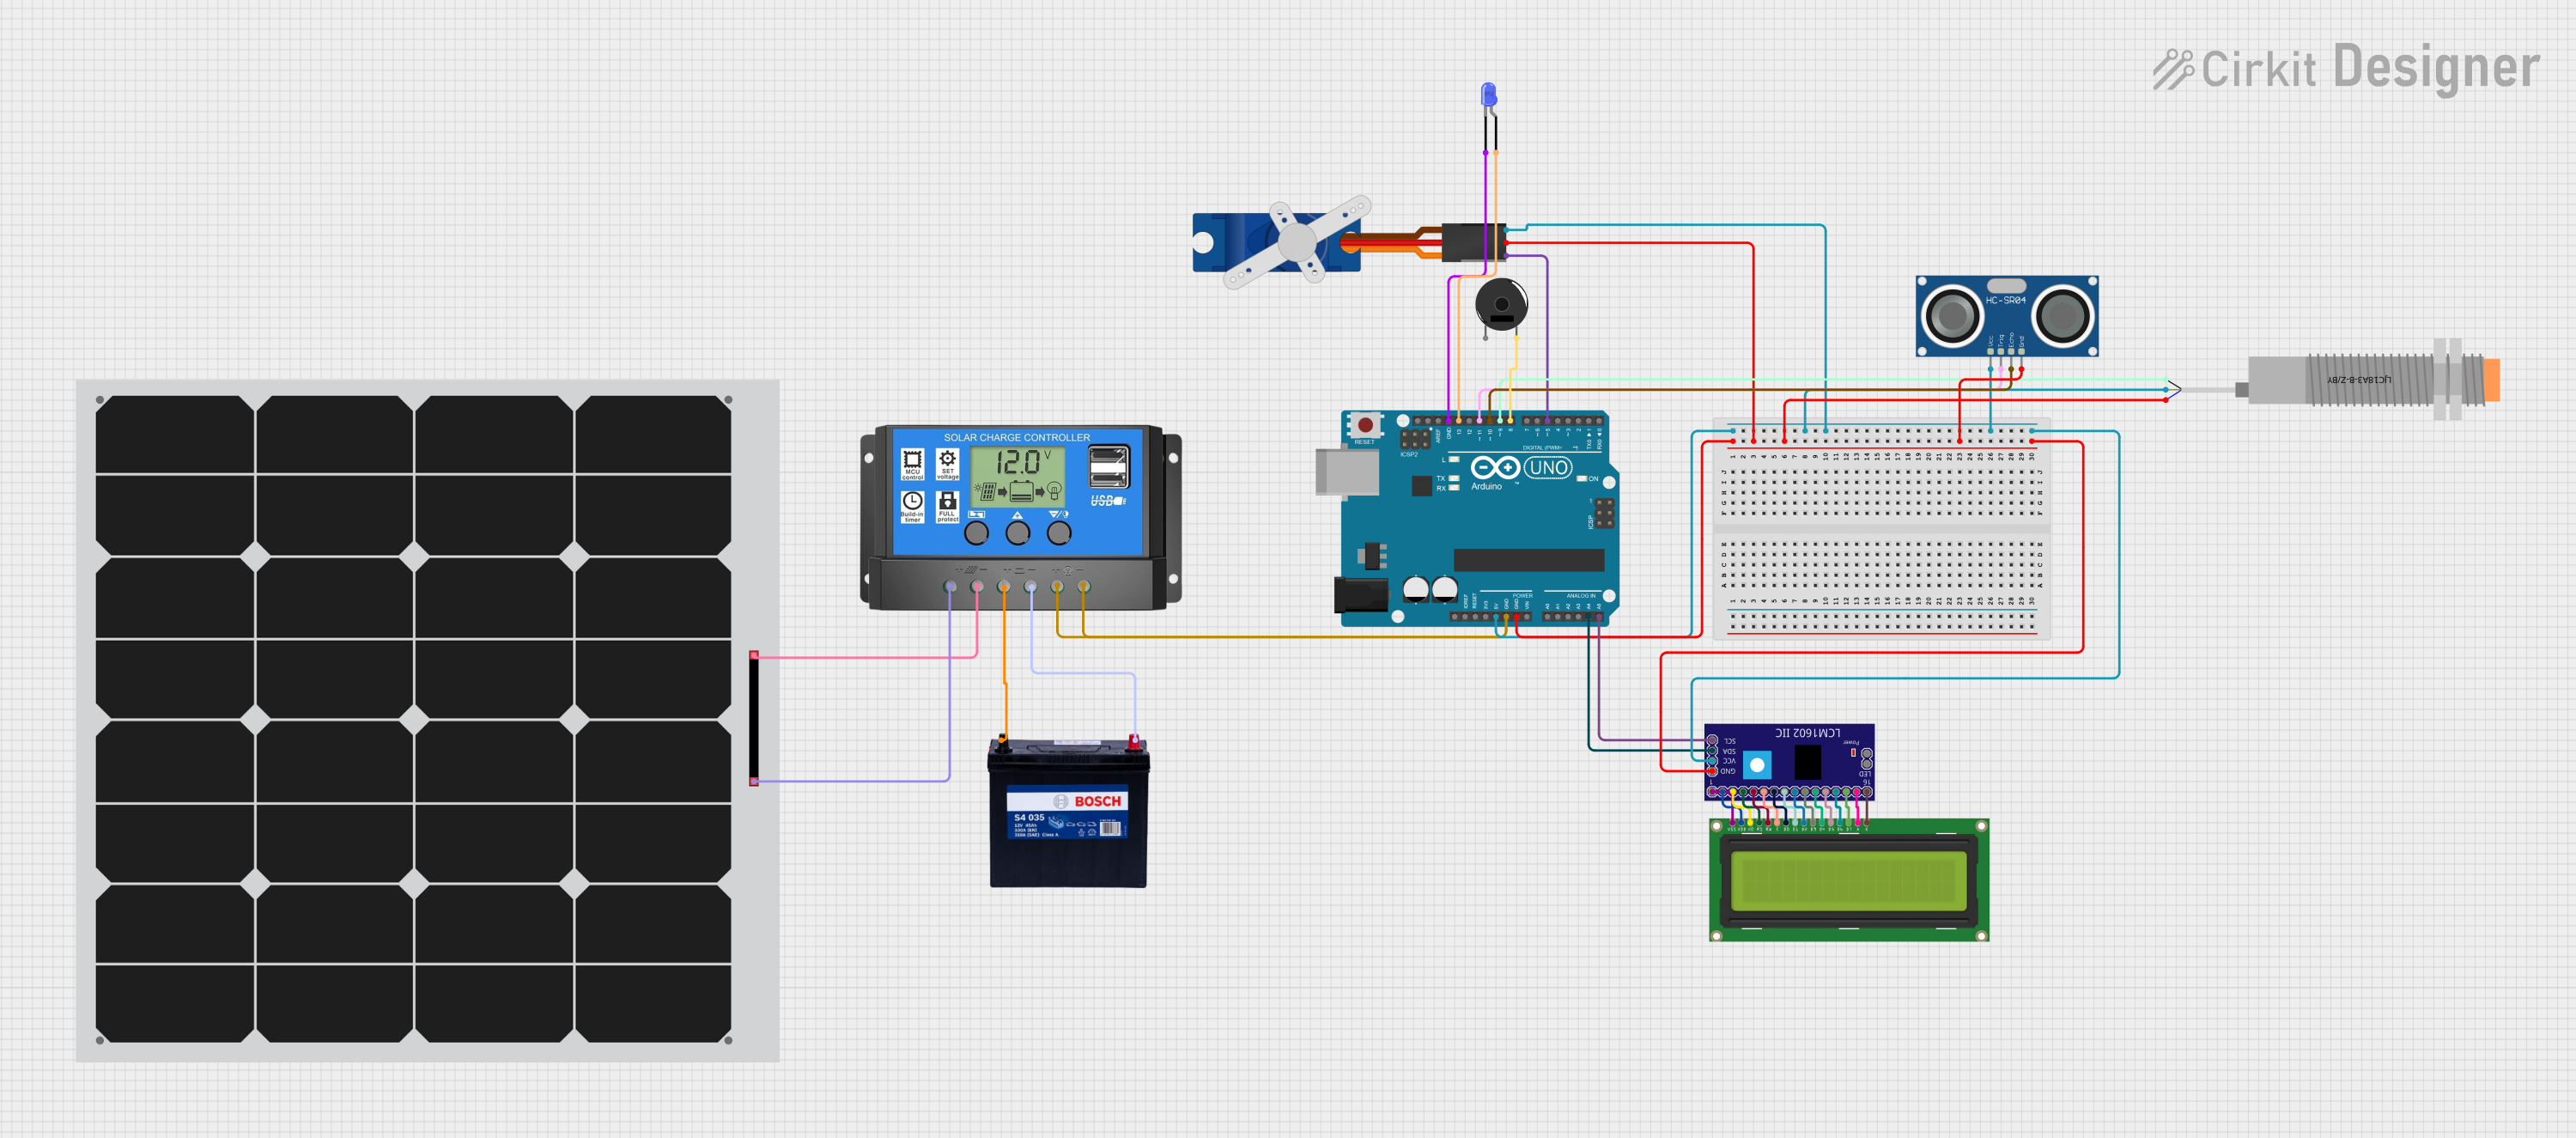
Circuit Documentation
Summary
This circuit integrates various components controlled by an Arduino UNO microcontroller to perform a range of functions. The system includes input devices like an HC-SR04 Ultrasonic Sensor and an LJC18A3-B-Z/BY Capacitive Proximity Sensor, output devices such as a Tower Pro SG90 servo, LEDs, a Piezo Buzzer, and an LCD Display interfaced through an LCM1602 IIC module. The circuit is powered by a solar panel connected to a solar charge controller, which also manages a 12V 200Ah battery. The circuit's primary purpose appears to be sensing and actuation based on input from the sensors, with visual feedback provided by the LEDs and the LCD display.
Component List
- Arduino UNO: A microcontroller board based on the ATmega328P, featuring digital and analog I/O pins.
- Tower Pro SG90 Servo: A small and lightweight servo motor for precise control movements.
- HC-SR04 Ultrasonic Sensor: A sensor for measuring distance via ultrasonic sound waves.
- LED (Blue): A blue light-emitting diode for visual signaling.
- Solar Charge Controller: A device that controls the charging of a battery from a solar panel and provides load output control.
- Solar Panel: A photovoltaic panel for converting sunlight into electrical energy.
- LCM1602 IIC: An I2C interface module for LCD displays, simplifying the connection between an LCD and a microcontroller.
- 12V 200Ah Battery: A large capacity battery for storing electrical energy.
- LCD Display 16x2: A liquid crystal display capable of showing 16 characters on 2 lines.
- LJC18A3-B-Z/BY Capacitive Proximity Sensor: A sensor that detects the presence or absence of objects using capacitive sensing technology.
- Piezo Buzzer: An electronic device that emits a tone when an electric signal is applied.
Wiring Details
Arduino UNO
- 5V: Powers the HC-SR04 Ultrasonic Sensor, LCM1602 IIC, and LJC18A3-B-Z/BY Capacitive Proximity Sensor.
- GND: Common ground for the Tower Pro SG90 servo, HC-SR04 Ultrasonic Sensor, LCM1602 IIC, LJC18A3-B-Z/BY Capacitive Proximity Sensor, and LEDs.
- A4 (SDA): Connected to the SDA pin of the LCM1602 IIC for I2C communication.
- A5 (SCL): Connected to the SCL pin of the LCM1602 IIC for I2C communication.
- D13: Connected to the anode of a blue LED.
- D11: Sends trigger signal to the HC-SR04 Ultrasonic Sensor.
- D10: Receives echo signal from the HC-SR04 Ultrasonic Sensor.
- D9: Connected to the SIG (BLK) pin of the LJC18A3-B-Z/BY Capacitive Proximity Sensor.
- D8: Connected to pin 2 of the Piezo Buzzer.
- D5: Sends control signal to the Tower Pro SG90 servo.
Tower Pro SG90 Servo
- Signal: Receives control signal from Arduino UNO (D5).
- +5V: Receives power from Arduino UNO (5V).
- GND: Connected to common ground.
HC-SR04 Ultrasonic Sensor
- VCC: Powered by Arduino UNO (5V).
- TRIG: Receives trigger signal from Arduino UNO (D11).
- ECHO: Sends echo signal to Arduino UNO (D10).
- GND: Connected to common ground.
LED (Blue)
- Anode: Connected to Arduino UNO (D13) for signaling.
- Cathode: Connected to common ground.
Solar Charge Controller
- Solar Cell +: Connected to the positive terminal of the Solar Panel.
- Solar Cell -: Connected to the negative terminal of the Solar Panel.
- Battery +: Connected to the 12V terminal of the 12V 200Ah Battery.
- Battery -: Connected to the GND terminal of the 12V 200Ah Battery.
- Load +: Connected to Arduino UNO (GND).
- Load -: Connected to Arduino UNO (GND).
Solar Panel
- +: Connected to Solar Charge Controller (Solar Cell +).
- -: Connected to Solar Charge Controller (Solar Cell -).
LCM1602 IIC
- GND: Connected to common ground.
- VCC: Powered by Arduino UNO (5V).
- SDA: Connected to Arduino UNO (A4) for I2C communication.
- SCL: Connected to Arduino UNO (A5) for I2C communication.
- Other pins: Interconnected with corresponding pins on the LCD Display 16x2 for display control.
12V 200Ah Battery
- GND: Connected to Solar Charge Controller (Battery +).
- 12V: Connected to Solar Charge Controller (Battery -).
LCD Display 16x2
- Interconnected with corresponding pins on the LCM1602 IIC for display control and power.
LJC18A3-B-Z/BY Capacitive Proximity Sensor
- VI (BRN): Powered by Arduino UNO (5V).
- VO (BLU): Connected to common ground.
- SIG (BLK): Connected to Arduino UNO (D9) for signal output.
Piezo Buzzer
- Pin 1: Connected to common ground.
- Pin 2: Connected to Arduino UNO (D8) for tone generation.
Documented Code
Arduino UNO Code (sketch.ino)
void setup() {
  // put your setup code here, to run once:

}

void loop() {
  // put your main code here, to run repeatedly:

}
Note: The provided code is a template and does not include specific functionality. It needs to be populated with the logic to control the connected components based on the desired application.