
Arduino UNO Based Hybrid Energy Management System with Solar, Battery, and Grid Power Control
View and Edit Project In Cirkit Designer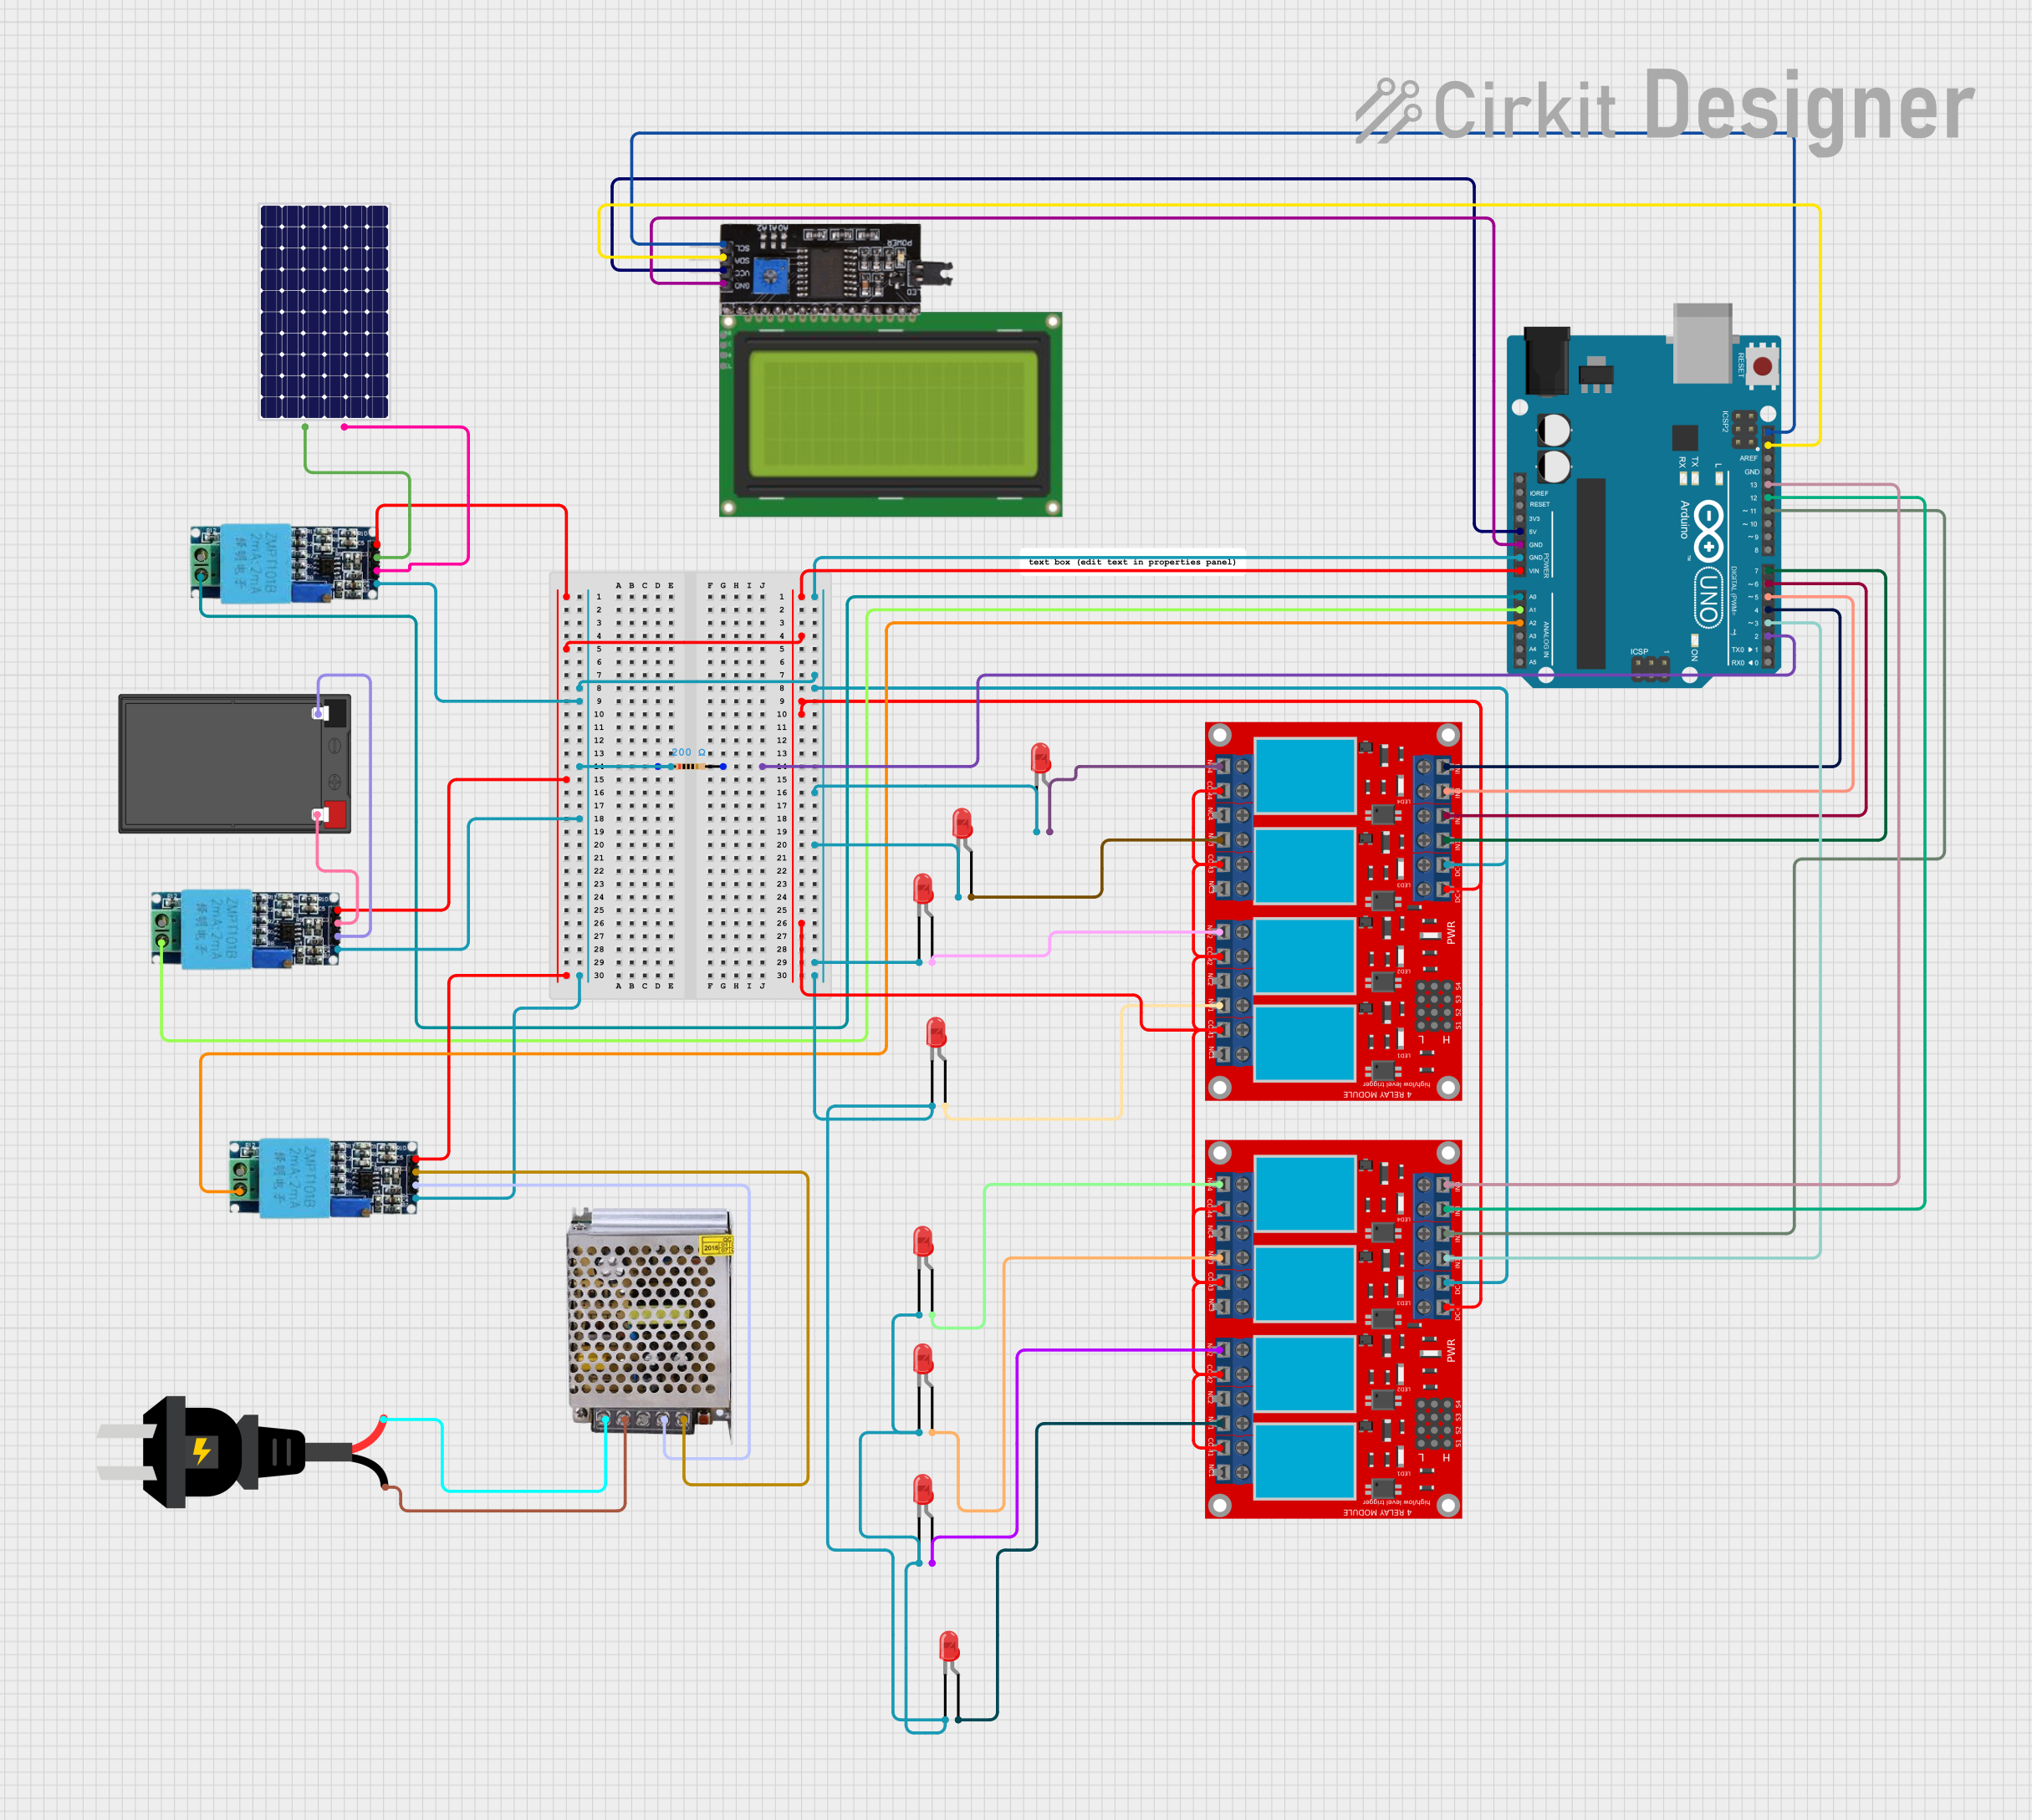
Hybrid Energy Management System Documentation
Summary
The Hybrid Energy Management System is designed to manage and distribute power from multiple sources, including solar panels, batteries, and the grid. It utilizes an Arduino UNO microcontroller to monitor voltage levels and control relays that switch between power sources based on their availability and voltage levels. The system also includes a 20x4 LCD with an I2C module for displaying voltage readings and the current power source. Voltage sensors are used to measure the voltage from the solar panel, battery, and grid. A 4-channel relay module is used to control the power flow to different loads and to manage charging. The system is powered by a 12V 5A power supply connected to an AC source.
Component List
- Arduino UNO: A microcontroller board based on the ATmega328P, used for controlling the logic of the energy management system.
- Lcd 20x4 i2c: A 20x4 character LCD display with an I2C interface, used for displaying system status and voltage readings.
- I2C module: An interface module that allows the LCD to communicate with the Arduino UNO over the I2C protocol.
- 4 channel relay module: Two modules with four relays each, used for switching between power sources and controlling power to various loads.
- Voltage Sensor: Three sensors used to measure the voltage of the solar panel, battery, and grid.
- Solar Panel: A photovoltaic panel used to convert solar energy into electrical energy.
- Battery: An energy storage device used to store electrical energy for later use.
- POWER SUPPLY 12V 5AMP: A power supply unit that converts AC to 12V 5A DC, used to power the system.
- AC source: The main AC power source for the system.
- Resistor (200 Ohms): A resistor used in the circuit for current limiting or voltage division.
- LED: Two Pin (red): Eight LEDs used as indicators in the system.
Wiring Details
Arduino UNO
- Vin: Connected to the Vcc of all Voltage Sensors and VCC+ of both 4-channel relay modules.
- GND: Common ground for the system, connected to the GND of the I2C module, VCC- (GND) of both 4-channel relay modules, and cathodes of all LEDs.
- 5V: Powers the I2C module.
- A0, A1, A2: Analog inputs connected to the Phase pin of each Voltage Sensor for solar, battery, and grid voltage monitoring.
- D2: Digital output connected to one end of a 200 Ohm resistor, the other end connected to the anode of an LED.
- D3, D4, D5, D6, D7, D11, D12, D13: Digital outputs controlling the IN 1-4 pins of both 4-channel relay modules.
- SCL, SDA: I2C communication pins connected to the SCL and SDA pins of the I2C module.
Lcd 20x4 i2c
- GND: Connected to the system ground.
- 5v: Powered by the 5V output from the Arduino UNO.
- SCA, SCL: Connected to the corresponding SDA and SCL pins on the I2C module.
I2C module
- SCL, SDA: Connected to the corresponding SCL and SDA pins on the Arduino UNO.
- VCC: Powered by the 5V output from the Arduino UNO.
- GND: Connected to the system ground.
4 channel relay module (x2)
- VCC+: Powered by the Vin of the Arduino UNO.
- VCC- (GND): Connected to the system ground.
- IN 1-4: Controlled by digital outputs D3-D7 and D11-D13 on the Arduino UNO.
- COM 1-4: Common terminals for relay switches, connected to the VCC+.
- N.O. 1-4: Normally open contacts of the relays, connected to the anodes of the LEDs.
Voltage Sensor (x3)
- Vcc: Powered by the Vin of the Arduino UNO.
- Ground: Connected to the system ground.
- Phase: Connected to the A0, A1, and A2 analog inputs on the Arduino UNO for solar, battery, and grid voltage monitoring.
- Out: Output of the voltage sensor, connected to the positive terminals of the solar panel, battery, and 12V-24V Output (DC) of the power supply.
- Gnd: Connected to the negative terminals of the solar panel, battery, and GND (DC) of the power supply.
Solar Panel
- +: Connected to the Out pin of the corresponding Voltage Sensor.
- -: Connected to the Gnd pin of the corresponding Voltage Sensor.
Battery
- +: Connected to the Out pin of the corresponding Voltage Sensor.
- -: Connected to the Gnd pin of the corresponding Voltage Sensor.
POWER SUPPLY 12V 5AMP
- 220V Positive Pole (AC): Connected to the + pin of the AC source.
- 220V Negative Pole (AC): Connected to the - pin of the AC source.
- GND (DC): Connected to the Gnd pin of the corresponding Voltage Sensor.
- 12V-24V Output (DC): Connected to the Out pin of the corresponding Voltage Sensor.
AC source
- +: Connected to the 220V Positive Pole (AC) of the power supply.
- -: Connected to the 220V Negative Pole (AC) of the power supply.
Resistor (200 Ohms)
- pin1: Connected to the D2 digital output on the Arduino UNO.
- pin2: Connected to the anode of an LED.
LED: Two Pin (red) (x8)
- cathode: Connected to the system ground.
- anode: Connected to the N.O. contacts of the relays in the 4-channel relay modules.
Documented Code
Arduino UNO Code (sketch.ino)
#include <Wire.h>
#include <LiquidCrystal_I2C.h>

LiquidCrystal_I2C lcd(0x27, 20, 4);

const int solarPin = A0;
const int batteryPin = A1;
const int gridPin = A2;

const int relaySolar = 13;
const int relayBattery = 12;
const int relayGrid = 11;
const int relayHighLoad = 7;
const int relayNormalLoad = 6;
const int relayLowLoad = 5;
const int Gcharge = 4;
const int Scharge = 3;
const int Emer = 1;

float solarVoltage, batteryVoltage, gridVoltage;

void setup() {
  Serial.begin(9600);
  lcd.backlight();
  lcd.begin(20, 4);
  lcd.init();

  lcd.setCursor(0, 1);
  lcd.print("HYBRID ENERGY SMART");
  lcd.setCursor(5, 2);
  lcd.print("MANAGEMENT");
  delay(2000);

  pinMode(relaySolar, OUTPUT);
  pinMode(relayBattery, OUTPUT);
  pinMode(relayGrid, OUTPUT);
  pinMode(relayHighLoad, OUTPUT);
  pinMode(relayNormalLoad, OUTPUT);
  pinMode(relayLowLoad, OUTPUT);
  pinMode(Gcharge, OUTPUT);
  pinMode(Scharge, OUTPUT);
  pinMode(Emer, OUTPUT);

  digitalWrite(relaySolar, HIGH);
  digitalWrite(relayBattery, HIGH);
  digitalWrite(relayGrid, HIGH);
  digitalWrite(relayHighLoad, HIGH);
  digitalWrite(relayNormalLoad, HIGH);
  digitalWrite(relayLowLoad, HIGH);
  digitalWrite(Gcharge, HIGH);
  digitalWrite(Scharge, HIGH);
  digitalWrite(Emer, HIGH);
}

void loop() {
  solarVoltage = analogRead(solarPin) * (5.0 / 1023.0) * (26.0 / 5.0);
  batteryVoltage = analogRead(batteryPin) * (5.0 / 1023.0) * (23.5 / 5.0);
  gridVoltage = analogRead(gridPin) * (5.0 / 1023.0) * (23.5 / 5.0);

  lcd.clear();
  lcd.setCursor(0, 0);
  lcd.print("Solar: ");
  lcd.print(solarVoltage, 2);
  lcd.print("V");

  lcd.setCursor(0, 1);
  lcd.print("Battery: ");
  lcd.print(batteryVoltage, 2);
  lcd.print("V");

  lcd.setCursor(0, 2);
  lcd.print("Grid: ");
  lcd.print(gridVoltage, 2);
  lcd.print("V");

  // Logic for selecting the power source based on voltage levels
  // and controlling the relays accordingly.
  // The LCD displays the current power source and voltage levels.
  // The system prioritizes solar power, then battery, and finally grid power.
  // It also manages the charging of the battery and the distribution of power
  // to high, normal, and low load circuits.

  delay(1000);
}
Additional Notes
The provided code snippet is a simplified version of the full program. It includes