
Arduino Nano-Based OLED Clock with RTC and LiPo Battery Charging
View and Edit Project In Cirkit Designer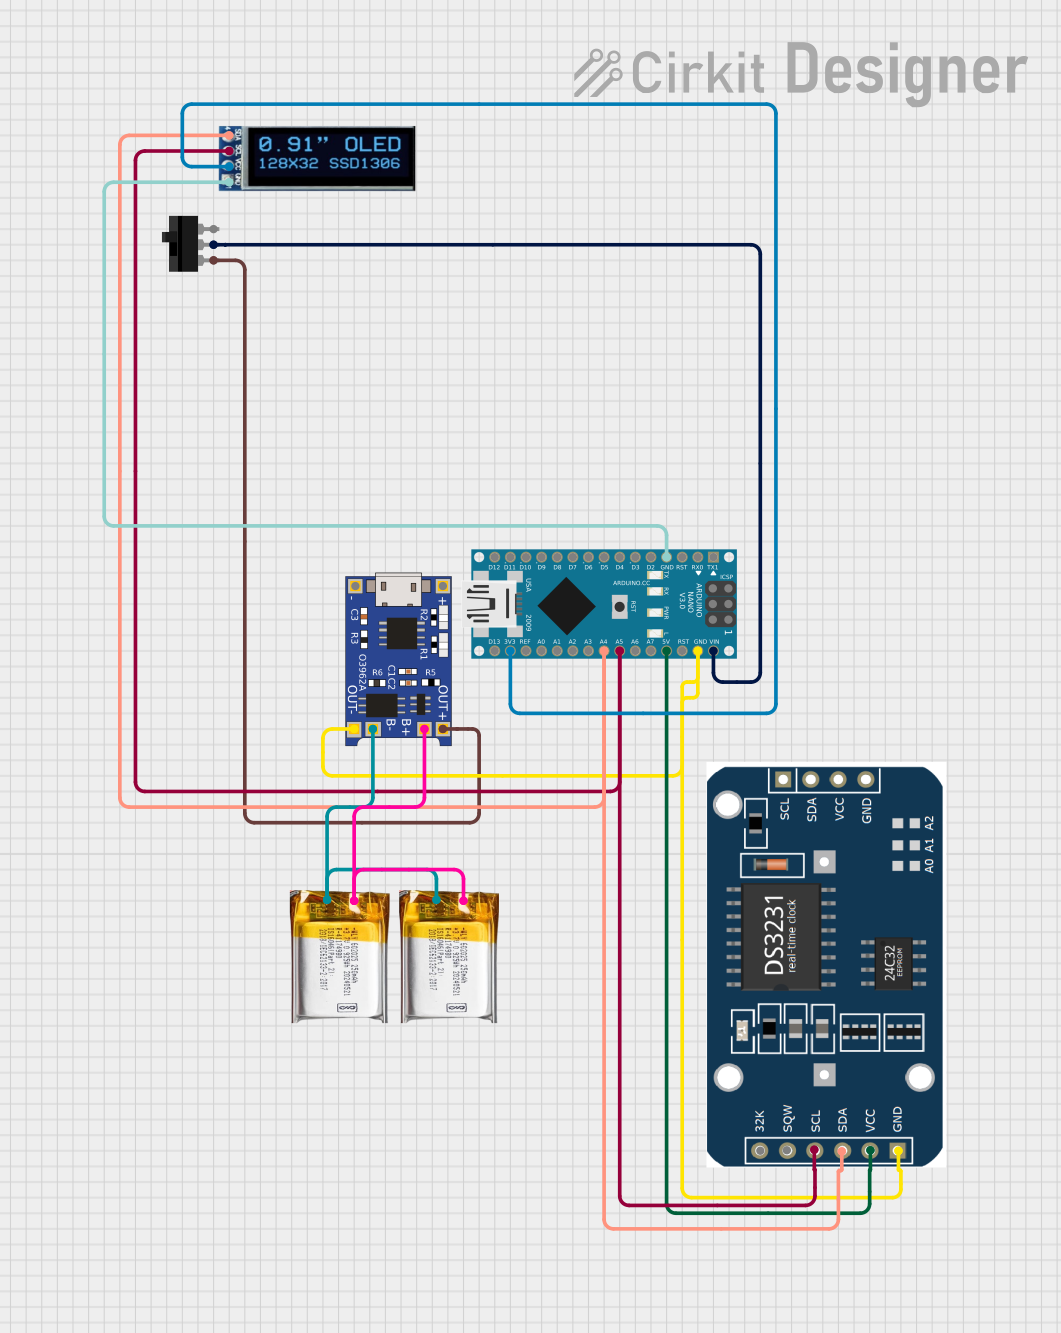
Circuit Documentation
Summary
This circuit is designed to create an OLED clock using an Arduino Nano as the main microcontroller. The clock time is maintained by an RTC (Real-Time Clock) module and displayed on an OLED screen. The circuit is powered by a 3.7V LiPo battery, which is charged and protected by a TP4056 charging module. A toggle switch is included to control the power supply to the Arduino Nano.
Component List
Arduino Nano
- Microcontroller board based on the ATmega328P
- It has a variety of digital and analog I/O pins
- Capable of I2C communication
TP4056
- Lithium Battery Charger module
- Provides charging and protection for the LiPo battery
- Has designated pins for battery input and charging output
OLED Display (128x32)
- Small display for visual output
- Communicates over I2C
- Powered by 3.3V
Toggle Switch
- Single-pole double-throw (SPDT) switch
- Used to control the power supply to the Arduino Nano
RTC Module
- Maintains accurate time
- Communicates with the Arduino Nano via I2C
- Powered by 5V from the Arduino Nano
3.7V LiPo Battery
- Provides power to the circuit
- Connected to the TP4056 for charging
Wiring Details
Arduino Nano
GNDconnected to OLED Display GND and RTC Module GNDVINconnected to Toggle Switch COM5Vconnected to RTC Module VCC3V3connected to OLED Display VCCA5connected to RTC Module SCL and OLED Display SCLA4connected to RTC Module SDA and OLED Display SDA
TP4056
OUT-connected to RTC Module GND and Arduino Nano GNDB+connected to both 3.7V LiPo batteries +VeB-connected to both 3.7V LiPo batteries GNDOUT+connected to Toggle Switch L1
OLED Display (128x32)
SDAconnected to Arduino Nano A4 and RTC Module SDASCLconnected to Arduino Nano A5 and RTC Module SCLVCCconnected to Arduino Nano 3V3GNDconnected to Arduino Nano GND
Toggle Switch
COMconnected to Arduino Nano VINL1connected to TP4056 OUT+
RTC Module
SCLconnected to Arduino Nano A5 and OLED Display SCLSDAconnected to Arduino Nano A4 and OLED Display SDAVCCconnected to Arduino Nano 5VGNDconnected to Arduino Nano GND
3.7V LiPo Battery
+Veconnected to TP4056 B+GNDconnected to TP4056 B-
Documented Code
/*
 * This Arduino Nano code was developed by newbiely.com
 *
 * This Arduino Nano code is made available for public use without any restriction
 *
 * For comprehensive instructions and wiring diagrams, please visit:
 * https://newbiely.com/tutorials/arduino-nano/arduino-nano-oled-clock
 */

#include <Wire.h>
#include <Adafruit_GFX.h>
#include <Adafruit_SSD1306.h>
#include <RTClib.h>

#define OLED_WIDTH 128 // OLED display width,  in pixels
#define OLED_HEIGHT 32 // OLED display height, in pixels

Adafruit_SSD1306 oled(OLED_WIDTH, OLED_HEIGHT, &Wire, -1); // create SSD1306 display object connected to I2C
RTC_DS3231 rtc;

String time;

void setup() {
  Serial.begin(9600);

  // initialize OLED display with address 0x3C for 128x64
  if (!oled.begin(SSD1306_SWITCHCAPVCC, 0x3C)) {
    Serial.println(F("SSD1306 allocation failed"));
    while (true);
  }

  delay(2000);         // wait for initializing
  oled.clearDisplay(); // clear display

  oled.setTextSize(2);          // text size
  oled.setTextColor(WHITE);     // text color
  oled.setCursor(0, 10);        // position to display

  // SETUP RTC MODULE
  if (! rtc.begin()) {
    Serial.println("Couldn't find RTC");
    Serial.flush();
    while (true);
  }

  // automatically sets the RTC to the date & time on PC this sketch was compiled
  rtc.adjust(DateTime(F(__DATE__), F(__TIME__)));
  time.reserve(10); // to avoid fragmenting memory when using String
}

void loop() {
  DateTime now = rtc.now();

  time = "";
  time += now.hour();
  time += ':';
  time += now.minute();
  time += ':';
  time += now.second();

  oled_display_center(time);
}

void oled_display_center(String text) {
  int16_t x1;
  int16_t y1;
  uint16_t width;
  uint16_t height;

  oled.getTextBounds(text, 0, 0, &x1, &y1, &width, &height);

  // center the display both horizontally and vertically
  oled.clearDisplay(); // clear display
  oled.setCursor((OLED_WIDTH - width) / 2, (OLED_HEIGHT - height) / 2);
  oled.println(text); // text to display
  oled.display();
}
This code initializes the OLED display and RTC module, then enters a loop where it continuously updates the display with the current time. The oled_display_center function is used to center the text on the OLED screen.