
Circuit Documentation
Summary
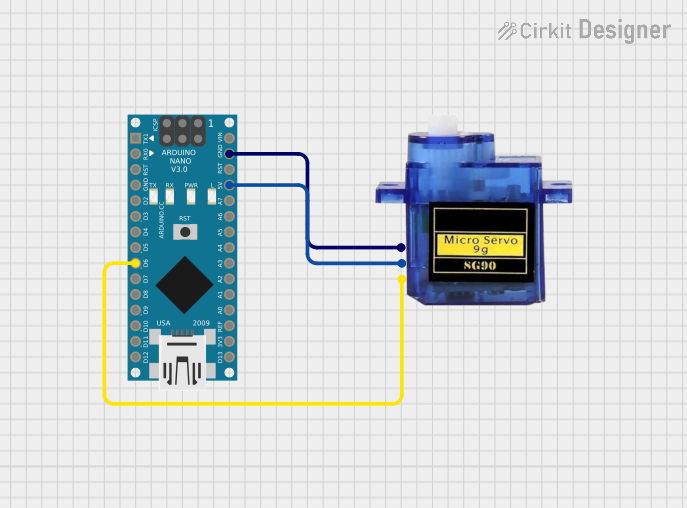
This circuit consists of two Arduino Nano microcontrollers and a Micro Servo 9G. The primary function of the circuit is to control the Micro Servo 9G using one of the Arduino Nano boards. The servo is connected to the Arduino Nano and is programmed to sweep back and forth between 0 and 180 degrees.
Component List
Arduino Nano
- Description: A small, complete, and breadboard-friendly board based on the ATmega328P.
- Pins: D1/TX, D0/RX, RESET, GND, D2, D3, D4, D5, D6, D7, D8, D9, D10, D11/MOSI, D12/MISO, VIN, 5V, A7, A6, A5, A4, A3, A2, A1, A0, AREF, 3V3, D13/SCK
Arduino Nano
- Description: A small, complete, and breadboard-friendly board based on the ATmega328P.
- Pins: D1/TX, D0/RX, RESET, GND, D2, D3, D4, D5, D6, D7, D8, D9, D10, D11/MOSI, D12/MISO, VIN, 5V, A7, A6, A5, A4, A3, A2, A1, A0, AREF, 3V3, D13/SCK
Micro Servo 9G
- Description: A small and lightweight servo motor with high output power.
- Pins: GND, +5V, PWM
Wiring Details
Arduino Nano (1)
- D6: Connected to PWM of Micro Servo 9G
- GND: Connected to GND of Micro Servo 9G
- 5V: Connected to +5V of Micro Servo 9G
Arduino Nano (2)
- No connections specified in the net list.
Micro Servo 9G
- PWM: Connected to D6 of Arduino Nano (1)
- GND: Connected to GND of Arduino Nano (1)
- +5V: Connected to 5V of Arduino Nano (1)
Code Documentation
Arduino Nano (1)
/*
 * This Arduino Sketch controls a Micro Servo 9G connected to pin D6 of an
 * Arduino Nano. The servo will sweep back and forth between 0 and 180 degrees.
 */

#include <Servo.h>

Servo myServo;  // create servo object to control a servo

void setup() {
  myServo.attach(6);  // attaches the servo on pin D6 to the servo object
}

void loop() {
  for (int pos = 0; pos <= 180; pos += 1) { // goes from 0 to 180 degrees
    myServo.write(pos);  // tell servo to go to position in variable 'pos'
    delay(15);  // waits 15ms for the servo to reach the position
  }
  for (int pos = 180; pos >= 0; pos -= 1) { // goes from 180 to 0 degrees
    myServo.write(pos);  // tell servo to go to position in variable 'pos'
    delay(15);  // waits 15ms for the servo to reach the position
  }
}
Arduino Nano (2)
void setup() {
  // put your setup code here, to run once:

}

void loop() {
  // put your main code here, to run repeatedly:

}
Additional Documentation
No additional code or documentation provided for Arduino Nano (2).