
Arduino UNO Controlled RGB LED, Vibration Motor, and Bluetooth Communication System
View and Edit Project In Cirkit Designer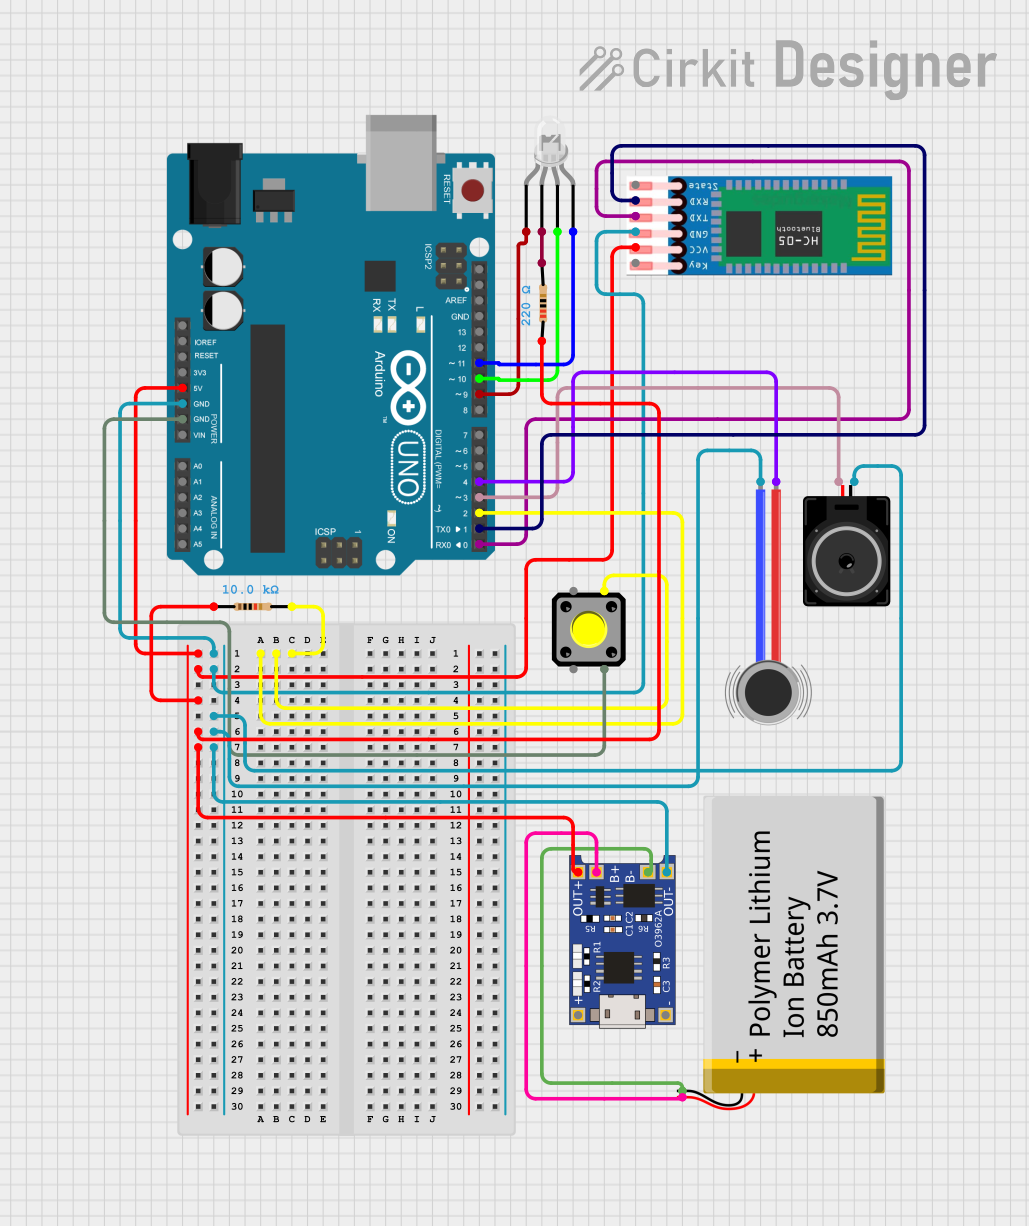
Circuit Documentation
Summary of the Circuit
This circuit is designed around an Arduino UNO microcontroller, which serves as the central processing unit for controlling various peripherals including an RGB LED (Common Cathode), a vibration motor, a loudspeaker, a pushbutton, and an HC-05 Bluetooth module. The circuit is powered by a Polymer Lithium Ion Battery, which is managed by a TP4056 charging module. The circuit includes resistors for current limiting and input pull-up configurations. The purpose of the circuit is not explicitly defined, but it appears to be a multi-functional prototype with capabilities for wireless communication, audio and haptic feedback, and user input.
Component List
Arduino UNO
- Microcontroller board based on the ATmega328P
- Provides digital and analog I/O pins
- Can be programmed via USB connection
LED: Four Pin (Common Cathode)
- RGB LED with a common cathode configuration
- Requires current-limiting resistors to prevent damage
Resistor (220 Ohms)
- Used for current limiting, typically for LEDs
Resistor (10k Ohms)
- Often used as a pull-up resistor or for other voltage-dividing applications
Vibration Motor
- Provides haptic feedback
- Driven by a digital output from the Arduino
TP4056
- Lithium battery charging module
- Manages charging and safe power delivery from the battery
Pushbutton
- User input device
- Can be configured as a momentary switch
HC-05
- Bluetooth module for wireless communication
- Interfaces with the Arduino via serial communication
Loudspeaker
- Audio output device
- Driven by a digital or PWM output from the Arduino
Polymer Lithium Ion Battery - 850mAh
- Provides power to the circuit
- Rechargeable via the TP4056 module
Wiring Details
Arduino UNO
D2connected to a 10k Ohm resistor and pushbutton5Vconnected to HC-05 VCC, 220 Ohm resistor, and TP4056 OUT+GNDconnected to HC-05 GND, loudspeaker, vibration motor, TP4056 OUT-, and pushbuttonD11connected to the blue anode of the RGB LEDD10connected to the green anode of the RGB LEDD9connected to the red anode of the RGB LEDD4connected to the vibration motor POSD3connected to the loudspeakerD1connected to HC-05 RXDD0connected to HC-05 TXD
LED: Four Pin (Common Cathode)
red anodeconnected to ArduinoD9common cathodeconnected to a 220 Ohm resistorgreen anodeconnected to ArduinoD10blue anodeconnected to ArduinoD11
Resistor (220 Ohms)
- One pin connected to the common cathode of the RGB LED
- Other pin connected to Arduino
GND
Resistor (10k Ohms)
- One pin connected to Arduino
5V - Other pin connected to Arduino
D2and pushbutton
Vibration Motor
POSconnected to ArduinoD4NEGconnected to ArduinoGND
TP4056
OUT-connected to ArduinoGNDB-connected to batteryGNDB+connected to batteryVCCOUT+connected to Arduino5V
Pushbutton
- One side connected to Arduino
D2and 10k Ohm resistor - Other side connected to Arduino
GND
HC-05
ENnot connectedVCCconnected to Arduino5VGNDconnected to ArduinoGNDTXDconnected to ArduinoD0RXDconnected to ArduinoD1STATEnot connected
Loudspeaker
- One pin connected to Arduino
D3 - Other pin connected to Arduino
GND
Polymer Lithium Ion Battery - 850mAh
GNDconnected to TP4056B-VCCconnected to TP4056B+
Documented Code
Arduino UNO Code (sketch.ino)
void setup() {
  // put your setup code here, to run once:

}

void loop() {
  // put your main code here, to run repeatedly:

}
Note: The provided code is a template and does not include any functionality. It needs to be populated with the logic to control the peripherals based on the requirements of the project.