
Arduino UNO Based I2C LCD Calculator with 4x4 Keypad Interface
View and Edit Project In Cirkit Designer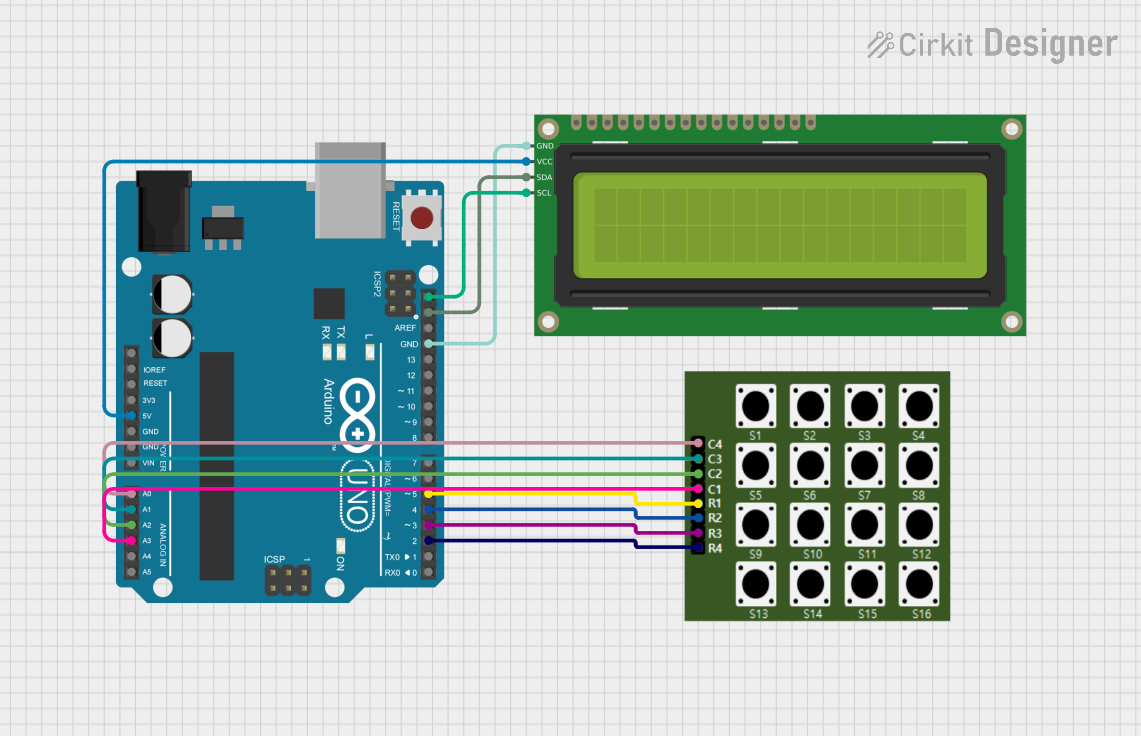
Circuit Documentation
Summary of the Circuit
This circuit consists of an Arduino UNO microcontroller, a 4x4 keypad, and a 16x2 I2C LCD display. The Arduino UNO serves as the central processing unit, interfacing with the keypad for user input and controlling the LCD display to provide visual feedback. The keypad allows for user interaction, enabling the input of numbers and commands. The LCD display shows information to the user, such as the numbers entered on the keypad and the results of any calculations or commands processed by the Arduino.
Component List
Arduino UNO
- Description: A microcontroller board based on the ATmega328P.
- Purpose: Acts as the central processing unit for the circuit, reading inputs from the keypad and controlling the output on the LCD display.
4x4 Keypad
- Description: A matrix keypad with 16 buttons arranged in 4 rows and 4 columns.
- Purpose: Provides a user interface for inputting numbers and commands into the system.
16x2 I2C LCD
- Description: A liquid crystal display with 16 characters per line and 2 lines, with an I2C interface for communication.
- Purpose: Displays information to the user, including input from the keypad and results from the Arduino's processing.
Wiring Details
Arduino UNO
- 5V connected to 16x2 I2C LCD VCC
- GND connected to 16x2 I2C LCD GND
- A0 connected to 4x4 Keypad C4
- A1 connected to 4x4 Keypad C3
- A2 connected to 4x4 Keypad C2
- A3 connected to 4x4 Keypad C1
- D2 connected to 4x4 Keypad R4
- D3 connected to 4x4 Keypad R3
- D4 connected to 4x4 Keypad R2
- D5 connected to 4x4 Keypad R1
- SDA connected to 16x2 I2C LCD SDA
- SCL connected to 16x2 I2C LCD SCL
4x4 Keypad
- C1 connected to Arduino UNO A3
- C2 connected to Arduino UNO A2
- C3 connected to Arduino UNO A1
- C4 connected to Arduino UNO A0
- R1 connected to Arduino UNO D5
- R2 connected to Arduino UNO D4
- R3 connected to Arduino UNO D3
- R4 connected to Arduino UNO D2
16x2 I2C LCD
- VCC connected to Arduino UNO 5V
- GND connected to Arduino UNO GND
- SDA connected to Arduino UNO SDA
- SCL connected to Arduino UNO SCL
Documented Code
#include <Wire.h>               // Include the I2C library
#include <LiquidCrystal_I2C.h>   // Include the I2C LCD library

/* Display */
LiquidCrystal_I2C lcd(0x27, 16, 2);  // I2C address of the LCD (0x27 is common), and 16 columns and 2 rows

/* Keypad setup */
const byte KEYPAD_ROWS = 4;
const byte KEYPAD_COLS = 4;
byte rowPins[KEYPAD_ROWS] = {5, 4, 3, 2}; // Connect to the row pins of the keypad
byte colPins[KEYPAD_COLS] = {A3, A2, A1, A0}; // Connect to the column pins of the keypad
char keys[KEYPAD_ROWS][KEYPAD_COLS] = {
  {'1', '2', '3', '+'},
  {'4', '5', '6', '-'},
  {'7', '8', '9', '*'},
  {'.', '0', '=', '/'}
};

Keypad keypad = Keypad(makeKeymap(keys), rowPins, colPins, KEYPAD_ROWS, KEYPAD_COLS);

String memory = "";
String current = "";
char operation = 0;

void showSplashScreen() {
  lcd.clear();
  lcd.print("GoodArduinoCode");
  lcd.setCursor(0, 1);
  String message = "Calculator";
  for (byte i = 0; i < message.length(); i++) {
    lcd.print(message[i]);
    delay(50);
  }
  delay(500);
}

void updateCursor() {
  if (millis() / 250 % 2 == 0 ) {
    lcd.cursor();
  } else {
    lcd.noCursor();
  }
}

void setup() {
  lcd.begin(16, 2);           // Initialize the LCD with 16 columns and 2 rows
  showSplashScreen();
  lcd.clear();
  lcd.cursor();
  lcd.setCursor(1, 0);
}

double calculate(char operation, double left, double right) {
  switch (operation) {
    case '+': return left + right;
    case '-': return left - right;
    case '*': return left * right;
    case '/': return left / right;
    default: return 0;
  }
}

void processInput(char key) {
  if ('-' == key && current == "") {
    current = "-";
    lcd.print("-");
    return;
  }

  switch (key) {
    case '+':
    case '-':
    case '*':
    case '/':
      if (!operation) {
        memory = current;
        current = "";
      }
      operation = key;
      lcd.setCursor(0, 1);
      lcd.print(key);
      lcd.setCursor(current.length() + 1, 1);
      return;

    case '=':
      if (memory != "" && current != "" && operation) {
        double leftNum = memory.toDouble();
        double rightNum = current.toDouble();
        memory = String(calculate(operation, leftNum, rightNum));
        current = "";
        lcd.clear();
        lcd.setCursor(1, 0);
        lcd.print(memory);
        lcd.setCursor(0, 1);
        lcd.print(operation);
      }
      return;
  }

  if ('.' == key && current.indexOf('.') >= 0) {
    return;
  }

  if ('.' != key && current == "0") {
    current = String(key);
  } else if (key) {
    current += String(key);
  }

  lcd.print(key);
}

void loop() {
  updateCursor();
  char key = keypad.getKey();
  if (key) {
    processInput(key);
  }
}
This code is designed to run on the Arduino UNO and interfaces with both the 4x4 keypad and the 16x2 I2C LCD. It includes a simple calculator application that allows the user to input numbers and basic arithmetic operations. The LCD displays the input and the result of the calculations. The code is structured with initialization in the setup() function, continuous input processing in the loop() function, and helper functions to handle specific tasks such as displaying the splash screen, updating the cursor, and performing calculations.