Arduino UNO-Based Automated Irrigation System with Soil Moisture Sensor and LCD Display
Circuit Documentation
Summary
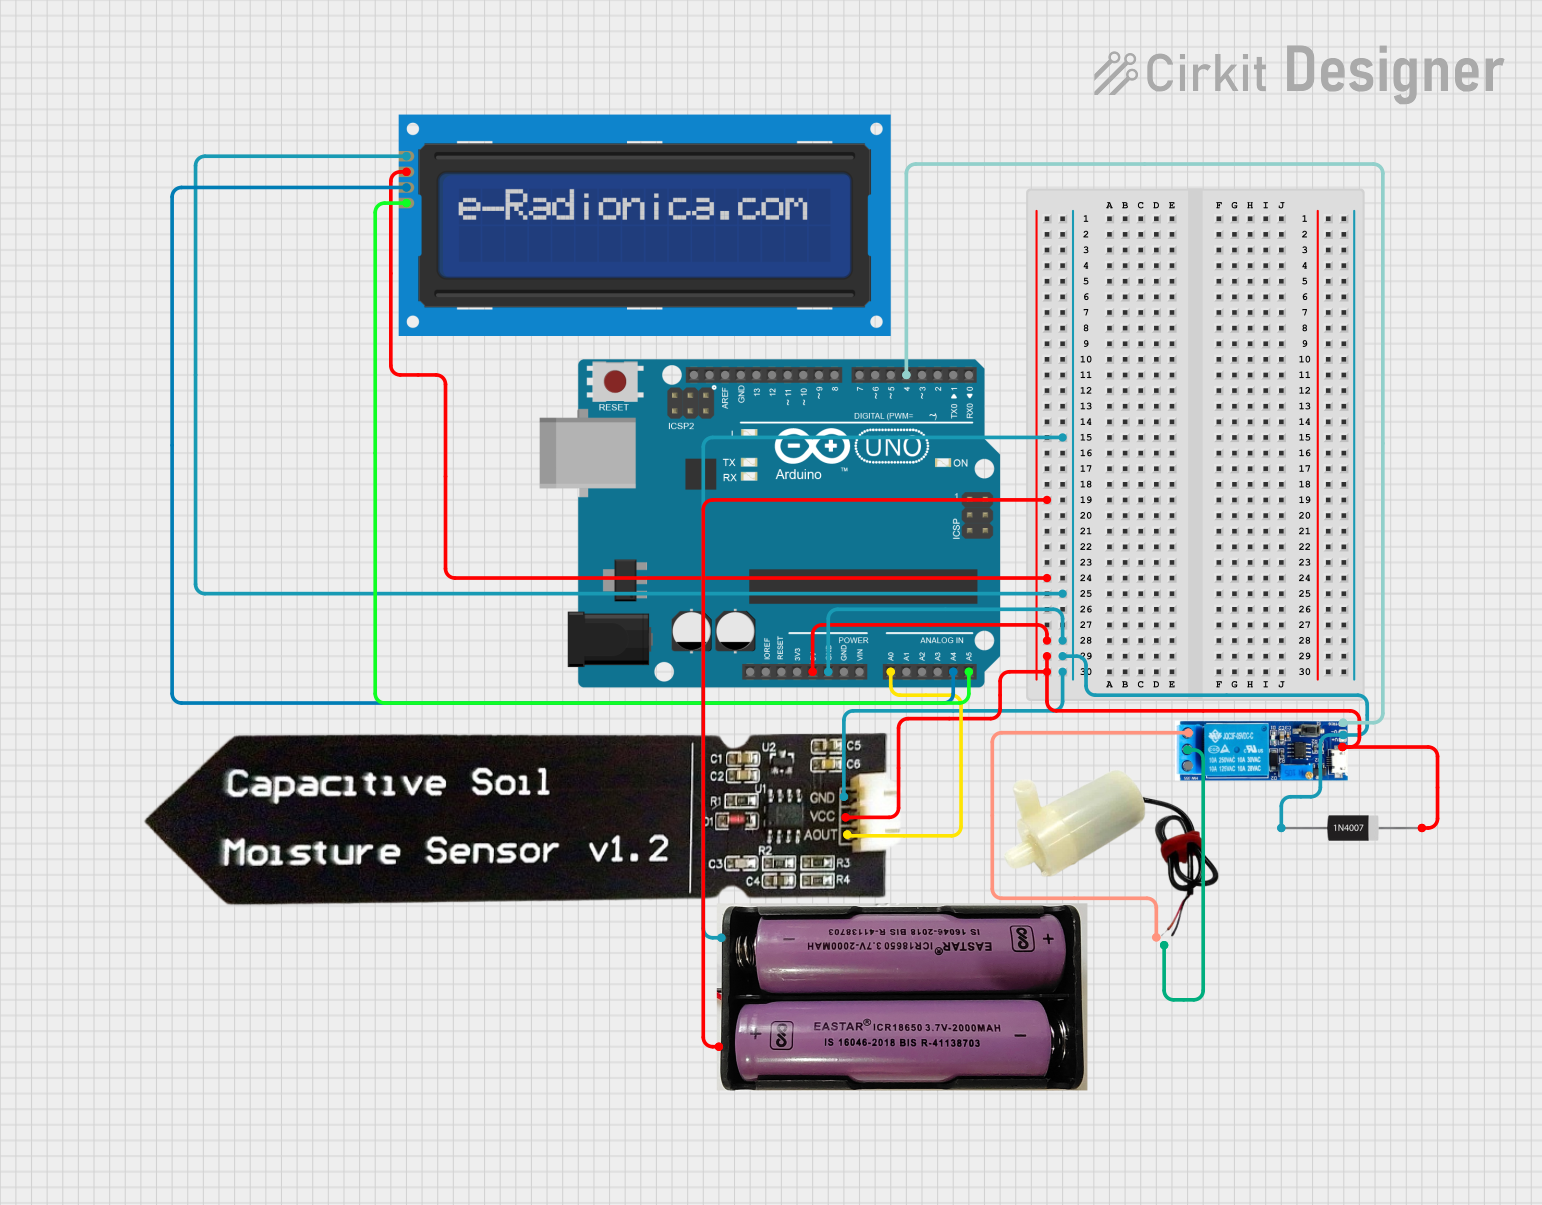
This circuit is an automated irrigation system that uses an Arduino UNO to control a water pump based on soil moisture levels. The system includes a capacitive soil moisture sensor, a relay module, a 5V mini water pump, an LCD screen for displaying information, and a 7.4V power source. The Arduino reads the soil moisture level and activates the water pump via the relay module when the soil is dry. The LCD screen displays the current moisture level and the irrigation status.
Component List
Arduino UNO
- Description: A microcontroller board based on the ATmega328P.
- Pins: UNUSED, IOREF, Reset, 3.3V, 5V, GND, Vin, A0, A1, A2, A3, A4, A5, SCL, SDA, AREF, D13, D12, D11, D10, D9, D8, D7, D6, D5, D4, D3, D2, D1, D0
Relay Module 5V-30V
- Description: A relay module used to control high voltage devices with a low voltage signal.
- Pins: common contact, normally open, normally closed, trigger, V-, V+
Capacitive Soil Moisture Sensor V1.2
- Description: A sensor that measures soil moisture levels.
- Pins: GND, VCC, AOUT
5V Mini Water Pump
- Description: A small water pump powered by 5V.
- Pins: positive pin, negative pin
1N4007 Rectifier Diode
- Description: A diode used for rectification purposes.
- Pins: Cathode, Anode
LCD Screen 16x2 I2C
- Description: A 16x2 character LCD screen with I2C interface.
- Pins: SCL, SDA, VCC, GND
7.4V Power Source
- Description: A 7.4V power source.
- Pins: +, -
Wiring Details
Arduino UNO
- GND: Connected to GND of the 7.4V power source, LCD screen, relay module, diode, and soil moisture sensor.
- 5V: Connected to VCC of the 7.4V power source, LCD screen, relay module, diode, and soil moisture sensor.
- A0: Connected to AOUT of the soil moisture sensor.
- A4: Connected to SDA of the LCD screen.
- A5: Connected to SCL of the LCD screen.
- D4: Connected to trigger of the relay module.
Relay Module 5V-30V
- V-: Connected to GND of the 7.4V power source.
- V+: Connected to VCC of the 7.4V power source.
- trigger: Connected to D4 of the Arduino UNO.
- common contact: Connected to the negative pin of the water pump.
- normally open: Connected to the positive pin of the water pump.
Capacitive Soil Moisture Sensor V1.2
- GND: Connected to GND of the 7.4V power source.
- VCC: Connected to VCC of the 7.4V power source.
- AOUT: Connected to A0 of the Arduino UNO.
5V Mini Water Pump
- negative pin: Connected to the common contact of the relay module.
- positive pin: Connected to the normally open pin of the relay module.
1N4007 Rectifier Diode
- Anode: Connected to GND of the 7.4V power source.
- Cathode: Connected to VCC of the 7.4V power source.
LCD Screen 16x2 I2C
- GND: Connected to GND of the 7.4V power source.
- VCC: Connected to VCC of the 7.4V power source.
- SDA: Connected to A4 of the Arduino UNO.
- SCL: Connected to A5 of the Arduino UNO.
7.4V Power Source
- -: Connected to GND of the Arduino UNO, LCD screen, relay module, diode, and soil moisture sensor.
- +: Connected to VCC of the Arduino UNO, LCD screen, relay module, diode, and soil moisture sensor.
Code Documentation
#include <Wire.h>
#include <LiquidCrystal_I2C.h>  // Include the I2C LCD library

// Set the LCD address to 0x27 for a 16 chars and 2-line display
LiquidCrystal_I2C lcd(0x27, 16, 2);  // Initialize with I2C address

// Pin configurations
const int moistureSensorPin = A0;    // Soil moisture sensor connected to A0 (analog pin)
const int relayPin = 4;              // GPIO4 (D2 on NodeMCU) to control water pump

// Thresholds for irrigation control
const int dryThreshold = 500;        // Value indicating dry soil
const int wetThreshold = 300;        // Value indicating adequately moist soil

// Timing variables
unsigned long irrigationStartTime = 0; // To store when the irrigation started
bool irrigating = false;               // To track if irrigation is in progress
const unsigned long irrigationDuration = 9200; // Duration of irrigation in milliseconds (9.20 seconds)

void setup() {
  Serial.begin(9600);                  // Start serial communication for debugging
  lcd.begin(16, 2);                    // Initialize the LCD with 16 columns and 2 rows
  lcd.backlight();                     // Turn on the LCD backlight
  lcd.print("Irrigation");             // Display initial message
  delay(2000);                         // Wait for 2 seconds
  lcd.clear();                         // Clear the display

  pinMode(relayPin, OUTPUT);           // Set relay pin as output
  digitalWrite(relayPin, HIGH);        // Ensure pump is off at startup (set relay to HIGH to turn off)
}

void loop() {
  int moistureValue = analogRead(moistureSensorPin); // Read moisture level

  // Display moisture value on LCD
  lcd.setCursor(0, 0);
  lcd.print("Moisture: ");
  lcd.print(moistureValue);             // Print the moisture value
  lcd.print("   ");                     // Clear any trailing characters

  // Control irrigation system based on moisture value
  if (moistureValue > dryThreshold && !irrigating) {
    // Start irrigation if soil is dry and not already irrigating
    digitalWrite(relayPin, LOW);        // Activate relay to turn on pump (active-low)
    lcd.setCursor(0, 1);
    lcd.print("Irrigating..    ");      // Display irrigating message
    irrigating = true;                  // Set irrigating flag
    irrigationStartTime = millis();     // Record the time irrigation started
  }

  if (irrigating) {
    // Check if the irrigation has been running for 9.2 seconds
    if (millis() - irrigationStartTime >= irrigationDuration) {
      digitalWrite(relayPin, HIGH);     // Deactivate relay to turn off pump (active-low)
      lcd.setCursor(0, 1);
      lcd.print("Irrigation off ");     // Display irrigation off message
      irrigating = false;               // Reset irrigating flag to allow next cycle if needed
    }
  }

  Serial.print("Moisture Value: ");     // Debug output to serial monitor
  Serial.println(moistureValue);        // Print moisture value to serial monitor
  delay(1000);                          // Wait for 1 second before the next check
}
This code initializes the LCD screen and sets up the pins for the soil moisture sensor and relay module. It reads the soil moisture level and controls the water pump based on the moisture value. The LCD screen displays the current moisture level and the irrigation status. The system irrigates the soil for 9.2 seconds when the soil is dry and then turns off the pump.