
Arduino UNO Based Soil Moisture Monitoring with I2C LCD Display
View and Edit Project In Cirkit Designer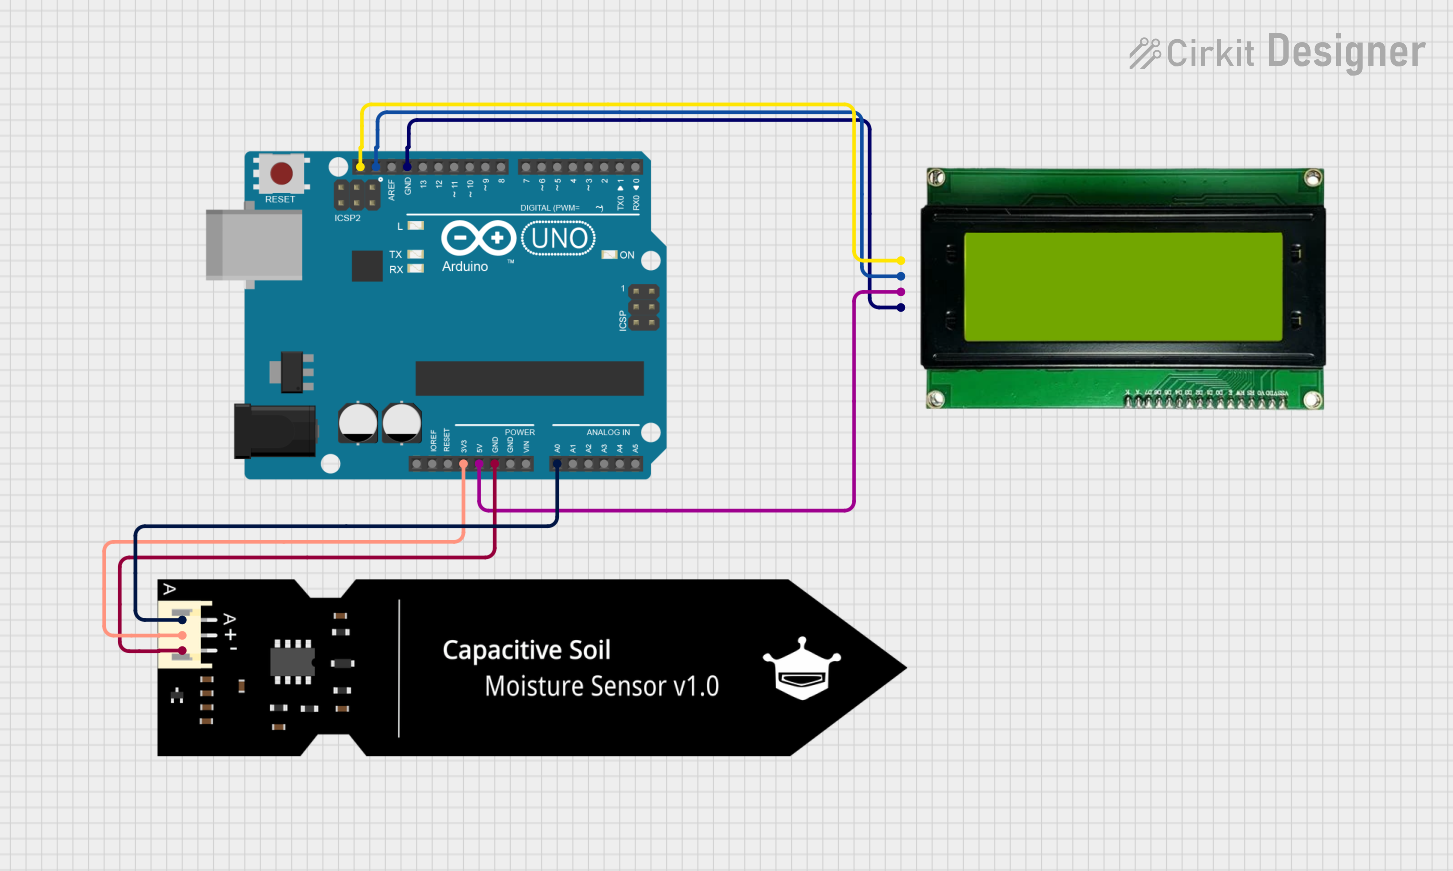
Circuit Documentation
Summary of the Circuit
This circuit consists of an Arduino UNO microcontroller, an MKE-M08 LCD2004 I2C Module, and a DFRobot Capacitive Soil Moisture Sensor (V1.0). The Arduino UNO serves as the central processing unit, controlling the LCD module via the I2C communication protocol and reading moisture levels from the soil moisture sensor. The LCD module is used to display data or messages, while the soil moisture sensor provides analog readings of the moisture content in the soil.
Component List
Arduino UNO
- Description: A microcontroller board based on the ATmega328P.
- Pins: UNUSED, IOREF, Reset, 3.3V, 5V, GND, Vin, A0-A5, SCL, SDA, AREF, D0-D13.
MKE-M08 LCD2004 I2C Module
- Description: A 20x4 character LCD display with an I2C interface.
- Pins: GND, 5V, SDA, SCL.
DFRobot Capacitive Soil Moisture Sensor (V1.0)
- Description: A sensor that measures the moisture content in the soil using capacitive sensing.
- Pins: A, VCC, GND.
Wiring Details
Arduino UNO
- 3.3V connected to the VCC of the Soil Moisture Sensor.
- 5V connected to the 5V of the LCD Module.
- GND connected to the GND of both the Soil Moisture Sensor and the LCD Module.
- A0 connected to the analog output (A) of the Soil Moisture Sensor.
- SCL connected to the SCL of the LCD Module.
- SDA connected to the SDA of the LCD Module.
MKE-M08 LCD2004 I2C Module
- GND connected to the GND of the Arduino UNO.
- 5V connected to the 5V of the Arduino UNO.
- SDA connected to the SDA of the Arduino UNO.
- SCL connected to the SCL of the Arduino UNO.
DFRobot Capacitive Soil Moisture Sensor (V1.0)
- VCC connected to the 3.3V of the Arduino UNO.
- GND connected to the GND of the Arduino UNO.
- A connected to the A0 of the Arduino UNO.
Documented Code
The following code is intended to be uploaded to the Arduino UNO microcontroller:
void setup() {
  // put your setup code here, to run once:

}

void loop() {
  // put your main code here, to run repeatedly:

}
The code provided is a template with empty setup() and loop() functions. The setup() function is intended for initialization code that runs once at the start, such as configuring pin modes or initializing libraries. The loop() function contains the main logic of the program, which runs repeatedly after setup() is complete.
To complete this code, one would need to initialize the I2C communication for the LCD module, set up the LCD for display, and write the logic to read the analog value from the soil moisture sensor and display it on the LCD.