
ESP32 and IRFZ44N MOSFET Controlled 12V LED Strip with Relay Module
View and Edit Project In Cirkit Designer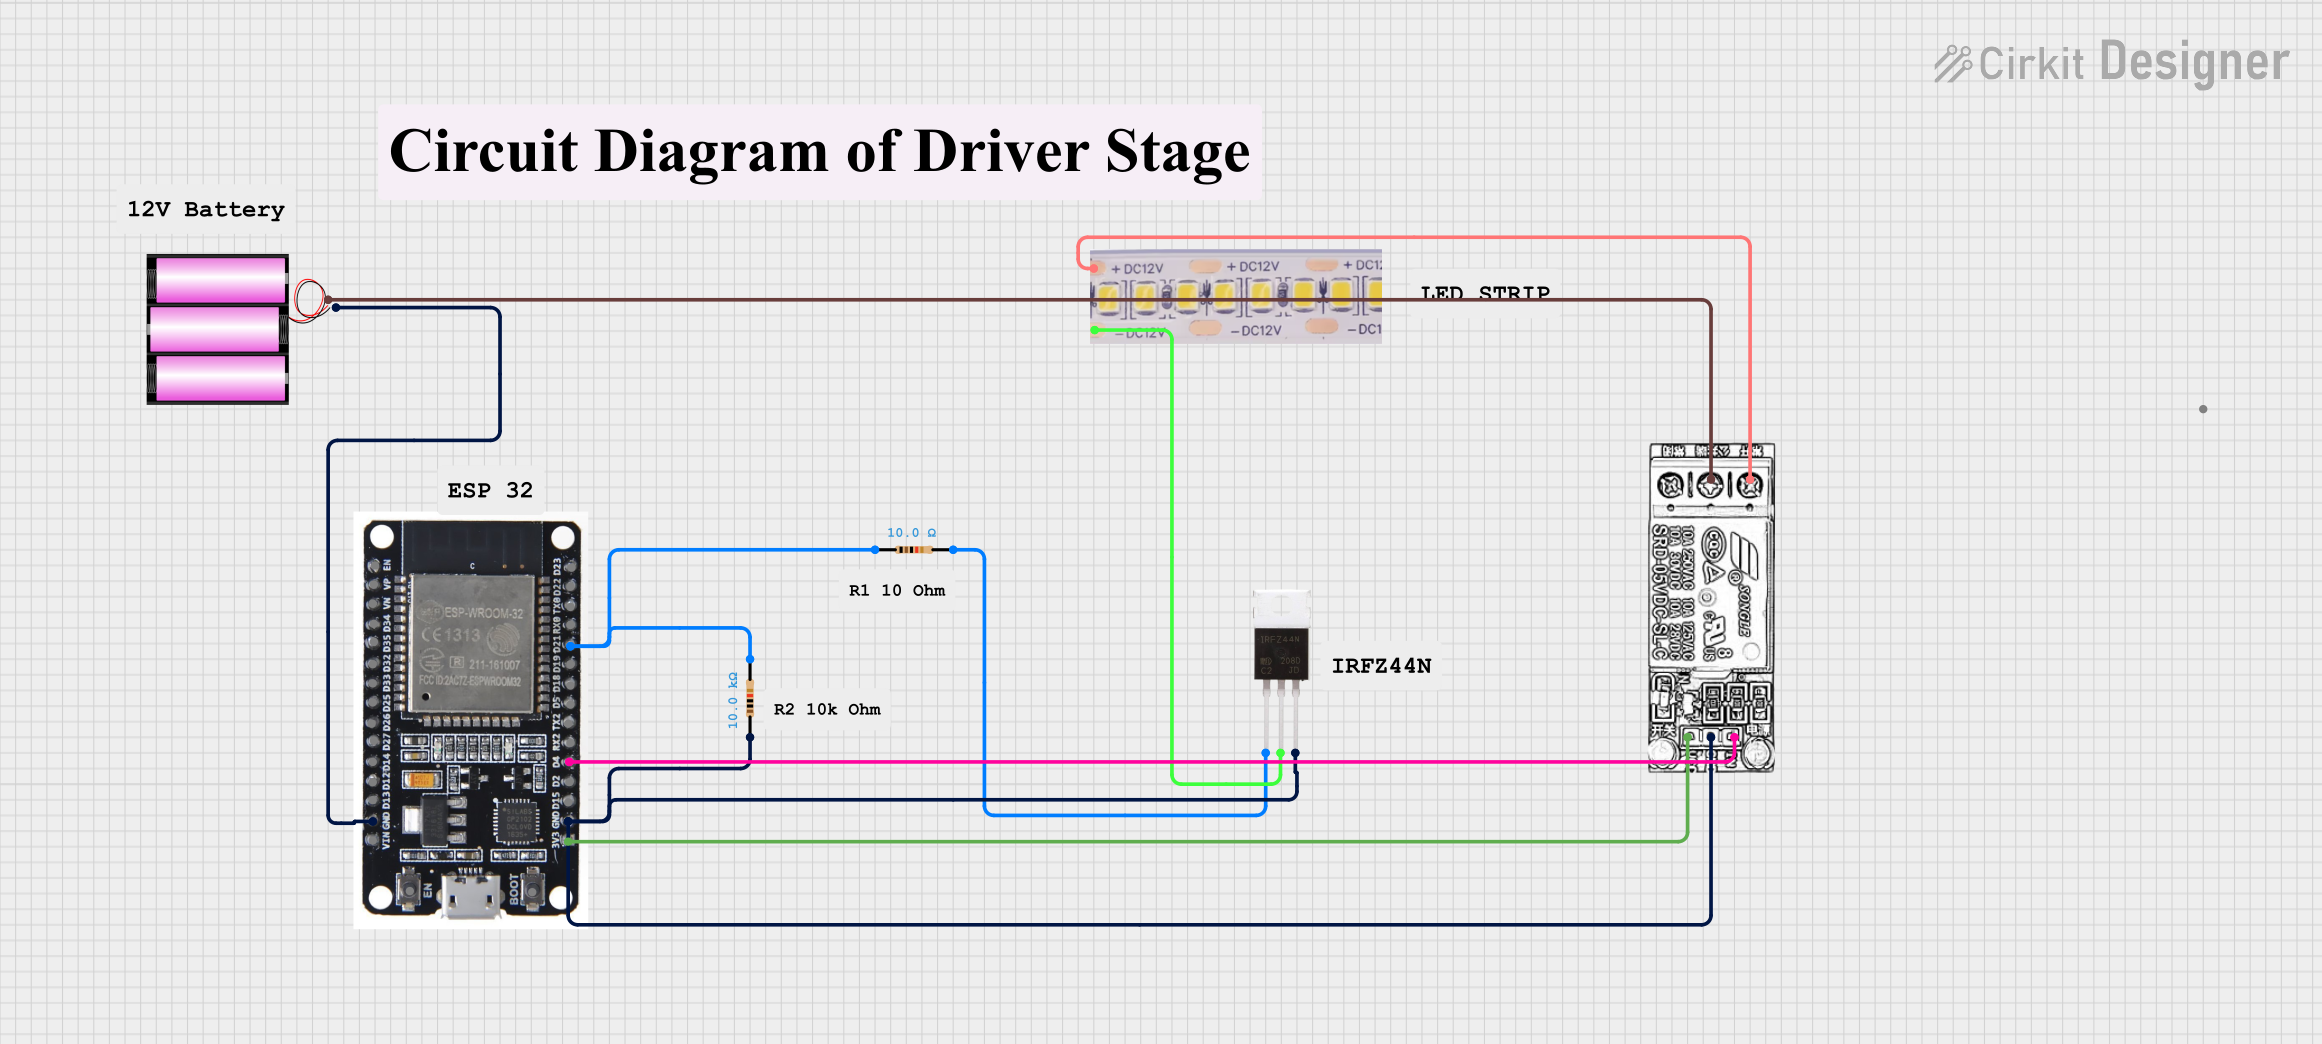
Circuit Documentation
Summary
This circuit controls the brightness of a 12V LED strip using an IRFZ44N MOSFET and PWM from an ESP32 microcontroller. Additionally, it turns the LED strip on and off using a relay module. The ESP32 microcontroller is programmed to gradually increase and decrease the brightness of the LED strip and toggle the relay to control the power to the LED strip.
Component List
ESP32
- Description: A powerful microcontroller with built-in Wi-Fi and Bluetooth capabilities.
- Pins: EN, VP, VN, D34, D35, D32, D33, D25, D26, D27, D14, D12, D13, GND, VIN, 3V3, D15, D2, D4, RX2, TX2, D5, D18, D19, D21, RX0, TX0, D22, D23, BOOT
IRFZ44N
- Description: A N-channel MOSFET used for switching and amplifying electronic signals.
- Pins: Gate, Drain, Source
Resistor (10 Ohms)
- Description: A resistor with a resistance of 10 Ohms.
- Pins: pin1, pin2
Resistor (10k Ohms)
- Description: A resistor with a resistance of 10k Ohms.
- Pins: pin1, pin2
Battery 12V
- Description: A 12V battery used to power the circuit.
- Pins: +, -
12V White LED Strip
- Description: A strip of white LEDs that operates at 12V.
- Pins: +12V, GND
Relay Module
- Description: A module used to control high voltage devices with a low voltage signal.
- Pins: NC, COM, INPUT, GND, VCC
Wiring Details
ESP32
- GND connected to - of Battery 12V
- 3V3 connected to VCC of Relay Module
- GND connected to Source of IRFZ44N, GND of Relay Module, and pin1 of 10k Ohms Resistor
- D4 connected to INPUT of Relay Module
- D21 connected to pin1 of 10 Ohms Resistor
IRFZ44N
- Gate connected to pin2 of 10 Ohms Resistor
- Drain connected to GND of 12V White LED Strip
Resistor (10 Ohms)
- pin1 connected to D21 of ESP32
- pin2 connected to Gate of IRFZ44N
Resistor (10k Ohms)
- pin1 connected to GND of ESP32
- pin2 connected to pin1 of 10 Ohms Resistor
Battery 12V
- + connected to COM of Relay Module
12V White LED Strip
- +12V connected to NC of Relay Module
- GND connected to Drain of IRFZ44N
Relay Module
- VCC connected to 3V3 of ESP32
- GND connected to GND of ESP32
- INPUT connected to D4 of ESP32
- COM connected to + of Battery 12V
- NC connected to +12V of 12V White LED Strip
Code Documentation
/*
 * This Arduino Sketch controls the brightness of a 12V LED strip using
 * an IRFZ44N MOSFET and PWM from an ESP32 microcontroller. Additionally,
 * it turns the LED strip on and off using a relay module.
 */

const int pwmPin = 21; // ESP32 pin connected to the Gate of IRFZ44N
const int relayPin = 4; // ESP32 pin connected to the INPUT of the relay module

void setup() {
  // Initialize the PWM pin as an output
  pinMode(pwmPin, OUTPUT);
  // Initialize the relay pin as an output
  pinMode(relayPin, OUTPUT);
  // Start with the LED strip turned off
  digitalWrite(relayPin, LOW);
}

void loop() {
  // Example: Gradually increase brightness
  for (int brightness = 0; brightness <= 255; brightness++) {
    analogWrite(pwmPin, brightness);
    delay(10); // Adjust delay for desired fade speed
  }
  // Example: Gradually decrease brightness
  for (int brightness = 255; brightness >= 0; brightness--) {
    analogWrite(pwmPin, brightness);
    delay(10); // Adjust delay for desired fade speed
  }
  // Turn the LED strip off
  digitalWrite(relayPin, LOW);
  delay(1000); // Keep it off for 1 second
  // Turn the LED strip on
  digitalWrite(relayPin, HIGH);
  delay(1000); // Keep it on for 1 second
}
This code initializes the PWM and relay pins as outputs and starts with the LED strip turned off. In the loop, it gradually increases and decreases the brightness of the LED strip using PWM and toggles the relay to turn the LED strip on and off.