
Arduino UNO Flame Detection Robot with LCD Display and Buzzer Alert
View and Edit Project In Cirkit Designer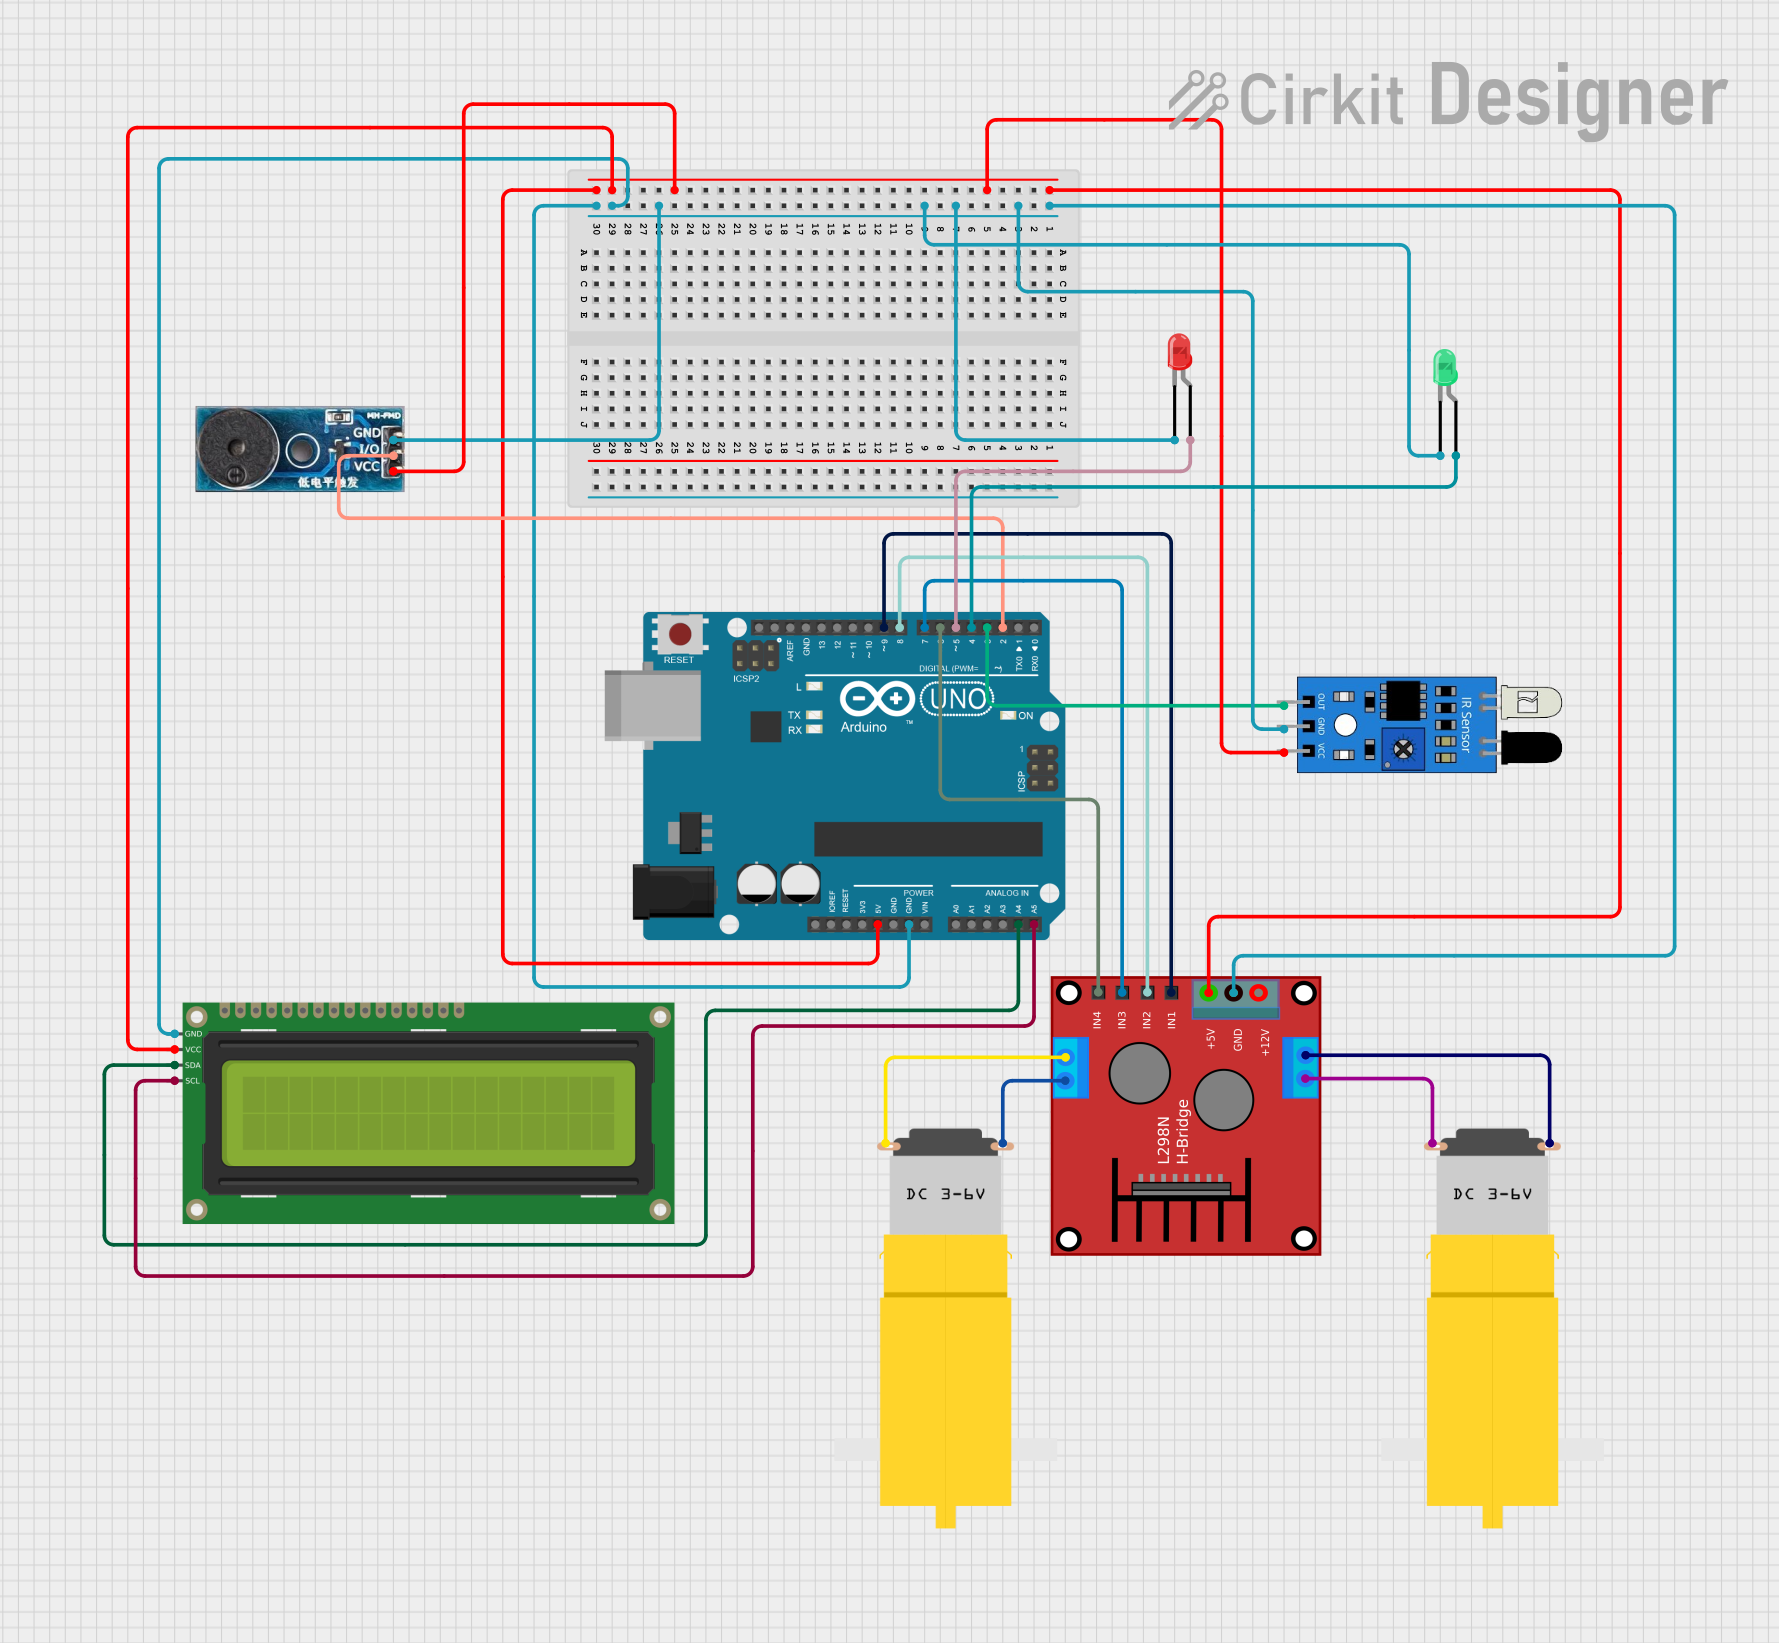
Circuit Documentation
Summary
This circuit is designed to detect flames using an IR sensor and respond by activating motors, LEDs, and a buzzer. The system is controlled by an Arduino UNO, which processes the sensor input and drives the output components accordingly. The status is displayed on a 16x2 I2C LCD.
Component List
Arduino UNO
- Description: Microcontroller board based on the ATmega328P.
- Pins: UNUSED, IOREF, Reset, 3.3V, 5V, GND, Vin, A0, A1, A2, A3, A4, A5, SCL, SDA, AREF, D13, D12, D11, D10, D9, D8, D7, D6, D5, D4, D3, D2, D1, D0
Ponte H
- Description: H-Bridge motor driver.
- Pins: OUT4-Motor2, OUT3-Motor2, OUT2-Motor1, OUT1-Motor1, 5V, GND, 12V, IN3, IN1, IN2, IN4
IR Sensor
- Description: Infrared sensor for flame detection.
- Pins: out, gnd, vcc
LED: Two Pin (red)
- Description: Red LED.
- Pins: cathode, anode
LED: Two Pin (green)
- Description: Green LED.
- Pins: cathode, anode
Motor amarillo motorreductor hobby
- Description: Hobby motor with gearbox.
- Pins: vcc, GND
Buzzer Module
- Description: Buzzer for sound alerts.
- Pins: GND, Vcc, I/O
16x2 I2C LCD
- Description: 16x2 character LCD with I2C interface.
- Pins: GND, VCC, SDA, SCL
Wiring Details
Arduino UNO
5V connected to:
- Ponte H (5V)
- IR Sensor (vcc)
- Buzzer Module (Vcc)
- 16x2 I2C LCD (VCC)
GND connected to:
- Ponte H (GND)
- IR Sensor (gnd)
- LED: Two Pin (red) (cathode)
- LED: Two Pin (green) (cathode)
- Buzzer Module (GND)
- 16x2 I2C LCD (GND)
D2 connected to Buzzer Module (I/O)
D3 connected to IR Sensor (out)
D4 connected to LED: Two Pin (green) (anode)
D5 connected to LED: Two Pin (red) (anode)
D6 connected to Ponte H (IN4)
D7 connected to Ponte H (IN3)
D8 connected to Ponte H (IN2)
D9 connected to Ponte H (IN1)
A4 connected to 16x2 I2C LCD (SDA)
A5 connected to 16x2 I2C LCD (SCL)
Ponte H
5V connected to Arduino UNO (5V)
GND connected to Arduino UNO (GND)
OUT1-Motor1 connected to Motor amarillo motorreductor hobby (vcc)
OUT2-Motor1 connected to Motor amarillo motorreductor hobby (GND)
OUT3-Motor2 connected to Motor amarillo motorreductor hobby (GND)
OUT4-Motor2 connected to Motor amarillo motorreductor hobby (vcc)
IN1 connected to Arduino UNO (D9)
IN2 connected to Arduino UNO (D8)
IN3 connected to Arduino UNO (D7)
IN4 connected to Arduino UNO (D6)
IR Sensor
vcc connected to Arduino UNO (5V)
gnd connected to Arduino UNO (GND)
out connected to Arduino UNO (D3)
LED: Two Pin (red)
cathode connected to Arduino UNO (GND)
anode connected to Arduino UNO (D5)
LED: Two Pin (green)
cathode connected to Arduino UNO (GND)
anode connected to Arduino UNO (D4)
Motor amarillo motorreductor hobby
vcc connected to Ponte H (OUT1-Motor1)
GND connected to Ponte H (OUT2-Motor1)
vcc connected to Ponte H (OUT4-Motor2)
GND connected to Ponte H (OUT3-Motor2)
Buzzer Module
Vcc connected to Arduino UNO (5V)
GND connected to Arduino UNO (GND)
I/O connected to Arduino UNO (D2)
16x2 I2C LCD
VCC connected to Arduino UNO (5V)
GND connected to Arduino UNO (GND)
SDA connected to Arduino UNO (A4)
SCL connected to Arduino UNO (A5)
Code Documentation
#include <Wire.h>
#include <LiquidCrystal_I2C.h>

#define buzzer 2
#define motor_a1 9
#define motor_a2 8
#define motor_b1 7
#define motor_b2 6
#define LED_red 5
#define LED_green 4
#define flame_sensor 3

int flame_detected;

LiquidCrystal_I2C lcd(0x27, 16 , 2);

void setup() {
  Serial.begin(9600);
  lcd.init();
  lcd.backlight();
  pinMode(buzzer, OUTPUT);
  pinMode(motor_a1, OUTPUT);
  pinMode(motor_a2, OUTPUT);
  pinMode(motor_b1, OUTPUT);
  pinMode(motor_b2, OUTPUT);
  pinMode(LED_red, OUTPUT);
  pinMode(LED_green, OUTPUT);
  pinMode(flame_sensor, INPUT);
}

void loop() {
  flame_detected = digitalRead(flame_sensor);

  if (flame_detected == 1) {
    lcd.clear();
    lcd.setCursor(0,0);
    lcd.print("Flame detected");
    digitalWrite(motor_a1, 1);
    digitalWrite(motor_a2, 0);
    digitalWrite(motor_b1, 1);
    digitalWrite(motor_b2, 0);
    digitalWrite(LED_red, 1);
    digitalWrite(LED_green, 0);
    digitalWrite(buzzer, 1);
    delay(250);
    digitalWrite(buzzer, 0);
    delay(250);
  }

  else{
    lcd.clear();
    lcd.setCursor(0,0);
    lcd.print("No");
    lcd.setCursor(0,1);
    lcd.print("Flame detected");
    digitalWrite(motor_a1, 0);
    digitalWrite(motor_a2, 0);
    digitalWrite(motor_b1, 0);
    digitalWrite(motor_b2, 0);
    digitalWrite(LED_green, 1);
    digitalWrite(LED_red, 0);
    digitalWrite(buzzer, 0);
    delay(250);
  }
}
This code initializes the components and continuously checks for flame detection. If a flame is detected, it activates the motors, red LED, and buzzer, and displays a message on the LCD. If no flame is detected, it stops the motors, activates the green LED, and displays a different message on the LCD.