
Arduino UNO and ESP8266 Wi-Fi Controlled Traffic Light System
View and Edit Project In Cirkit Designer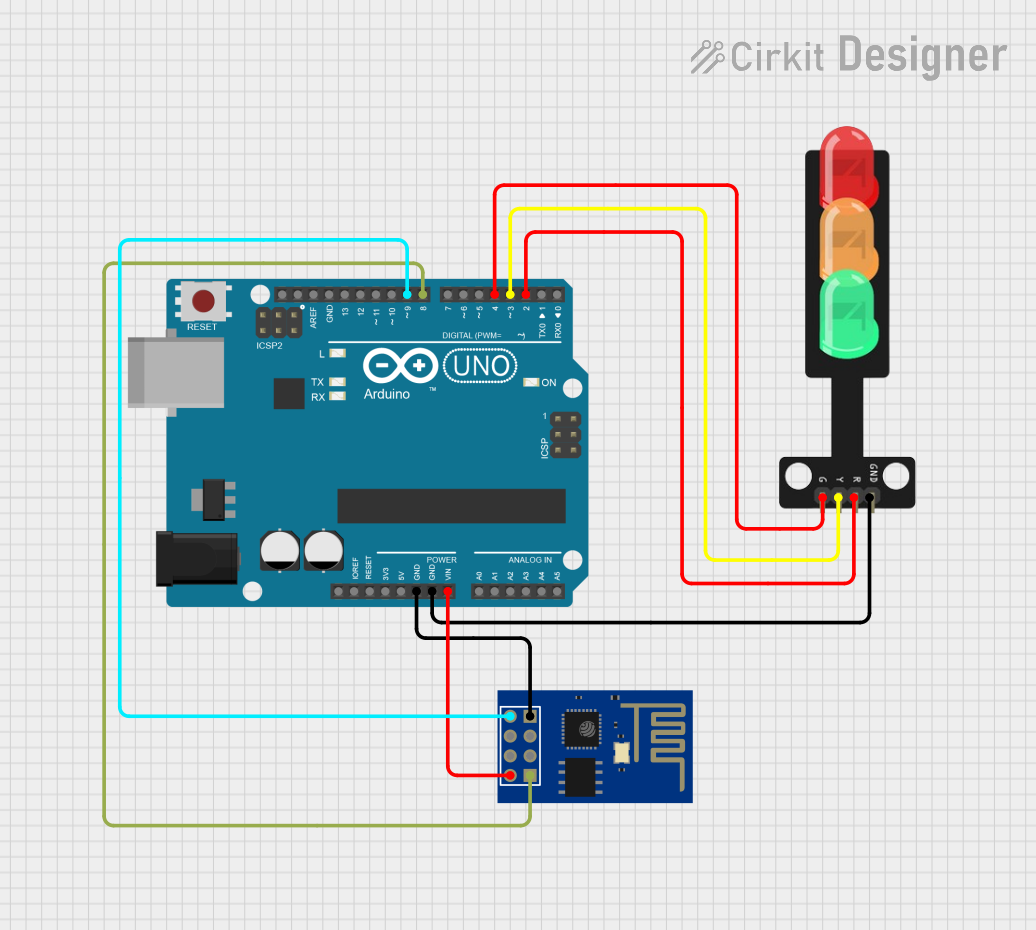
Circuit Documentation
Summary
This circuit is designed to control a traffic light system using an Arduino UNO microcontroller. The system also includes an ESP8266 ESP-01 WiFi module for communication purposes. The traffic light consists of three LEDs (Red, Yellow, and Green) that are controlled by the Arduino. The ESP8266 module is used to send status updates of the traffic light cycle.
Component List
Arduino UNO
- Description: A microcontroller board based on the ATmega328P.
- Pins: UNUSED, IOREF, Reset, 3.3V, 5V, GND, Vin, A0, A1, A2, A3, A4, A5, SCL, SDA, AREF, D13, D12, D11, D10, D9, D8, D7, D6, D5, D4, D3, D2, D1, D0
Traffic Light
- Description: A module representing a traffic light with three LEDs (Green, Yellow, Red).
- Pins: Green, Yellow, Red, GND
ESP8266 ESP-01 WiFi Module
- Description: A WiFi module based on the ESP8266 chip.
- Pins: TXD, CH_PD, RST, VCC, GND, GPIO_2, GPIO_0, RXD
Wiring Details
Arduino UNO
- GND: Connected to GND of ESP8266 ESP-01 WiFi Module and Traffic Light.
- Vin: Connected to VCC of ESP8266 ESP-01 WiFi Module.
- D9: Connected to TXD of ESP8266 ESP-01 WiFi Module.
- D8: Connected to RXD of ESP8266 ESP-01 WiFi Module.
- D4: Connected to Green pin of Traffic Light.
- D3: Connected to Yellow pin of Traffic Light.
- D2: Connected to Red pin of Traffic Light.
Traffic Light
- Green: Connected to D4 of Arduino UNO.
- Yellow: Connected to D3 of Arduino UNO.
- Red: Connected to D2 of Arduino UNO.
- GND: Connected to GND of Arduino UNO.
ESP8266 ESP-01 WiFi Module
- TXD: Connected to D9 of Arduino UNO.
- RXD: Connected to D8 of Arduino UNO.
- VCC: Connected to Vin of Arduino UNO.
- GND: Connected to GND of Arduino UNO.
Code Documentation
Arduino UNO Code
// Pin definitions
const int redPin = 2;
const int yellowPin = 3;
const int greenPin = 4;
const int esp8266RxPin = 8;
const int esp8266TxPin = 9;

void setup() {
  // Initialize the traffic light pins as outputs
  pinMode(redPin, OUTPUT);
  pinMode(yellowPin, OUTPUT);
  pinMode(greenPin, OUTPUT);

  // Initialize serial communication with ESP8266
  Serial.begin(9600);
  Serial.println("Traffic Light Controller Initialized");
}

void loop() {
  // Red light on
  digitalWrite(redPin, HIGH);
  delay(5000); // Red light for 5 seconds
  digitalWrite(redPin, LOW);

  // Green light on
  digitalWrite(greenPin, HIGH);
  delay(5000); // Green light for 5 seconds
  digitalWrite(greenPin, LOW);

  // Yellow light on
  digitalWrite(yellowPin, HIGH);
  delay(2000); // Yellow light for 2 seconds
  digitalWrite(yellowPin, LOW);

  // Send status to ESP8266
  Serial.println("Traffic Light Cycle Complete");
}
This code initializes the traffic light pins as outputs and sets up serial communication with the ESP8266 module. The loop function cycles through the traffic light sequence, turning on the red, green, and yellow LEDs for specified durations and then sending a status update to the ESP8266 module.