
Arduino UNO-Based Smart Door Lock System with RFID, Ultrasonic Sensor, and LCD Display
View and Edit Project In Cirkit Designer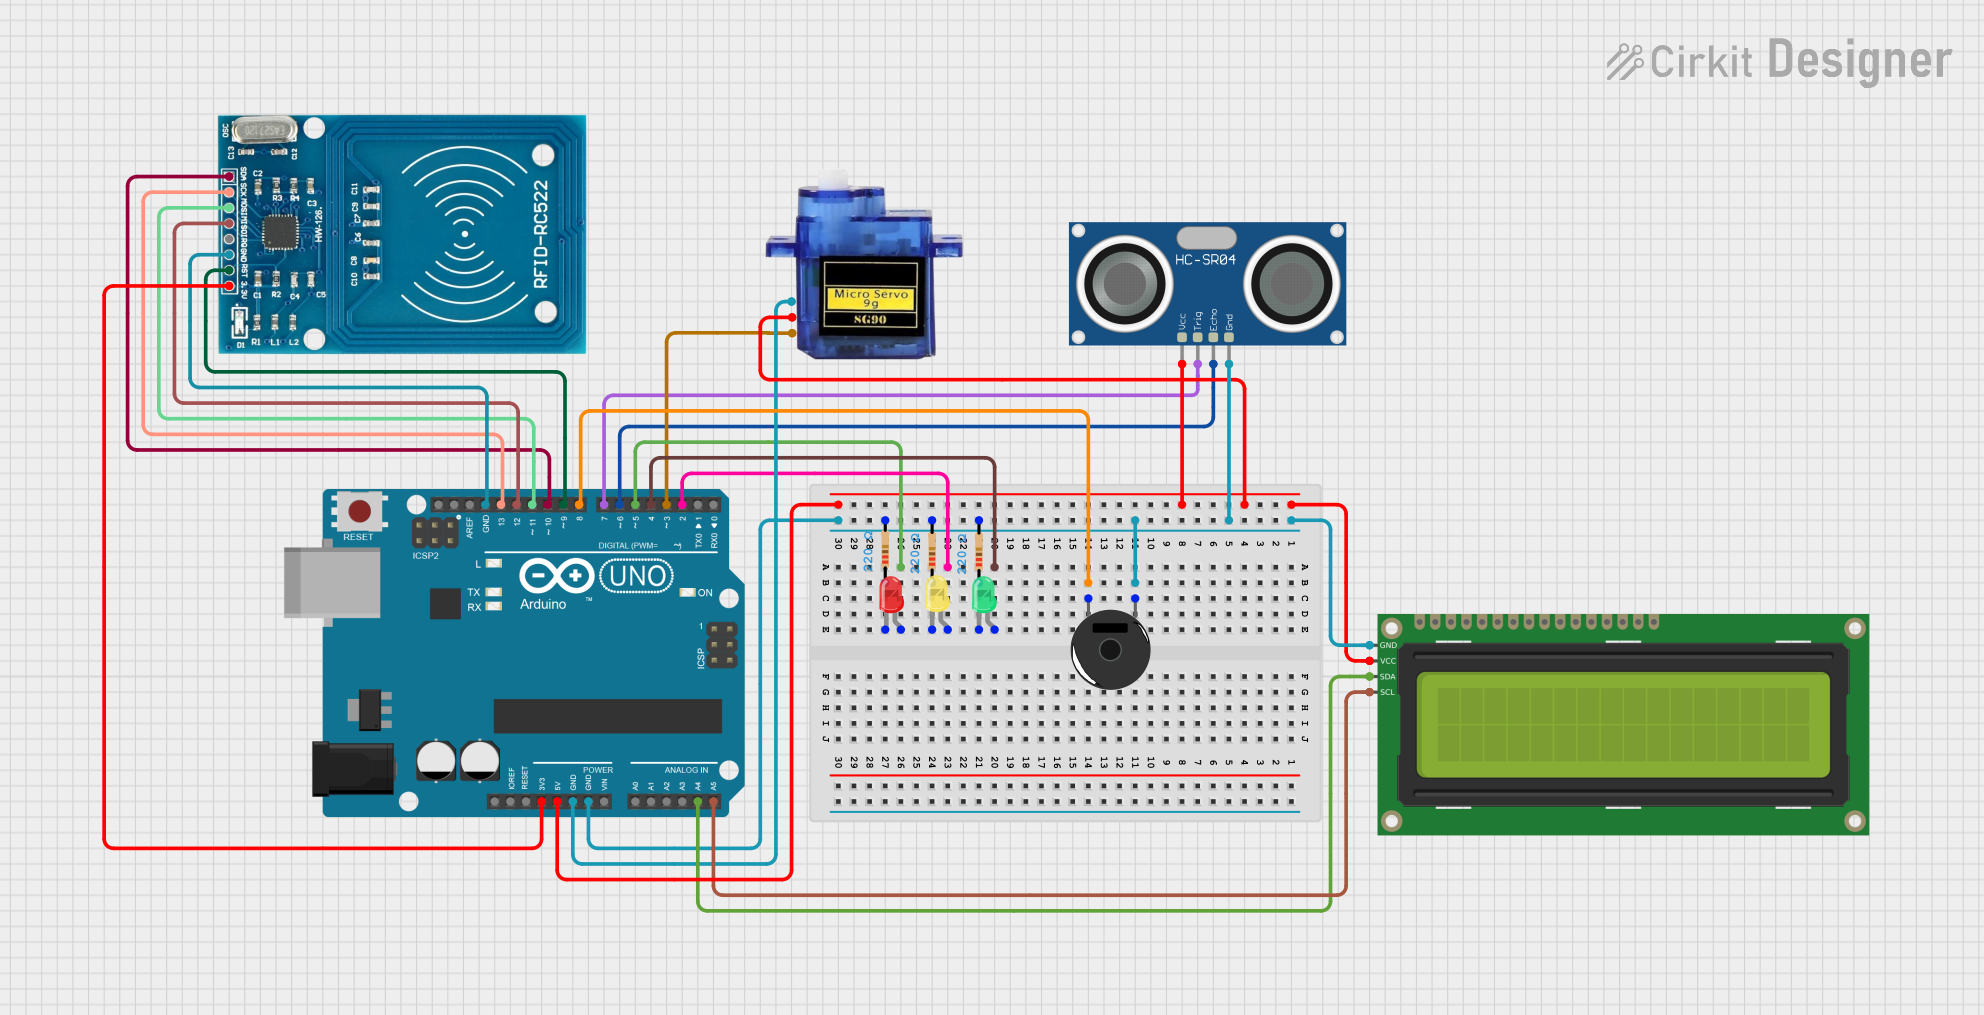
Circuit Documentation
Summary
This circuit is designed to control a door lock system using an Arduino UNO microcontroller. The system includes an RFID reader for authentication, an ultrasonic sensor for object detection, a servo motor for locking and unlocking the door, an LCD display for user interaction, and LEDs for status indication. Additionally, a piezo buzzer provides audible feedback.
Component List
Arduino UNO
- Description: Microcontroller board based on the ATmega328P.
- Pins: UNUSED, IOREF, Reset, 3.3V, 5V, GND, Vin, A0, A1, A2, A3, A4, A5, SCL, SDA, AREF, D13, D12, D11, D10, D9, D8, D7, D6, D5, D4, D3, D2, D1, D0
HC-SR04 Ultrasonic Sensor
- Description: Ultrasonic distance sensor.
- Pins: VCC, TRIG, ECHO, GND
Micro servo 9G
- Description: Small servo motor.
- Pins: GND, +5V, PWM
16x2 I2C LCD
- Description: 16x2 character LCD with I2C interface.
- Pins: GND, VCC, SDA, SCL
RFID-RC522
- Description: RFID reader module.
- Pins: VCC (3.3V), RST, GND, IRQ, MISO, MOSI, SCK, SDA
Piezo Buzzer
- Description: Simple piezoelectric buzzer.
- Pins: pin 1, pin 2
Resistor (220 Ohms)
- Description: Resistor with 220 Ohms resistance.
- Pins: pin1, pin2
LED: Two Pin (green)
- Description: Green LED.
- Pins: cathode, anode
LED: Two Pin (yellow)
- Description: Yellow LED.
- Pins: cathode, anode
LED: Two Pin (red)
- Description: Red LED.
- Pins: cathode, anode
Wiring Details
Arduino UNO
- GND: Connected to GND of Piezo Buzzer, 16x2 I2C LCD, HC-SR04 Ultrasonic Sensor, Micro servo 9G, and RFID-RC522.
- 5V: Connected to VCC of 16x2 I2C LCD, Micro servo 9G, and HC-SR04 Ultrasonic Sensor.
- 3.3V: Connected to VCC (3.3V) of RFID-RC522.
- D8: Connected to pin 2 of Piezo Buzzer.
- D4: Connected to anode of Green LED.
- D2: Connected to anode of Yellow LED.
- D5: Connected to anode of Red LED.
- A4: Connected to SDA of 16x2 I2C LCD.
- A5: Connected to SCL of 16x2 I2C LCD.
- D13: Connected to SCK of RFID-RC522.
- D12: Connected to MISO of RFID-RC522.
- D11: Connected to MOSI of RFID-RC522.
- D10: Connected to SDA of RFID-RC522.
- D9: Connected to RST of RFID-RC522.
- D7: Connected to TRIG of HC-SR04 Ultrasonic Sensor.
- D6: Connected to ECHO of HC-SR04 Ultrasonic Sensor.
- D3: Connected to PWM of Micro servo 9G.
HC-SR04 Ultrasonic Sensor
- GND: Connected to GND of Arduino UNO.
- VCC: Connected to 5V of Arduino UNO.
- TRIG: Connected to D7 of Arduino UNO.
- ECHO: Connected to D6 of Arduino UNO.
Micro servo 9G
- GND: Connected to GND of Arduino UNO.
- +5V: Connected to 5V of Arduino UNO.
- PWM: Connected to D3 of Arduino UNO.
16x2 I2C LCD
- GND: Connected to GND of Arduino UNO.
- VCC: Connected to 5V of Arduino UNO.
- SDA: Connected to A4 of Arduino UNO.
- SCL: Connected to A5 of Arduino UNO.
RFID-RC522
- GND: Connected to GND of Arduino UNO.
- VCC (3.3V): Connected to 3.3V of Arduino UNO.
- RST: Connected to D9 of Arduino UNO.
- SCK: Connected to D13 of Arduino UNO.
- MISO: Connected to D12 of Arduino UNO.
- MOSI: Connected to D11 of Arduino UNO.
- SDA: Connected to D10 of Arduino UNO.
Piezo Buzzer
- pin 1: Connected to GND of Arduino UNO.
- pin 2: Connected to D8 of Arduino UNO.
Resistor (220 Ohms)
- pin1: Connected to cathode of Green LED.
- pin2: Connected to pin 1 of Piezo Buzzer.
Resistor (220 Ohms)
- pin1: Connected to cathode of Yellow LED.
- pin2: Connected to pin 1 of Piezo Buzzer.
Resistor (220 Ohms)
- pin1: Connected to cathode of Red LED.
- pin2: Connected to pin 1 of Piezo Buzzer.
LED: Two Pin (green)
- cathode: Connected to pin1 of Resistor.
- anode: Connected to D4 of Arduino UNO.
LED: Two Pin (yellow)
- cathode: Connected to pin1 of Resistor.
- anode: Connected to D2 of Arduino UNO.
LED: Two Pin (red)
- cathode: Connected to pin1 of Resistor.
- anode: Connected to D5 of Arduino UNO.
Code Documentation
#include <Servo.h>
#include <LiquidCrystal_I2C.h>
#include <SPI.h>
#include <MFRC522.h>

#define SS_PIN 10
#define RST_PIN 9
#define buzzer 8
#define servoPin 3
#define echoPin 6
#define trigPin 7

String UID = "2D 94 B5 02";  // UID of RFID card
byte lock = 1;               // status of door lock

Servo servo;
LiquidCrystal_I2C lcd(0x27, 16, 2);
MFRC522 rfid(SS_PIN, RST_PIN);
int Y = 2;
int G = 4;
int R = 5;
int duration = 0;
int distanceCM = 0;

void setup()
{
  pinMode(G, OUTPUT);
  pinMode(R, OUTPUT);
  pinMode(Y, OUTPUT);
  pinMode(echoPin, INPUT_PULLUP);
  pinMode(trigPin, OUTPUT);
  Serial.begin(9600);
  servo.write(0);
  lcd.init();
  lcd.backlight();
  lcd.clear();
  servo.attach(servoPin);
  SPI.begin();
  rfid.PCD_Init();
}

void loop()
{
  lcd.setCursor(4, 0);
  lcd.print("Welcome!");
  lcd.setCursor(1, 1);
  lcd.print("Put your card");

  checkDistance();

  if (distanceCM < 5)
  {
    digitalWrite(Y, 1);
    Serial.println("Object detected!");
  }
  else
    digitalWrite(Y, 0);

  checkRFID();
}

void checkDistance()
{
  digitalWrite(trigPin, HIGH);
  delayMicroseconds(10);  // need to delay to split the packet
                          // 100000 packets (1000000/10)
  digitalWrite(trigPin, LOW);

  duration = pulseIn(echoPin, HIGH); //time difference
  distanceCM = duration * 0.017175;
}

void checkRFID()
{
  if ( ! rfid.PICC_IsNewCardPresent())
    return;
  if ( ! rfid.PICC_ReadCardSerial())
    return;

  lcd.clear();
  lcd.setCursor(0, 0);
  lcd.print("Scanning");
  Serial.print("NUID tag is :");
  String ID = "";
  for (byte i = 0; i < rfid.uid.size; i++) {
    lcd.print(".");
    ID.concat(String(rfid.uid.uidByte[i] < 0x10 ? " 0" : " "));
    ID.concat(String(rfid.uid.uidByte[i], HEX));
    delay(300);
  }
  ID.toUpperCase();
  Serial.println(ID);

  if (ID.substring(1) == UID && lock == 0)
  {
    // ring once
    digitalWrite