Cirkit Designer
Your all-in-one circuit design IDE
Home /
Project Documentation
Arduino-Based Automated Rain Cover System with Solar-Powered Motor Control
Circuit Documentation
Summary
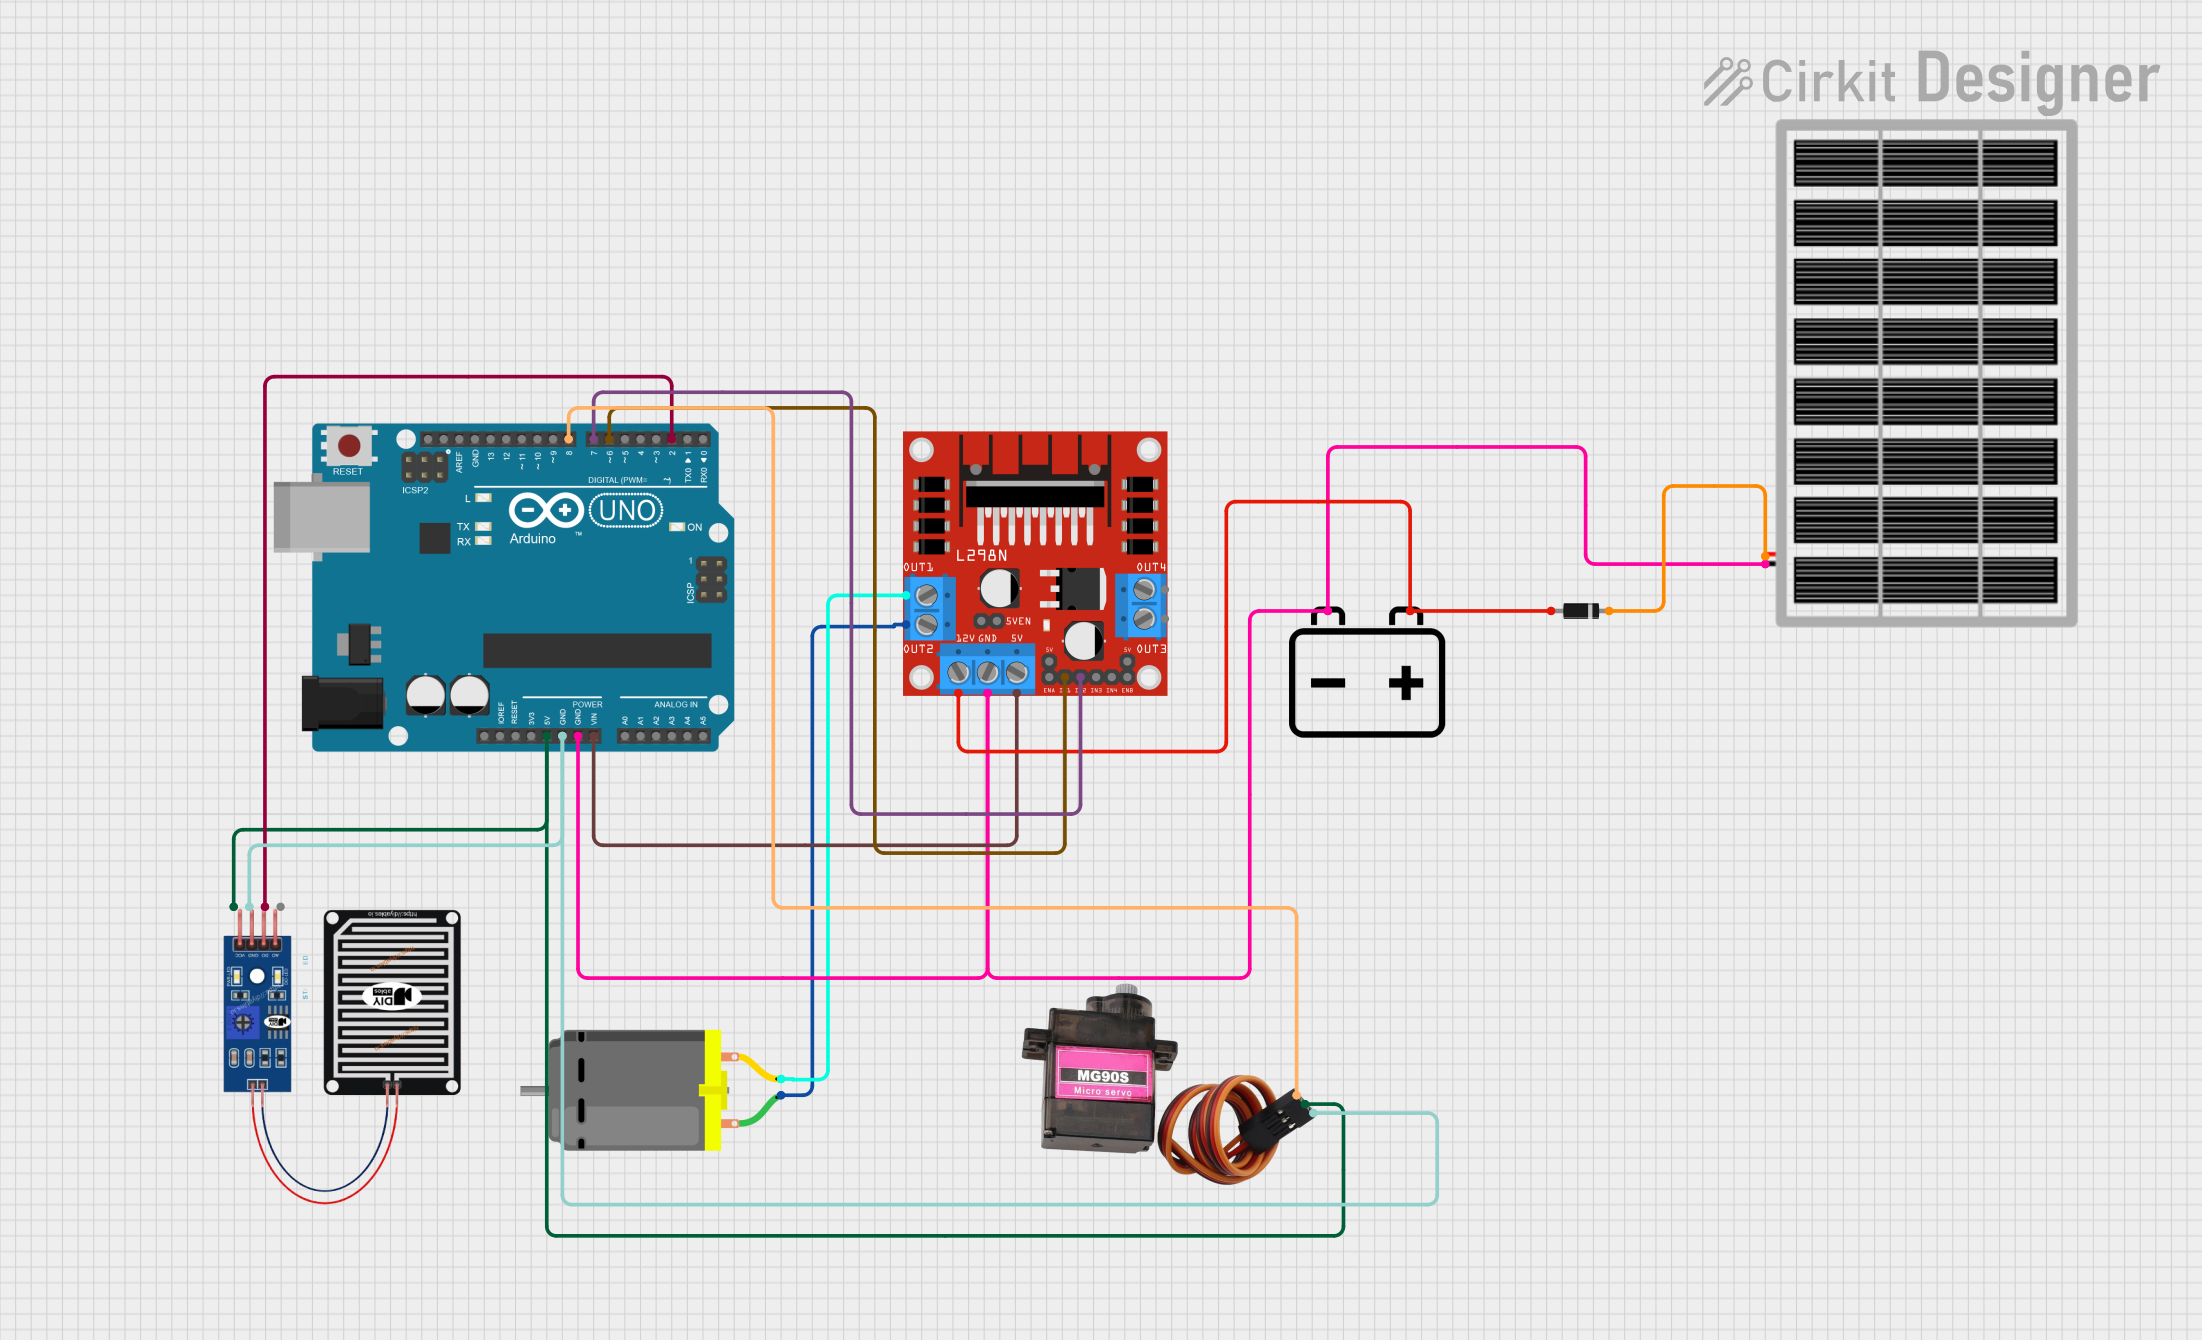
This circuit is designed to control a DC motor using an Arduino UNO based on input from a rain sensor. The circuit also includes a solar panel for power supply, a diode for protection, and an MG90S servo motor. The L298N motor driver is used to drive the DC motor. The Arduino UNO reads the rain sensor data and controls the motor to either open or close a cover based on the presence of rain.
Component List
RAIN SENSOR
- Description: Detects the presence of rain.
- Pins: AO, DO, GRD, VCC
L298N DC Motor Driver
- Description: Drives the DC motor.
- Pins: OUT1, OUT2, 12V, GND, 5V, OUT3, OUT4, 5V-ENA-JMP-I, 5V-ENA-JMP-O, +5V-J1, +5V-J2, ENA, IN1, IN2, IN3, IN4, ENB
DC Motor
- Description: The motor that opens and closes the cover.
- Pins: pin 1, pin 2
12V Battery
- Description: Provides power to the circuit.
- Pins: -, +
Solar Panel
- Description: Provides renewable energy to the circuit.
- Pins: gnd, vcc
Diode
- Description: Protects the circuit from reverse voltage.
- Pins: cathode, anode
Arduino UNO
- Description: The microcontroller that controls the circuit.
- Pins: UNUSED, IOREF, Reset, 3.3V, 5V, GND, Vin, A0, A1, A2, A3, A4, A5, SCL, SDA, AREF, D13, D12, D11, D10, D9, D8, D7, D6, D5, D4, D3, D2, D1, D0
MG90S
- Description: A servo motor used in the circuit.
- Pins: SIG, VCC, GND
Wiring Details
RAIN SENSOR
- DO connected to D2 on Arduino UNO
- GRD connected to GND on Arduino UNO and MG90S
- VCC connected to 5V on Arduino UNO and MG90S
L298N DC Motor Driver
- OUT1 connected to pin 2 on DC Motor
- OUT2 connected to pin 1 on DC Motor
- 12V connected to + on 12V Battery and anode on Diode
- GND connected to gnd on Solar Panel, GND on Arduino UNO, and - on 12V Battery
- 5V connected to Vin on Arduino UNO
- IN1 connected to D6 on Arduino UNO
- IN2 connected to D7 on Arduino UNO
DC Motor
- pin 1 connected to OUT2 on L298N DC Motor Driver
- pin 2 connected to OUT1 on L298N DC Motor Driver
12V Battery
- + connected to 12V on L298N DC Motor Driver and anode on Diode
- - connected to GND on L298N DC Motor Driver, GND on Arduino UNO, and gnd on Solar Panel
Solar Panel
- gnd connected to GND on L298N DC Motor Driver, GND on Arduino UNO, and - on 12V Battery
- vcc connected to cathode on Diode
Diode
- cathode connected to vcc on Solar Panel
- anode connected to + on 12V Battery and 12V on L298N DC Motor Driver
Arduino UNO
- D2 connected to DO on RAIN SENSOR
- GND connected to GRD on RAIN SENSOR, GND on MG90S, GND on L298N DC Motor Driver, GND on Solar Panel, and - on 12V Battery
- 5V connected to VCC on RAIN SENSOR and VCC on MG90S
- Vin connected to 5V on L298N DC Motor Driver
- D6 connected to IN1 on L298N DC Motor Driver
- D7 connected to IN2 on L298N DC Motor Driver
- D8 connected to SIG on MG90S
MG90S
- SIG connected to D8 on Arduino UNO
- VCC connected to 5V on Arduino UNO and VCC on RAIN SENSOR
- GND connected to GND on Arduino UNO and GRD on RAIN SENSOR
Documented Code
// Pin setup
#define RAIN_SENSOR_PIN 2    // Pin DO dari sensor hujan terhubung ke D2 pada Arduino
#define MOTOR_IN1 6          // Pin IN1 dari motor driver terhubung ke D6 pada Arduino
#define MOTOR_IN2 7          // Pin IN2 dari motor driver terhubung ke D7 pada Arduino
#define MOTOR_IN3 8          // Pin IN3 dari motor driver terhubung ke D8 pada Arduino
#define MOTOR_IN4 9          // Pin IN4 dari motor driver terhubung ke D9 pada Arduino

// Pin lainnya
#define ENA_PIN 5            // Pin ENA (kecepatan motor) terhubung ke pin 5 pada Arduino

// Ambang batas sensor hujan
#define RAIN_THRESHOLD 500   // Nilai sensor hujan untuk deteksi hujan

// Variabel kontrol waktu
unsigned long previousMillis = 0;
const long interval = 3000; // Durasi motor berputar selama 3 detik
bool motorRunning = false;

void setup() {
  // Inisialisasi pin sensor hujan
  pinMode(RAIN_SENSOR_PIN, INPUT);

  // Inisialisasi pin motor driver
  pinMode(MOTOR_IN1, OUTPUT);
  pinMode(MOTOR_IN2, OUTPUT);
  pinMode(MOTOR_IN3, OUTPUT);
  pinMode(MOTOR_IN4, OUTPUT);
  pinMode(ENA_PIN, OUTPUT);

  // Mulai komunikasi serial
  Serial.begin(9600);
}

void loop() {
  // Membaca nilai dari sensor hujan (DO)
  int rainValue = digitalRead(RAIN_SENSOR_PIN);
  Serial.print("Rain Sensor Value: ");
  Serial.println(rainValue);

  // Cek apakah sensor hujan mendeteksi hujan atau tidak
  if (rainValue == LOW) {  // Sensor hujan aktif (deteksi hujan jika nilai LOW)
    // Hujan terdeteksi, menutup kain
    Serial.println("Hujan terdeteksi! Menutup kain...");
    closeCover(); // Menarik kain (motor maju)
  } else {
    // Tidak ada hujan, membuka kain
    Serial.println("Tidak ada hujan. Membuka kain...");
    openCover(); // Menggulung kain (motor mundur)
  }

  // Waktu non-blok menggunakan millis()
  unsigned long currentMillis = millis();
  if (motorRunning && (currentMillis - previousMillis >= interval)) {
    previousMillis = currentMillis;
    stopMotor(); // Hentikan motor setelah waktu yang ditentukan
    motorRunning = false;
  }
}

// Fungsi untuk menarik kain (motor maju)
void closeCover() {
  digitalWrite(MOTOR_IN1, HIGH);  // Motor maju
  digitalWrite(MOTOR_IN2, LOW);
  digitalWrite(MOTOR_IN3, HIGH);  // Motor maju (untuk motor kedua jika ada)
  digitalWrite(MOTOR_IN4, LOW);
  analogWrite(ENA_PIN, 200);       // Kecepatan motor (200 dari 255)
  motorRunning = true;
  previousMillis = millis();      // Reset timer
}

// Fungsi untuk menggulung kain (motor mundur)
void openCover() {
  digitalWrite(MOTOR_IN1, LOW);   // Motor mundur
  digitalWrite(MOTOR_IN2, HIGH);
  digitalWrite(MOTOR_IN3, LOW);   // Motor mundur (untuk motor kedua jika ada)
  digitalWrite(MOTOR_IN4, HIGH);
  analogWrite(ENA_PIN, 200);      // Kecepatan motor (200 dari 255)
  motorRunning = true;
  previousMillis = millis();      // Reset timer
}

// Fungsi untuk menghentikan motor
void stopMotor() {
  digitalWrite(MOTOR_IN1, LOW);
  digitalWrite(M