Cirkit Designer
Your all-in-one circuit design IDE
Home /
Project Documentation
ESP32 and Arduino UNO Serial Communication Interface
Circuit Documentation
Summary
This document provides a detailed overview of a circuit that integrates an ESP32 Wroom Dev Kit and an Arduino UNO. The ESP32 and Arduino UNO are interconnected to facilitate communication and control. The document includes a component list, wiring details, and the embedded code used in the microcontrollers.
Component List
ESP32 Wroom Dev Kit
- Description: A powerful microcontroller with integrated Wi-Fi and Bluetooth capabilities.
- Pins: 3V3, EN, VP, VN, GPIO 34, GPIO 35, GPIO 32, GPIO 33, GPIO 25, GPIO 26, GPIO 27, GPIO 14, GND, GPIO 13, SD2, SD3, CMD, V5, GPIO 23, GPIO 22, TXD, RXD, GPIO 21, GPIO 19, GPIO 18, GPIO 5, GPIO 17, GPIO 16, GPIO 4, GPIO 0, GPIO 2, GPIO 15, SD1, SD0, CLK
- Purpose in Circuit: Acts as the main controller with Wi-Fi and Bluetooth capabilities.
Arduino UNO
- Description: A popular microcontroller board based on the ATmega328P.
- Pins: UNUSED, IOREF, Reset, 3.3V, 5V, GND, Vin, A0, A1, A2, A3, A4, A5, SCL, SDA, AREF, D13, D12, D11, D10, D9, D8, D7, D6, D5, D4, D3, D2, D1, D0
- Purpose in Circuit: Acts as a secondary controller to interface with additional peripherals.
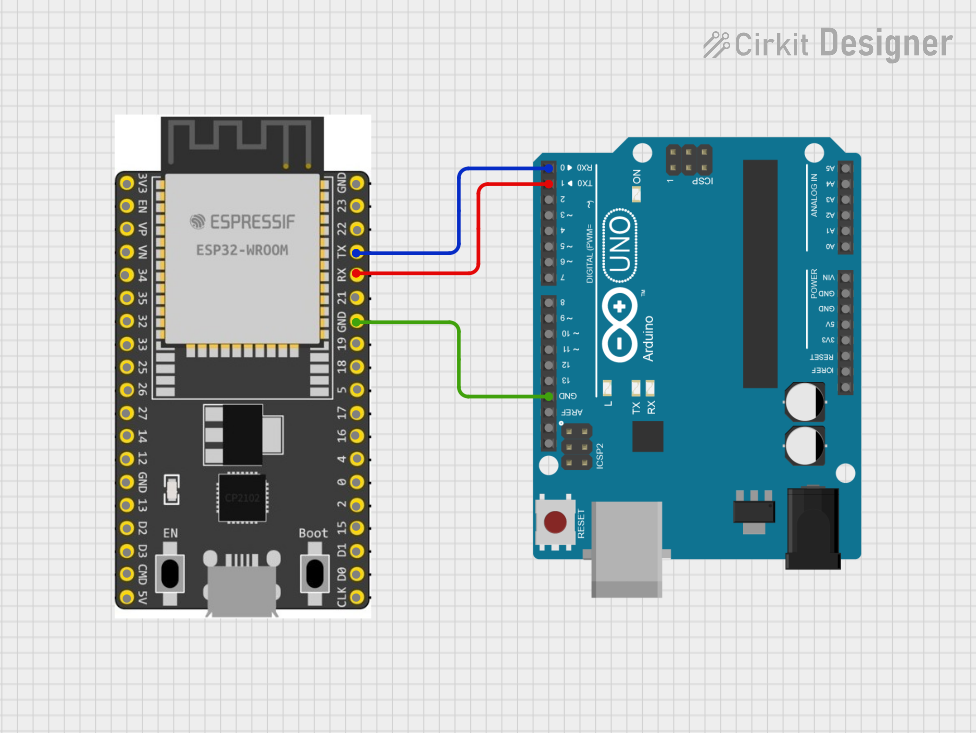
Wiring Details
ESP32 Wroom Dev Kit
- TXD is connected to D0 of the Arduino UNO.
- RXD is connected to D1 of the Arduino UNO.
- GND is connected to GND of the Arduino UNO.
Arduino UNO
- D0 is connected to TXD of the ESP32 Wroom Dev Kit.
- D1 is connected to RXD of the ESP32 Wroom Dev Kit.
- GND is connected to GND of the ESP32 Wroom Dev Kit.
Code Documentation
ESP32 Wroom Dev Kit Code
// File: sketch.ino

void setup() {
  // put your setup code here, to run once:

}

void loop() {
  // put your main code here, to run repeatedly:

}
Arduino UNO Code
// File: sketch.ino

void setup() {
  // put your setup code here, to run once:

}

void loop() {
  // put your main code here, to run repeatedly:

}
This documentation provides a comprehensive overview of the circuit, including the components used, their interconnections, and the embedded code for the microcontrollers.