
Arduino Nano RFID and LCD Display Time Tracker with Buzzer Alert
View and Edit Project In Cirkit Designer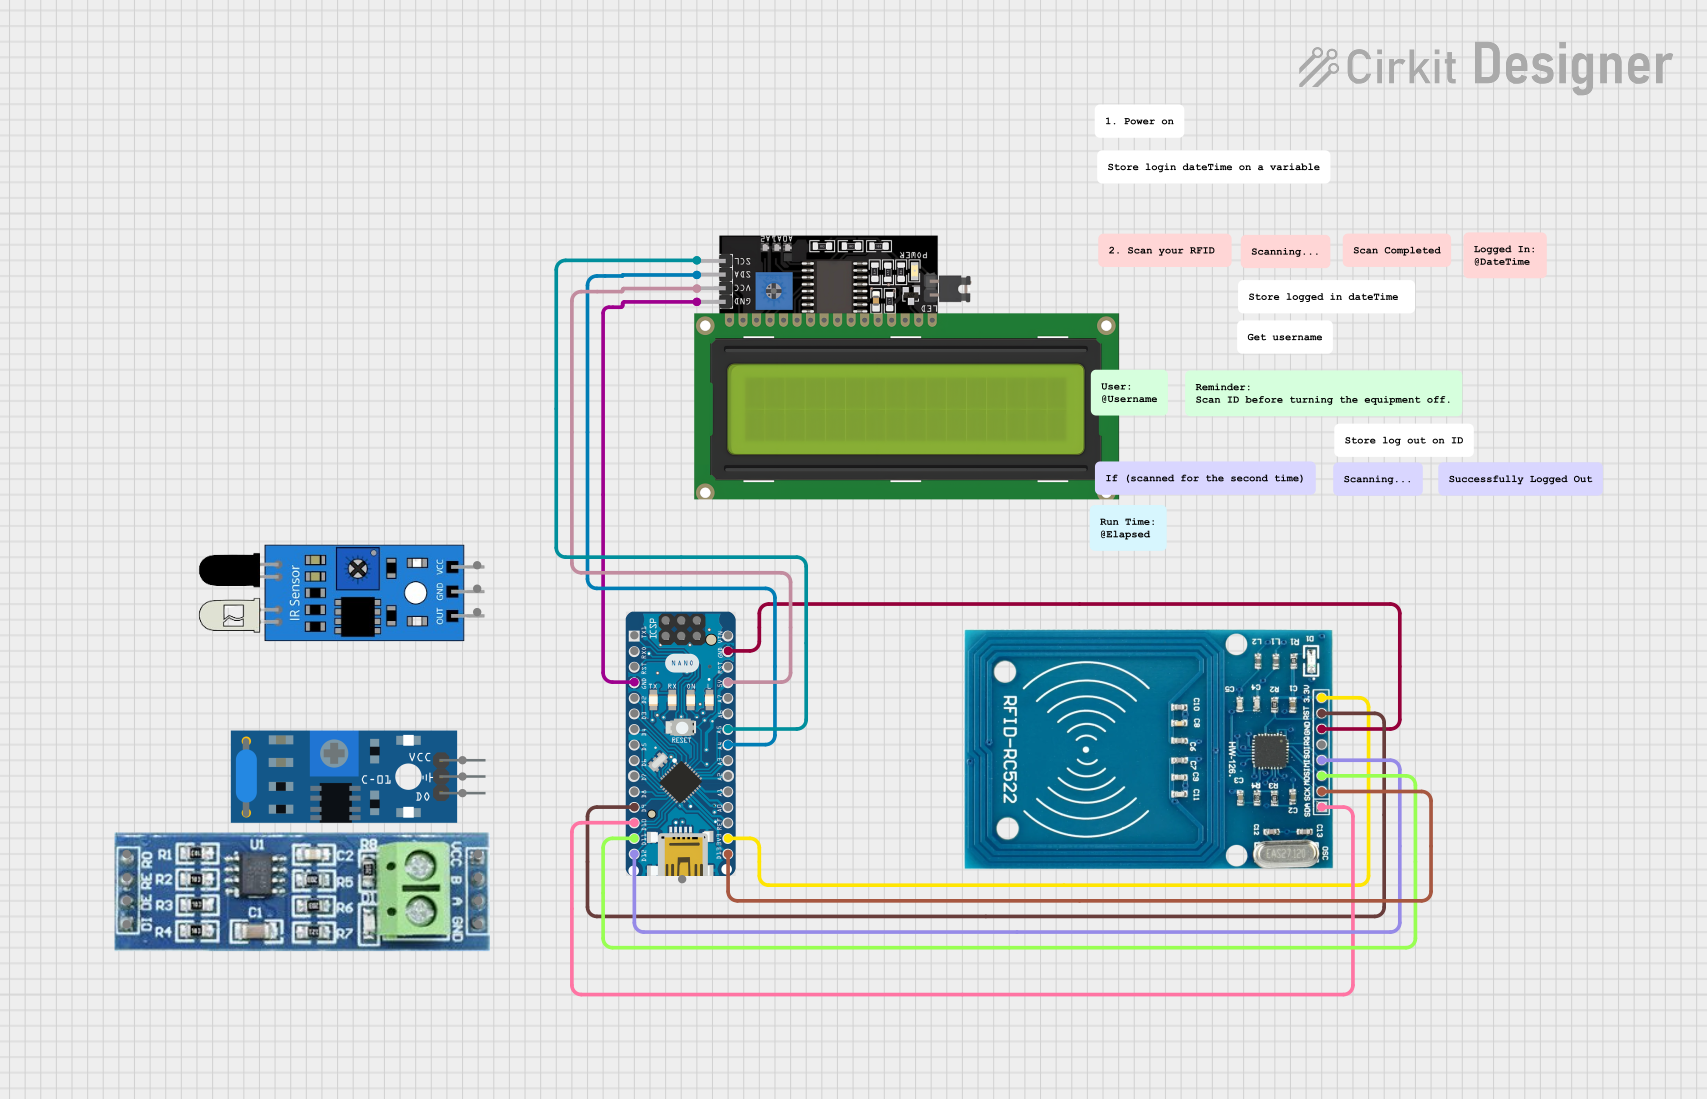
Circuit Documentation
Summary
This circuit involves an Arduino Nano microcontroller interfacing with an LCD Display (16x4 I2C) and an RFID-RC522 module. The circuit is designed to log and display login and logout times using the LCD display and an RTC module. Additionally, a buzzer and a button are used to signal and control the logging process.
Component List
LCD Display 16x4 I2C
- Pins: SCL, SDA, VCC, GND
- Description: A 16x4 character LCD display with I2C interface.
- Purpose: To display login and logout times.
RFID-RC522
- Pins: VCC (3.3V), RST, GND, IRQ, MISO, MOSI, SCK, SDA
- Description: An RFID reader module.
- Purpose: To read RFID tags for logging purposes.
Arduino Nano
- Pins: D1/TX, D0/RX, RESET, GND, D2, D3, D4, D5, D6, D7, D8, D9, D10, D11/MOSI, D12/MISO, VIN, 5V, A7, A6, A5, A4, A3, A2, A1, A0, AREF, 3V3, D13/SCK
- Description: A small, complete, and breadboard-friendly microcontroller board based on the ATmega328.
- Purpose: To control the circuit and execute the embedded code.
IR Sensor
- Pins: out, gnd, vcc
- Description: An infrared sensor module.
- Purpose: To detect objects or obstacles.
RS485
- Pins: VCC, RO, RE, GND, B, A, DE, DI
- Description: A module for RS485 communication.
- Purpose: To enable serial communication over long distances.
SW-420 Vibration Sensor
- Pins: vcc, Ground, Digital output
- Description: A vibration sensor module.
- Purpose: To detect vibrations or movements.
Wiring Details
LCD Display 16x4 I2C
- GND connected to Arduino Nano GND
- VCC connected to Arduino Nano 5V
- SCL connected to Arduino Nano A5
- SDA connected to Arduino Nano A4
RFID-RC522
- GND connected to Arduino Nano GND
- VCC (3.3V) connected to Arduino Nano 3V3
- RST connected to Arduino Nano D9
- SDA connected to Arduino Nano D10
- MOSI connected to Arduino Nano D11/MOSI
- MISO connected to Arduino Nano D12/MISO
- SCK connected to Arduino Nano D13/SCK
Arduino Nano
- GND connected to LCD Display 16x4 I2C GND and RFID-RC522 GND
- 5V connected to LCD Display 16x4 I2C VCC
- 3V3 connected to RFID-RC522 VCC (3.3V)
- A5 connected to LCD Display 16x4 I2C SCL
- A4 connected to LCD Display 16x4 I2C SDA
- D9 connected to RFID-RC522 RST
- D10 connected to RFID-RC522 SDA
- D11/MOSI connected to RFID-RC522 MOSI
- D12/MISO connected to RFID-RC522 MISO
- D13/SCK connected to RFID-RC522 SCK
Code Documentation
#include <Wire.h>
#include <RTClib.h>
#include <LiquidCrystal_I2C.h>

// Initialize the LCD display with I2C address 0x27 and size 16x2
LiquidCrystal_I2C lcd(0x27, 16, 2);

// Initialize the RTC module
RTC_DS3231 rtc;

// Variables to store login and logout times
DateTime loggedIn;
DateTime loggedOut;

// Variable to store the period (AM/PM)
String period = "AM";

// Pin definitions
const byte BUZZER_PIN = 5;
const byte BUTTON_PIN = 3;

// Variables to track button state
byte lastState = LOW;  // Previous state of the button
int currentState;      // Current state of the button

void setup() {
  // Start the I2C communication
  Wire.begin();

  // Set pin modes
  pinMode(BUZZER_PIN, OUTPUT);
  pinMode(BUTTON_PIN, INPUT_PULLUP);

  // Initialize serial communication at 9600 bits per second
  Serial.begin(9600);

  // Initialize the LCD display
  lcd.init();
  lcd.backlight();

  // Initialize the RTC module
  if (!rtc.begin()) {
    Serial.print("Couldn't find RTC");
    Serial.flush();
    while (1);
  }

  // Check if the RTC lost power and set the time if necessary
  if (rtc.lostPower()) {
    Serial.println("RTC lost power, let's set the time!");
    rtc.adjust(DateTime(F(__DATE__), F(__TIME__)));
  }

  // Display the login time on the LCD
  lcd.clear();
  lcd.print("Logged In:");
  loggedIn = rtc.now();
  displayTime(loggedIn);
}

void loop() {
  // Read the state of the button
  currentState = digitalRead(BUTTON_PIN);

  // Check for button press (transition from HIGH to LOW)
  if (lastState == HIGH && currentState == LOW) {
    // Sound the buzzer
    tone(BUZZER_PIN, 2000); // Send a 2kHz sound signal
    delay(500);             // for 0.5 seconds
    noTone(BUZZER_PIN);     // Stop the tone

    // Display the logout time on the LCD
    lcd.clear();
    lcd.print("Logged Out:");
    loggedOut = rtc.now();
    displayTime(loggedOut);

    delay(3000);
    lcd.clear();

    // Calculate and display the elapsed time
    long elapsedSeconds = loggedOut.unixtime() - loggedIn.unixtime();
    int elapsedHours = elapsedSeconds / 3600;
    int elapsedMinutes = (elapsedSeconds % 3600) / 60;
    int elapsedSecondsRemaining = elapsedSeconds % 60;

    lcd.print("Elapsed time:");
    lcd.setCursor(0, 1);
    lcd.print(elapsedHours);
    lcd.print("h ");
    lcd.print(elapsedMinutes);
    lcd.print("m ");
    lcd.print(elapsedSecondsRemaining);
    lcd.print("s");

    delay(5000);
    lcd.clear();
  }

  // Update the last state of the button
  lastState = currentState;
}

// Function to display time on the LCD
void displayTime(DateTime time) {
  lcd.setCursor(0, 1);
  int hour = time.hour();
  if (hour >= 12) {
    period = "PM";
    if (hour > 12) {
      hour -= 12;
    }
  } else if (hour == 0) {
    hour = 12;
  }
  lcd.print(hour);
  lcd.print(':');
  if (time.minute() < 10) lcd.print('0'); // Leading zero for minutes
  lcd.print(time.minute());
  lcd.print(':');
  if (time.second() < 10) lcd.print('0'); // Leading zero for seconds
  lcd.print(time.second());
  lcd.print(' ');
  lcd.print(period);
}
This code initializes the LCD display and RTC module, sets up the necessary pin modes, and handles the button press to log and display login and logout times. The buzzer is used to signal the button press, and the elapsed time is calculated and displayed on the LCD.