
Circuit Documentation
Summary of the Circuit
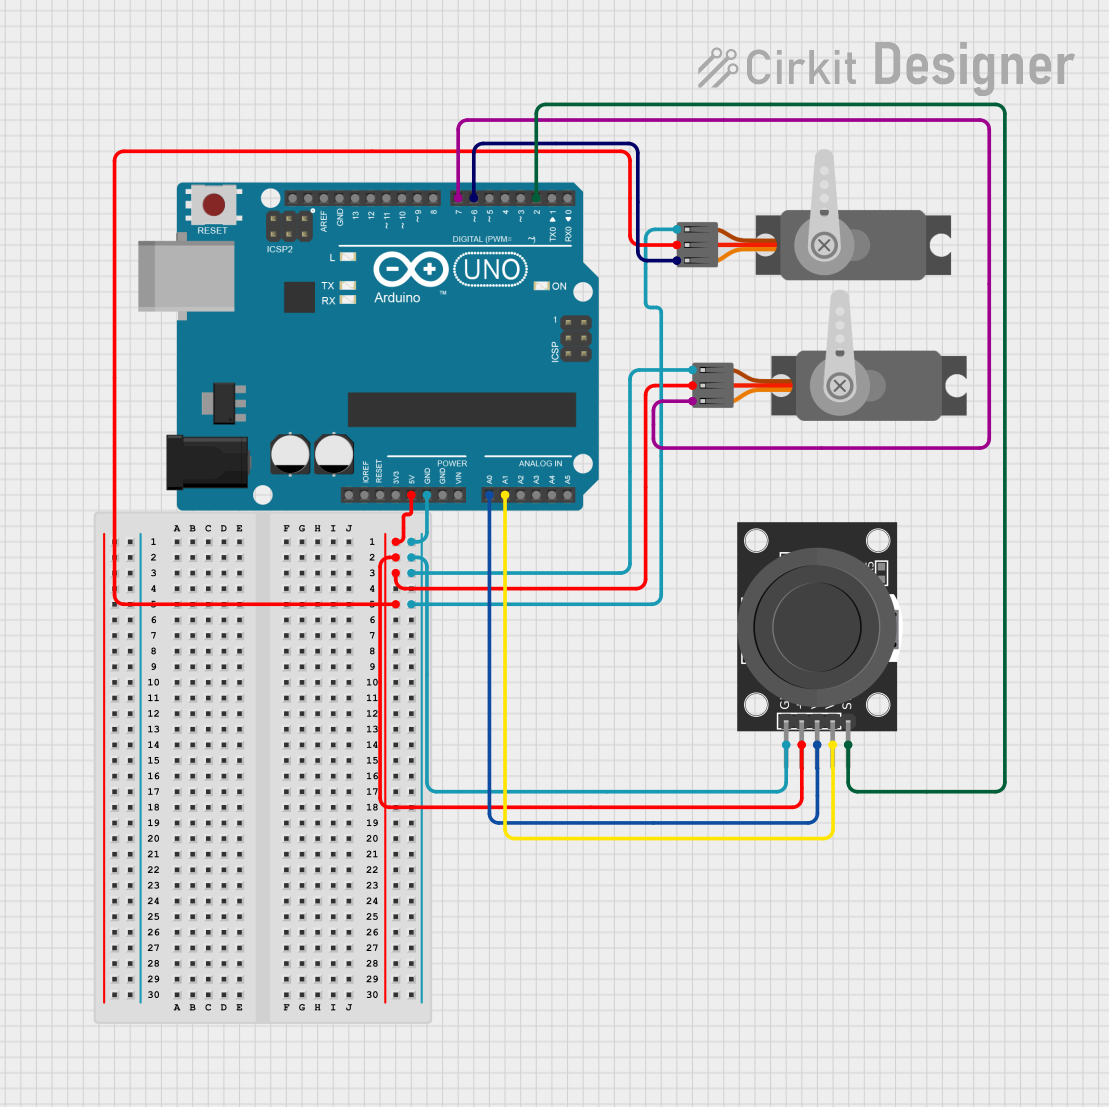
This circuit is designed to interface an Arduino UNO with two servo motors and a KY-023 Dual Axis Joystick Module. The Arduino UNO acts as the central controller, reading inputs from the joystick and controlling the position of the servo motors accordingly. The joystick provides two axes of control and a pushbutton switch, which can be used for various interactive applications. The servo motors are powered directly from the Arduino's 5V output and receive pulse width modulation (PWM) signals to set their positions.
Component List
Arduino UNO
- Description: A microcontroller board based on the ATmega328P.
- Pins: UNUSED, IOREF, Reset, 3.3V, 5V, GND, Vin, A0-A5, SCL, SDA, AREF, D0-D13.
Servo (Wokwi Compatible)
- Description: A standard servo motor compatible with Arduino for controlling mechanisms.
- Pins: GND, V+, PWM.
KY-023 Dual Axis Joystick Module
- Description: A joystick module that provides two analog outputs corresponding to the X and Y positions of the joystick, and a digital output for the pushbutton switch.
- Pins: GND, +5V, VRx, VRy, SW.
Wiring Details
Arduino UNO
- 5V: Supplies power to the KY-023 Joystick Module and both Servo motors.
- GND: Common ground for the Joystick Module and both Servo motors.
- A0: Reads the X-axis analog output from the Joystick Module.
- A1: Reads the Y-axis analog output from the Joystick Module.
- D2: Reads the pushbutton switch state from the Joystick Module.
- D6: Outputs PWM signal to control the position of one Servo motor.
- D7: Outputs PWM signal to control the position of the other Servo motor.
Servo (Wokwi Compatible)
- GND: Connected to the common ground.
- V+: Powered by the 5V output from the Arduino UNO.
- PWM: Receives PWM signal from the Arduino UNO to set the servo position.
KY-023 Dual Axis Joystick Module
- GND: Connected to the common ground.
- +5V: Powered by the 5V output from the Arduino UNO.
- VRx: X-axis analog output connected to A0 on the Arduino UNO.
- VRy: Y-axis analog output connected to A1 on the Arduino UNO.
- SW: Pushbutton switch output connected to D2 on the Arduino UNO.
Documented Code
Arduino UNO Code (sketch.ino)
void setup() {
  // put your setup code here, to run once:

}

void loop() {
  // put your main code here, to run repeatedly:

}
This code template provides the basic structure for an Arduino sketch, with setup() function to initialize settings once and loop() function to run the main code repeatedly. The user is expected to fill in the logic for reading the joystick inputs and controlling the servo motors within these functions.