
Arduino-Based Smart Garden Monitoring System with LCD Display and Automated Water Pump
View and Edit Project In Cirkit Designer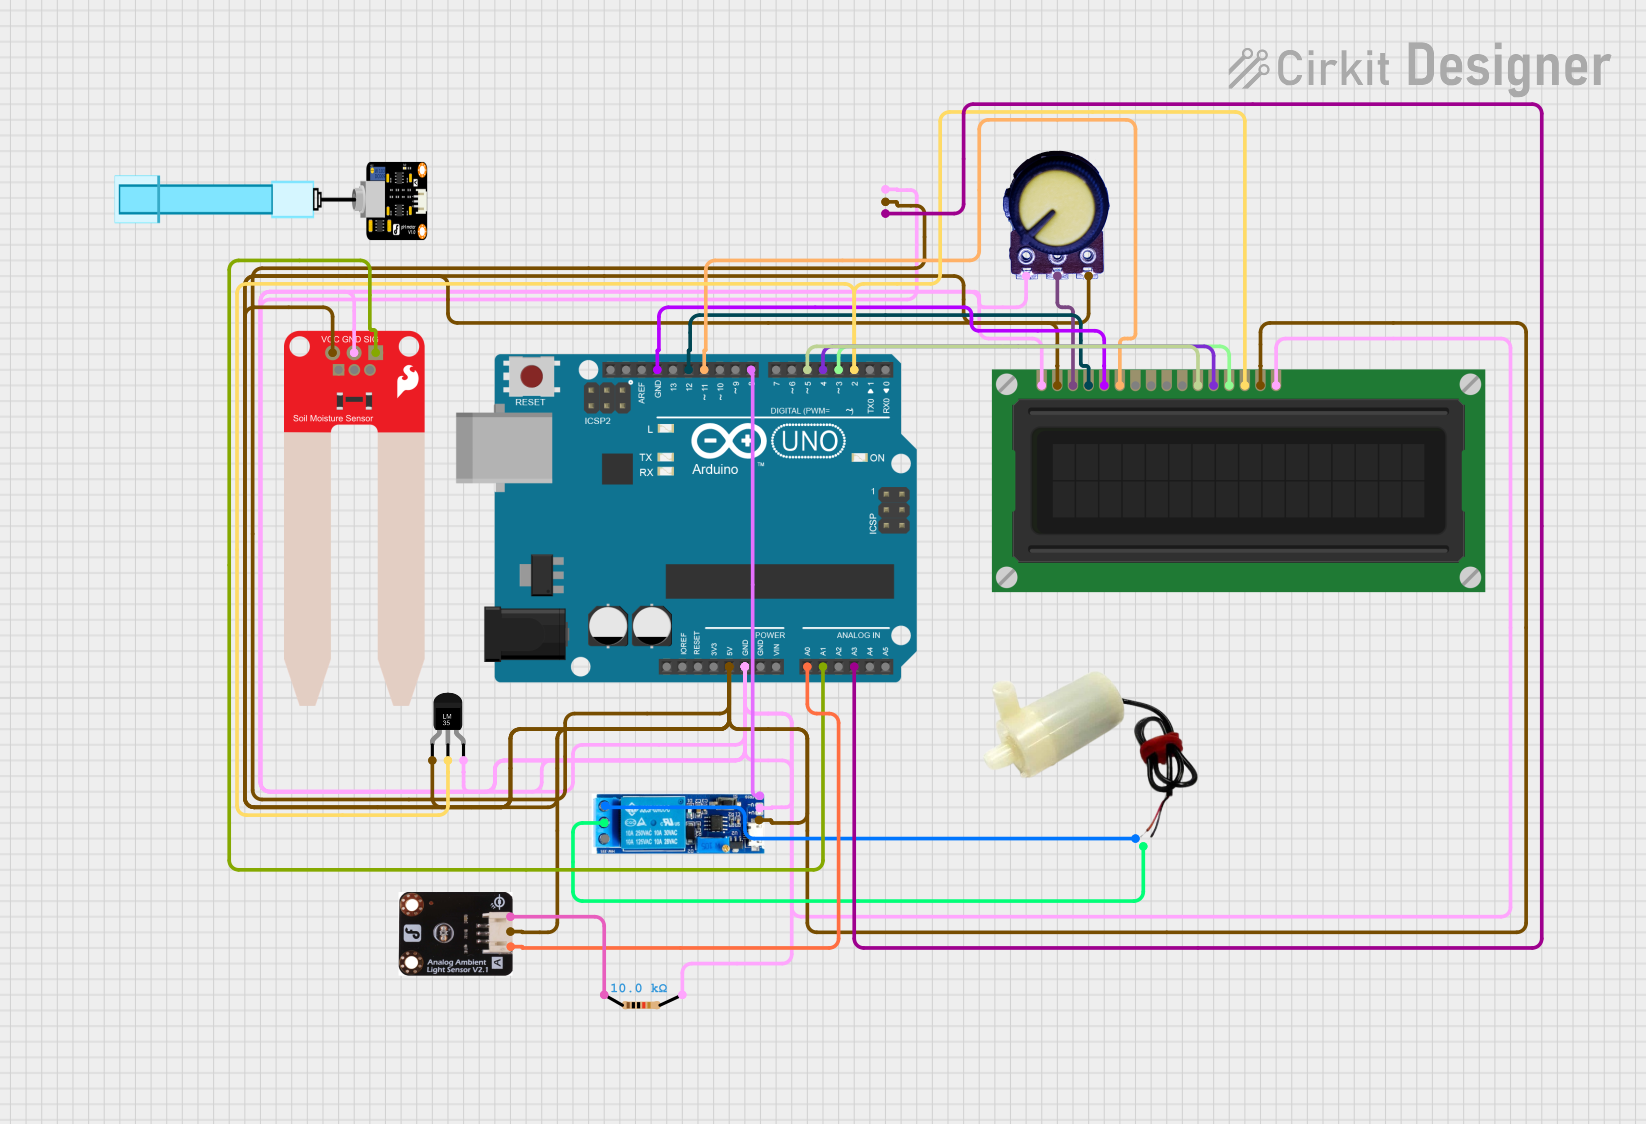
Circuit Documentation
Summary
This circuit is designed to monitor environmental conditions such as light level, soil moisture, temperature, and pH level. It uses an Arduino UNO microcontroller to read data from various sensors and display the information on an LCD screen. Additionally, the circuit controls a water pump via a relay module to maintain soil moisture levels.
Component List
Arduino UNO
- Description: Microcontroller board based on the ATmega328P.
- Pins: UNUSED, IOREF, Reset, 3.3V, 5V, GND, Vin, A0, A1, A2, A3, A4, A5, SCL, SDA, AREF, D13, D12, D11, D10, D9, D8, D7, D6, D5, D4, D3, D2, D1, D0
Temperature Sensor (LM35)
- Description: Analog temperature sensor.
- Pins: +Vs, Vout, GND
SparkFun Soil Moisture Sensor
- Description: Sensor to measure soil moisture levels.
- Pins: VCC, GND, SIG
5V Mini Water Pump
- Description: Small water pump powered by 5V.
- Pins: Positive pin, Negative pin
Relay Module 5V-30V
- Description: Relay module to control high voltage devices.
- Pins: Common contact, Normally open, Normally closed, Trigger, V-, V+
LCD Display (16 pin)
- Description: 16x2 character LCD display.
- Pins: VSS, VDD, VO, RS, R_W, E, DB0, DB1, DB2, DB3, DB4, DB5, DB6, DB7, A, K
Potentiometer
- Description: Variable resistor for adjusting LCD contrast.
- Pins: GND, Output, VCC
Ambient Light Sensor
- Description: Sensor to measure ambient light levels.
- Pins: GND, VCC, DATA
Resistor
- Description: 10k Ohm resistor.
- Pins: Pin1, Pin2
PH Meter
- Description: Sensor to measure pH levels.
- Pins: Signal, VCC, GND
Wiring Details
Arduino UNO
- 5V: Connected to VCC of the Temperature Sensor, SparkFun Soil Moisture Sensor, Ambient Light Sensor, PH Meter, V+ of the Relay Module, VDD and A of the LCD Display, and VCC of the Potentiometer.
- GND: Connected to GND of the Temperature Sensor, SparkFun Soil Moisture Sensor, Ambient Light Sensor, PH Meter, V- of the Relay Module, VSS and K of the LCD Display, GND of the Potentiometer, and R_W of the LCD Display.
- A0: Connected to DATA of the Ambient Light Sensor.
- A1: Connected to SIG of the SparkFun Soil Moisture Sensor.
- A2: Connected to Vout of the Temperature Sensor.
- A3: Connected to Signal of the PH Meter.
- D2: Connected to DB7 of the LCD Display.
- D3: Connected to DB6 of the LCD Display.
- D4: Connected to DB5 of the LCD Display.
- D5: Connected to DB4 of the LCD Display.
- D8: Connected to Trigger of the Relay Module.
- D11: Connected to E of the LCD Display.
- D12: Connected to RS of the LCD Display.
Temperature Sensor (LM35)
- +Vs: Connected to 5V of the Arduino UNO.
- Vout: Connected to A2 of the Arduino UNO.
- GND: Connected to GND of the Arduino UNO.
SparkFun Soil Moisture Sensor
- VCC: Connected to 5V of the Arduino UNO.
- GND: Connected to GND of the Arduino UNO.
- SIG: Connected to A1 of the Arduino UNO.
5V Mini Water Pump
- Positive pin: Connected to Normally Open of the Relay Module.
- Negative pin: Connected to Common Contact of the Relay Module.
Relay Module 5V-30V
- V+: Connected to 5V of the Arduino UNO.
- V-: Connected to GND of the Arduino UNO.
- Trigger: Connected to D8 of the Arduino UNO.
- Common Contact: Connected to Negative Pin of the 5V Mini Water Pump.
- Normally Open: Connected to Positive Pin of the 5V Mini Water Pump.
LCD Display (16 pin)
- VSS: Connected to GND of the Arduino UNO.
- VDD: Connected to 5V of the Arduino UNO.
- VO: Connected to Output of the Potentiometer.
- RS: Connected to D12 of the Arduino UNO.
- R_W: Connected to GND of the Arduino UNO.
- E: Connected to D11 of the Arduino UNO.
- DB4: Connected to D5 of the Arduino UNO.
- DB5: Connected to D4 of the Arduino UNO.
- DB6: Connected to D3 of the Arduino UNO.
- DB7: Connected to D2 of the Arduino UNO.
- A: Connected to 5V of the Arduino UNO.
- K: Connected to GND of the Arduino UNO.
Potentiometer
- GND: Connected to GND of the Arduino UNO.
- Output: Connected to VO of the LCD Display.
- VCC: Connected to 5V of the Arduino UNO.
Ambient Light Sensor
- GND: Connected to GND of the Arduino UNO.
- VCC: Connected to 5V of the Arduino UNO.
- DATA: Connected to A0 of the Arduino UNO.
Resistor
- Pin1: Connected to GND of the Ambient Light Sensor.
- Pin2: Connected to GND of the Arduino UNO.
PH Meter
- Signal: Connected to A3 of the Arduino UNO.
- VCC: Connected to 5V of the Arduino UNO.
- GND: Connected to GND of the Arduino UNO.
Code Documentation
#include <LiquidCrystal.h>
#include <DHT.h>

// Pin definitions
#define LDR_PIN A0                // LDR pin for light sensor
#define MOISTURE_PIN A1           // Soil Moisture Sensor
#define DHT_PIN 2                 // DHT11 sensor pin
#define RELAY_PIN 8               // Relay pin to control water pump
#define POT_PIN A2                // Potentiometer for LCD contrast
#define PH_PIN A3                 // pH sensor pin

// DHT sensor setup
#define DHT_TYPE DHT11            // Define the DHT sensor type (DHT11 or DHT22)
DHT dht(DHT_PIN, DHT_TYPE);

// LCD setup (16x2 LCD)
LiquidCrystal lcd(12, 11, 5, 4, 3, 2); // Pin mapping for 4-bit mode

void setup() {
  // Initialize serial communication
  Serial.begin(9600);

  // Initialize the LCD
  lcd.begin(16, 2);
  lcd.setBacklight(1); // Turn on the backlight

  // Initialize DHT sensor
  dht.begin();

  // Set the relay pin as output
  pinMode(RELAY_PIN, OUTPUT);
  digitalWrite(RELAY_PIN, LOW); // Ensure pump is off at start
}

void loop() {
  // Read sensor values
  int lightLevel = analogRead(LDR_PIN);        // Read light level
  int moistureLevel = analogRead(MOISTURE_PIN);  // Read soil moisture level
  float temperature = dht.readTemperature();  // Read temperature
  int phLevel = analogRead(PH_PIN);           // Read pH level from sensor

  // Check if DHT sensor failed to read
  if (isnan(temperature)) {
    Serial.println("Failed to read temperature!");
    temperature = 0.0;  // Set to 0 in case of failure
  }

  // Read potentiometer value to adjust LCD contrast
  int contrast = analogRead(POT_PIN) / 4;  // Scale potentiometer value (0-1023 -> 0-255)

  // Adjust the LCD contrast (not all LCD models support this method, it's for some specific types)
  analogWrite(6, contrast);  // Pin 6 for contrast adjustment (if applicable, for some LCD models)

  // Print the values to the Serial Monitor for debugging
  Serial.print("Light Level: ");
  Serial.print(lightLevel);
  Serial.print(" Moisture Level: ");
  Serial.print(moistureLevel);
  Serial.print(" Temp: ");
  Serial.print(temperature);
  Serial.print(" pH: ");
  Serial.println(phLevel);

  // Display values on the LCD
  lcd.clear();
  lcd.setCursor(0, 0);
  lcd.print