
Arduino UNO-Based Keypad-Controlled Door Lock System with LCD Display and Relay
View and Edit Project In Cirkit Designer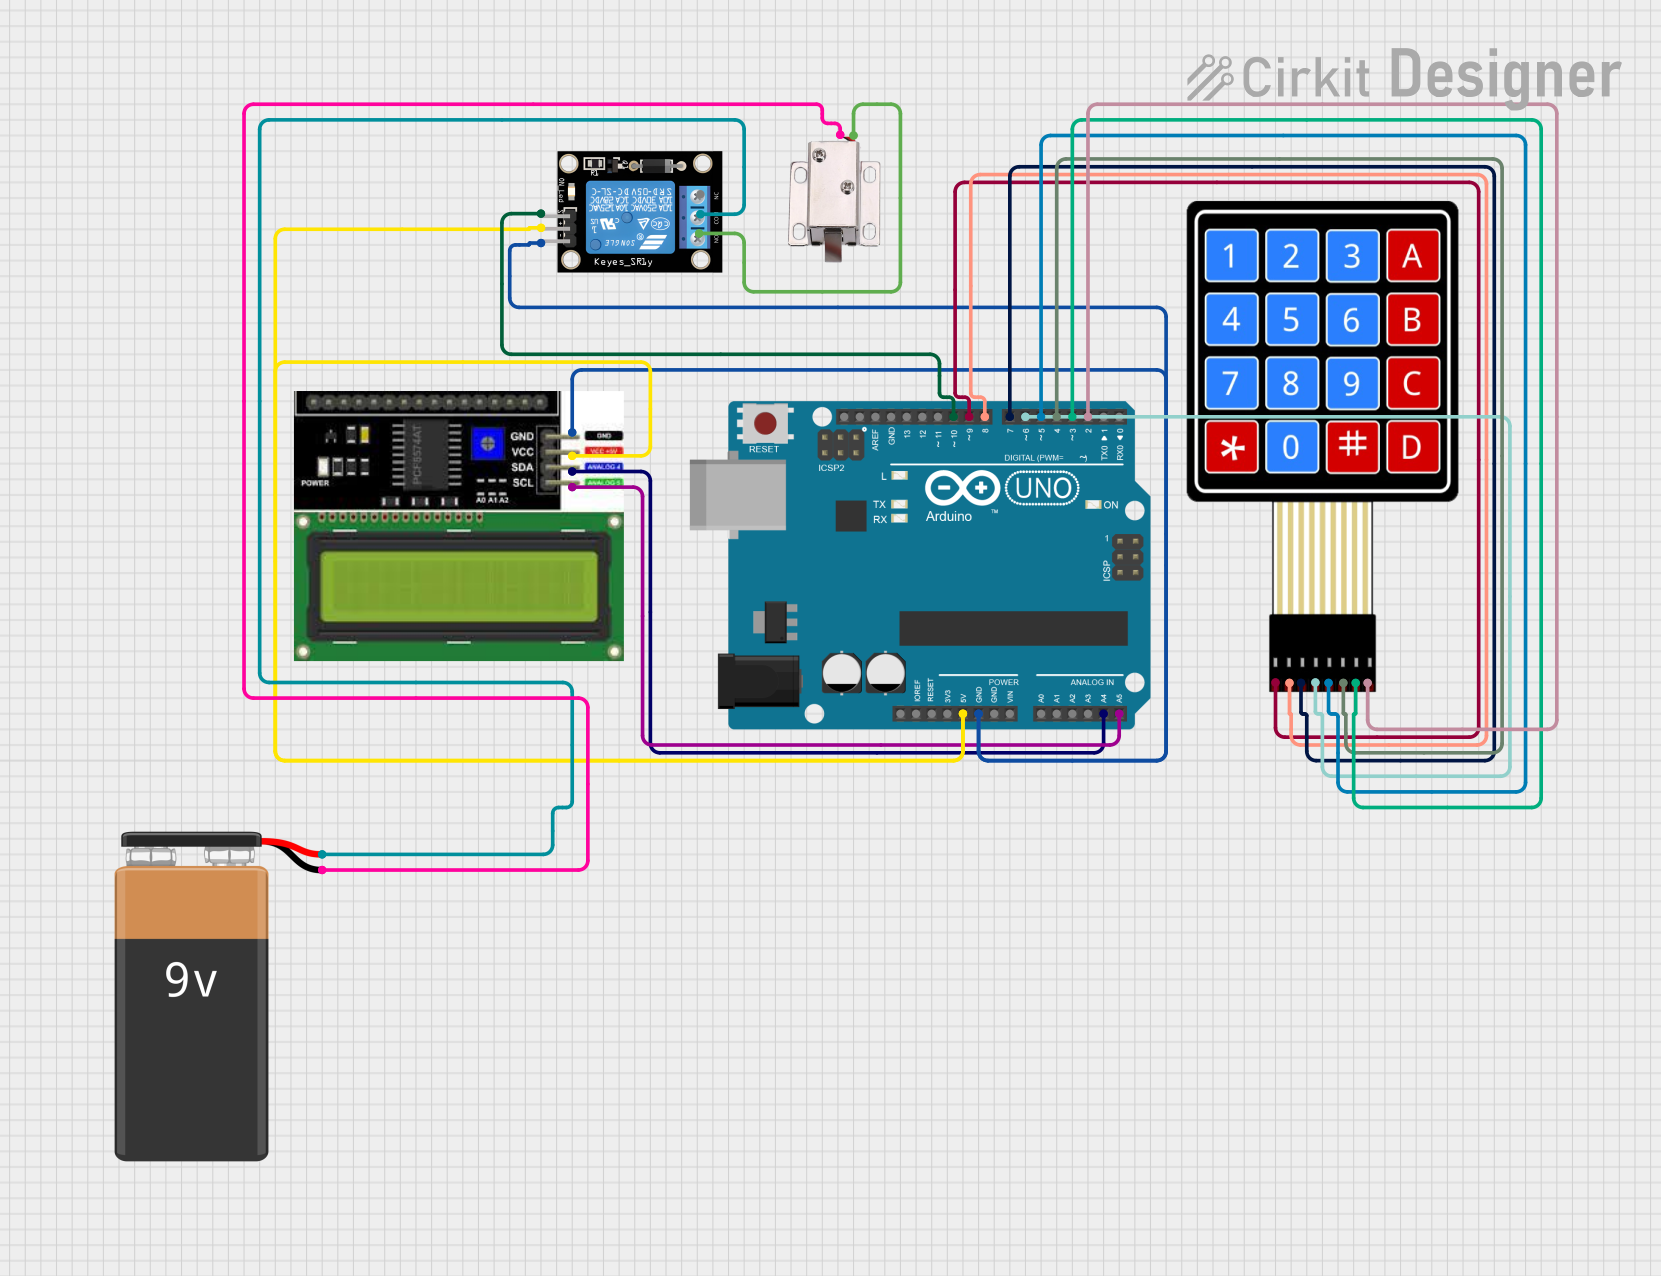
Circuit Documentation
Summary
This circuit is a door lock system that uses a 4x4 membrane matrix keypad, an LCD I2C display, and a relay module to control a 12V solenoid lock. The system is controlled by an Arduino UNO microcontroller. The user inputs a password via the keypad, which is displayed on the LCD. If the entered password matches the predefined password, the relay is activated, unlocking the solenoid lock.
Component List
Arduino UNO
- Description: Microcontroller board based on the ATmega328P.
- Pins: UNUSED, IOREF, Reset, 3.3V, 5V, GND, Vin, A0, A1, A2, A3, A4, A5, SCL, SDA, AREF, D13, D12, D11, D10, D9, D8, D7, D6, D5, D4, D3, D2, D1, D0
LCD I2C Display
- Description: 16x2 character LCD display with I2C interface.
- Pins: GND, VCC, SDA, SCL
Relay Module 1 Channel
- Description: Single-channel relay module for switching high voltage devices.
- Pins: S, 5V, GND, NC, COM, NO
4X4 Membrane Matrix Keypad
- Description: 4x4 matrix keypad for user input.
- Pins: R1, R2, R3, R4, C1, C2, C3, C4
12V Solenoid Lock
- Description: Electromechanical lock that operates on 12V.
- Pins: VCC, GND
9V Battery
- Description: Power source for the solenoid lock.
- Pins: -, +
Wiring Details
Arduino UNO
- 5V: Connected to VCC of LCD I2C Display and 5V of Relay Module.
- GND: Connected to GND of LCD I2C Display and GND of Relay Module.
- A4: Connected to SDA of LCD I2C Display.
- A5: Connected to SCL of LCD I2C Display.
- D10: Connected to S of Relay Module.
- D9: Connected to R1 of 4X4 Membrane Matrix Keypad.
- D8: Connected to R2 of 4X4 Membrane Matrix Keypad.
- D7: Connected to R3 of 4X4 Membrane Matrix Keypad.
- D6: Connected to R4 of 4X4 Membrane Matrix Keypad.
- D5: Connected to C1 of 4X4 Membrane Matrix Keypad.
- D4: Connected to C2 of 4X4 Membrane Matrix Keypad.
- D3: Connected to C3 of 4X4 Membrane Matrix Keypad.
- D2: Connected to C4 of 4X4 Membrane Matrix Keypad.
LCD I2C Display
- VCC: Connected to 5V of Arduino UNO.
- GND: Connected to GND of Arduino UNO.
- SDA: Connected to A4 of Arduino UNO.
- SCL: Connected to A5 of Arduino UNO.
Relay Module 1 Channel
- 5V: Connected to 5V of Arduino UNO.
- GND: Connected to GND of Arduino UNO.
- S: Connected to D10 of Arduino UNO.
- COM: Connected to + of 9V Battery.
- NO: Connected to VCC of 12V Solenoid Lock.
4X4 Membrane Matrix Keypad
- R1: Connected to D9 of Arduino UNO.
- R2: Connected to D8 of Arduino UNO.
- R3: Connected to D7 of Arduino UNO.
- R4: Connected to D6 of Arduino UNO.
- C1: Connected to D5 of Arduino UNO.
- C2: Connected to D4 of Arduino UNO.
- C3: Connected to D3 of Arduino UNO.
- C4: Connected to D2 of Arduino UNO.
12V Solenoid Lock
- VCC: Connected to NO of Relay Module.
- GND: Connected to - of 9V Battery.
9V Battery
- +: Connected to COM of Relay Module.
- -: Connected to GND of 12V Solenoid Lock.
Code Documentation
/*
 * Door Lock System using 4x4 Keypad, LCD, and Relay
 * This code reads input from a 4x4 keypad, displays it on an LCD using I2C,
 * and checks if the entered code matches a predefined password to
 * unlock the door by activating a relay. Feedback is provided on incorrect
 * entry, and blocking delays are prevented.
 * Password: 1234
 */

#include <Keypad.h>
#include <Wire.h>
#include <LiquidCrystal_I2C.h>

const byte ROWS = 4; // Four rows
const byte COLS = 4; // Four columns
char keys[ROWS][COLS] = {
  {'1','2','3','A'},
  {'4','5','6','B'},
  {'7','8','9','C'},
  {'*','0','#','D'}
};
byte rowPins[ROWS] = {9, 8, 7, 6}; // Connect to the row pinouts of the keypad
byte colPins[COLS] = {5, 4, 3, 2}; // Connect to the column pinouts of the keypad

Keypad keypad = Keypad(makeKeymap(keys), rowPins, colPins, ROWS, COLS);

LiquidCrystal_I2C lcd(0x27, 16, 2); // Set the LCD address to 0x27 for a 16 chars and 2 line display

const int relayPin = 10; // Pin connected to the relay
String password = "1234";
String input = "";
unsigned long lastInteraction = 0;
const unsigned long timeout = 3000; // 3 seconds timeout for feedback

void setup() {
  pinMode(relayPin, OUTPUT);
  digitalWrite(relayPin, LOW); // Ensure relay is off initially
  lcd.begin(16,2);
  lcd.backlight();
  lcd.print("Enter Password:");
}

void loop() {
  char key = keypad.getKey();
  if (key) {
    lastInteraction = millis();
    if (key == '#') {
      if (input == password) {
        lcd.clear();
        lcd.print("Access Granted");
        digitalWrite(relayPin, HIGH); // Activate relay
        delay(5000); // Keep relay on for 5 seconds
        digitalWrite(relayPin, LOW); // Deactivate relay
      } else {
        lcd.clear();
        lcd.print("Access Denied");
      }
      input = "";
    } else if (key == '*') {
      input = "";
      lcd.clear();
      lcd.print("Enter Password:");
    } else {
      input += key;
      lcd.setCursor(0, 1);
      lcd.print(input);
    }
  }
  if (millis() - lastInteraction > timeout && input != "") {
    lcd.clear();
    lcd.print("Enter Password:");
    input = "";
  }
}
This code initializes the keypad and LCD, sets up the relay pin, and continuously checks for key presses. When a key is pressed, it updates the input string and displays it on the LCD. If the '#' key is pressed, it checks if the input matches the predefined password. If the password is correct, it activates the relay to unlock the door. If the password is incorrect, it displays "Access Denied" on the LCD. The '*' key clears the input. If there is no interaction for 3 seconds, the input is cleared, and the prompt to enter the password is displayed again.