
Arduino UNO-Based Smart Car Parking System with IR Sensors and LCD Display
View and Edit Project In Cirkit Designer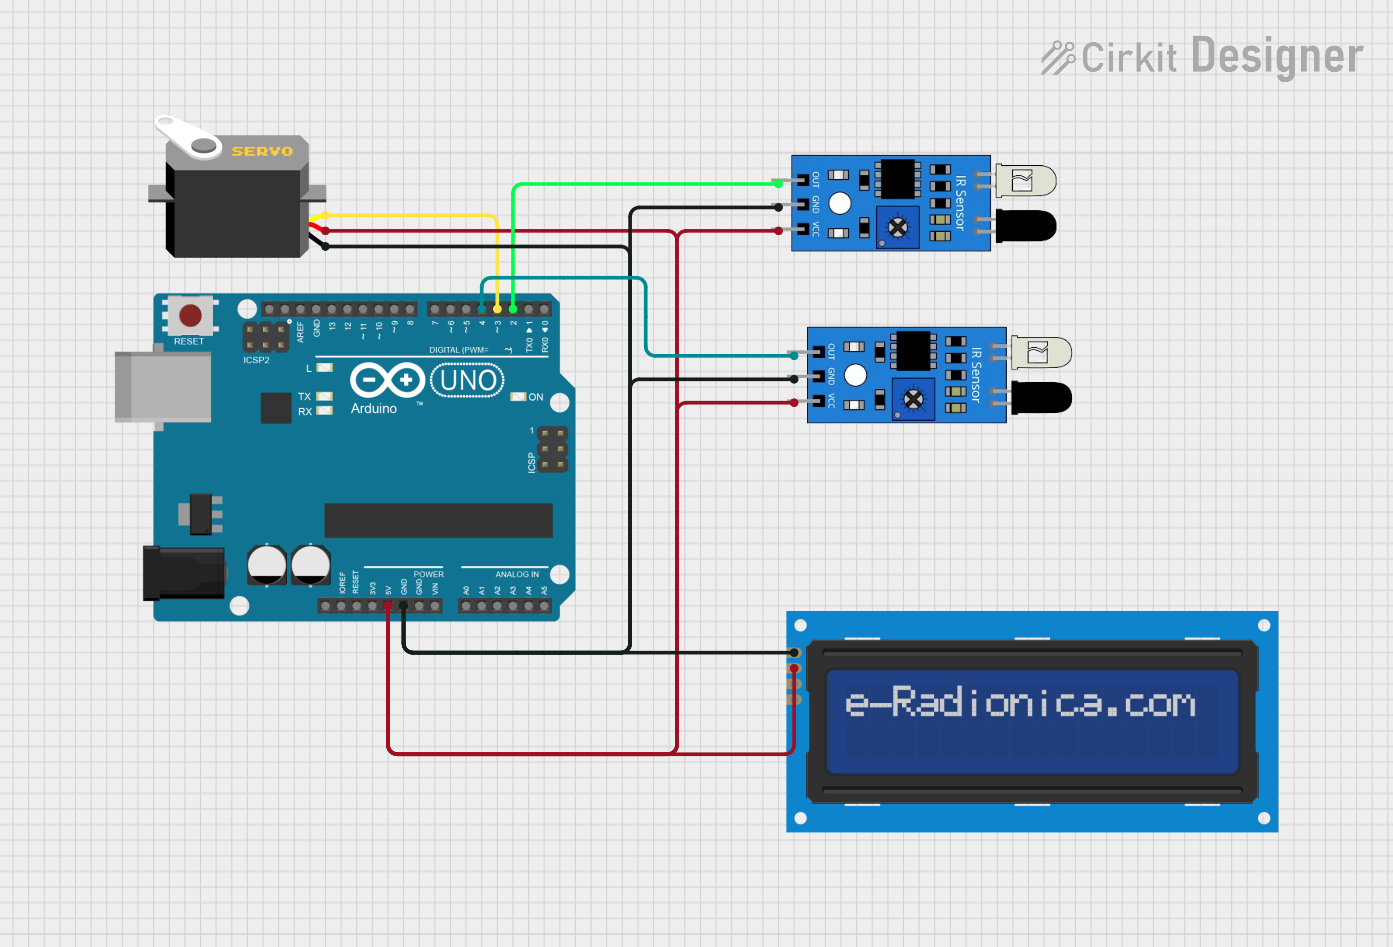
Circuit Documentation
Summary
This circuit is an Arduino-based car parking system. It uses an Arduino UNO microcontroller to control an LCD screen, two IR sensors, and a servo motor. The system detects the presence of a car using the IR sensors and updates the parking slot availability on the LCD screen. The servo motor acts as a gate that opens and closes based on the availability of parking slots.
Component List
Arduino UNO
- Description: A microcontroller board based on the ATmega328P.
- Pins: UNUSED, IOREF, Reset, 3.3V, 5V, GND, Vin, A0, A1, A2, A3, A4, A5, SCL, SDA, AREF, D13, D12, D11, D10, D9, D8, D7, D6, D5, D4, D3, D2, D1, D0
IR Sensor (x2)
- Description: Infrared sensor used to detect the presence of a car.
- Pins: out, gnd, vcc
LCD Screen 16x2 I2C
- Description: A 16x2 character LCD display with I2C interface.
- Pins: SCL, SDA, VCC, GND
Servo
- Description: A servo motor used to act as a gate.
- Pins: gnd, vcc, pulse
Wiring Details
Arduino UNO
- 5V: Connected to VCC of LCD screen, VCC of both IR sensors, and VCC of the servo.
- GND: Connected to GND of LCD screen, GND of both IR sensors, and GND of the servo.
- D4: Connected to the out pin of the second IR sensor.
- D3: Connected to the pulse pin of the servo.
- D2: Connected to the out pin of the first IR sensor.
IR Sensor 1
- out: Connected to D2 of Arduino UNO.
- gnd: Connected to GND of Arduino UNO.
- vcc: Connected to 5V of Arduino UNO.
IR Sensor 2
- out: Connected to D4 of Arduino UNO.
- gnd: Connected to GND of Arduino UNO.
- vcc: Connected to 5V of Arduino UNO.
LCD Screen 16x2 I2C
- SCL: Not connected in the provided net list.
- SDA: Not connected in the provided net list.
- VCC: Connected to 5V of Arduino UNO.
- GND: Connected to GND of Arduino UNO.
Servo
- gnd: Connected to GND of Arduino UNO.
- vcc: Connected to 5V of Arduino UNO.
- pulse: Connected to D3 of Arduino UNO.
Code Documentation
Arduino UNO Code
// Viral Science www.viralsciencecreativity.com www.youtube.com/c/viralscience
// Arduino Car Parking System

#include <Wire.h>
#include <LiquidCrystal_I2C.h>
LiquidCrystal_I2C lcd(0x3F,16,2);  //Change the HEX address
#include <Servo.h>

Servo myservo1;

int IR1 = 2;
int IR2 = 4;

int Slot = 4;           //Enter Total number of parking Slots

int flag1 = 0;
int flag2 = 0;

void setup() {
  lcd.begin();
  lcd.backlight();
  pinMode(IR1, INPUT);
  pinMode(IR2, INPUT);

  myservo1.attach(3);
  myservo1.write(100);

  lcd.setCursor (0,0);
  lcd.print("     ARDUINO    ");
  lcd.setCursor (0,1);
  lcd.print(" PARKING SYSTEM ");
  delay (2000);
  lcd.clear();
}

void loop(){

  if(digitalRead (IR1) == LOW && flag1==0){
    if(Slot>0){
      flag1=1;
      if(flag2==0){
        myservo1.write(0);
        Slot = Slot-1;
      }
    } else {
      lcd.setCursor (0,0);
      lcd.print("    SORRY :(    ");
      lcd.setCursor (0,1);
      lcd.print("  Parking Full  ");
      delay (3000);
      lcd.clear();
    }
  }

  if(digitalRead (IR2) == LOW && flag2==0){
    flag2=1;
    if(flag1==0){
      myservo1.write(0);
      Slot = Slot+1;
    }
  }

  if(flag1==1 && flag2==1){
    delay (1000);
    myservo1.write(100);
    flag1=0, flag2=0;
  }

  lcd.setCursor (0,0);
  lcd.print("    WELCOME!    ");
  lcd.setCursor (0,1);
  lcd.print("Slot Left: ");
  lcd.print(Slot);
}
IR Sensor Code
void setup() {
  // put your setup code here, to run once:
}

void loop() {
  // put your main code here, to run repeatedly:
}
This documentation provides a comprehensive overview of the circuit, including a summary, detailed component list, wiring details, and the code used in the microcontroller.