
Arduino UNO-Based Smart Temperature-Controlled Fan with OLED Display
View and Edit Project In Cirkit Designer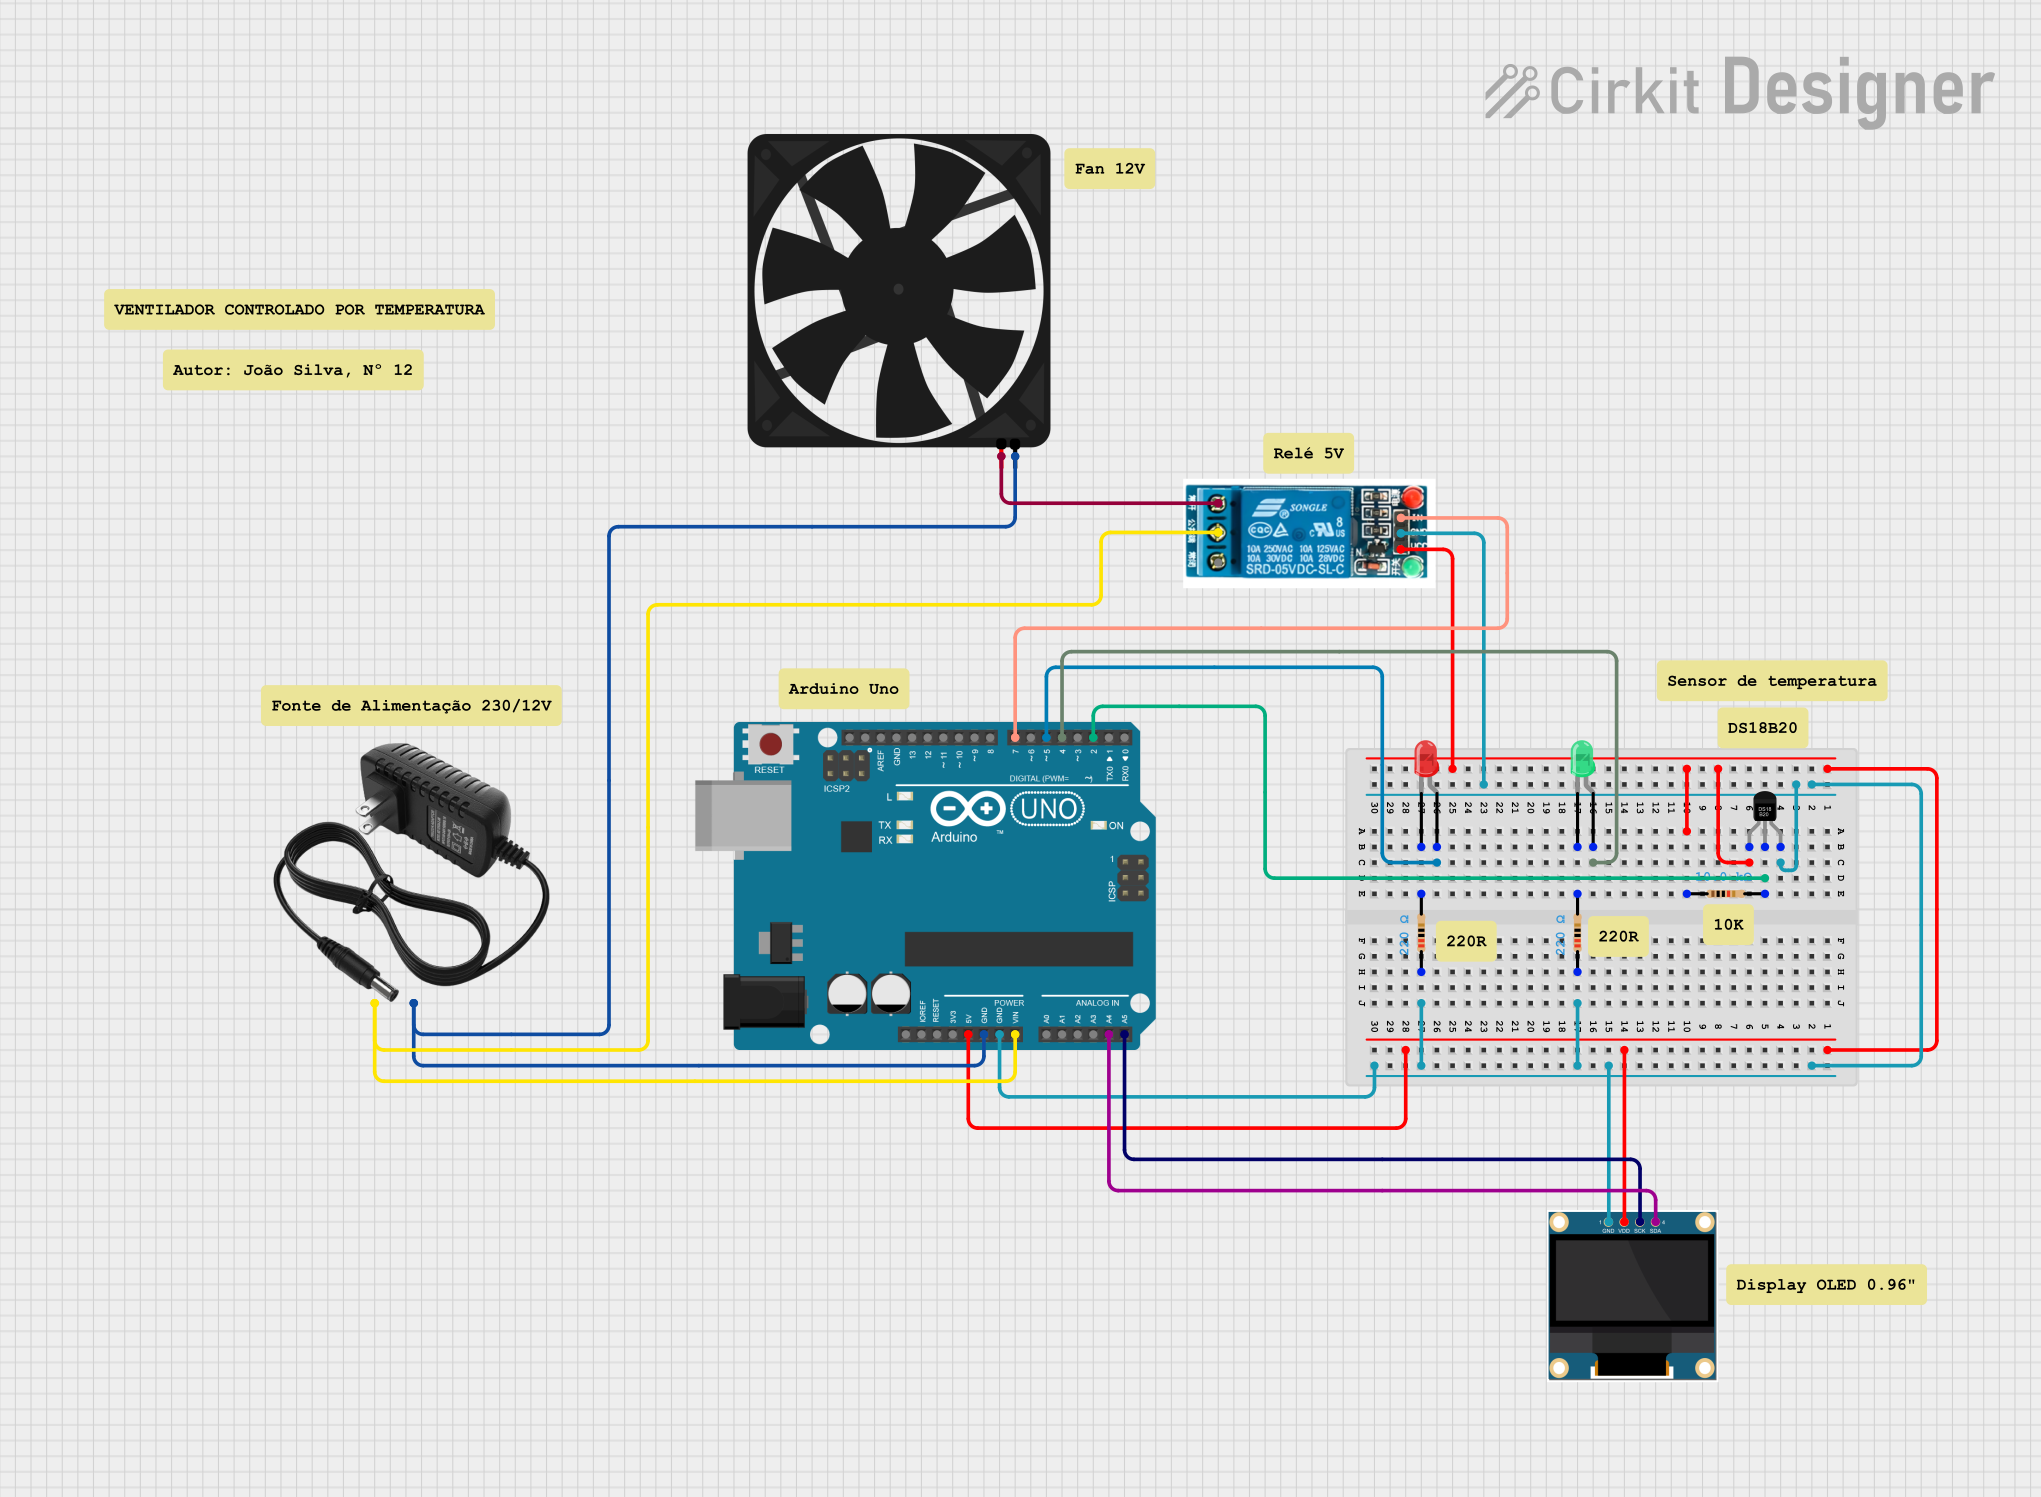
Circuit Documentation
Summary
This circuit involves an Arduino UNO microcontroller interfacing with various components including a 0.96" OLED display, a DS18B20 temperature sensor, a 5V relay, a fan, and LEDs. The circuit is powered by a 12V power supply. The Arduino UNO controls the relay, which in turn controls the fan. The OLED display is used for visual output, and the DS18B20 sensor measures temperature. LEDs are used for status indication.
Component List
Arduino UNO
- Description: Microcontroller board based on the ATmega328P.
- Pins: UNUSED, IOREF, Reset, 3.3V, 5V, GND, Vin, A0, A1, A2, A3, A4, A5, SCL, SDA, AREF, D13, D12, D11, D10, D9, D8, D7, D6, D5, D4, D3, D2, D1, D0
0.96" OLED
- Description: Small OLED display for visual output.
- Pins: GND, VDD, SCK, SDA
12V Power Supply
- Description: Power supply providing 12V.
- Pins: +, -
DS18B20
- Description: Digital temperature sensor.
- Pins: VDD, DQ, GND
Fan
- Description: Cooling fan.
- Pins: GND, 5V
5V Relay
- Description: Relay module for switching.
- Pins: Normally Open, Common terminal, Normally Closed, In, GND, VCC
Resistor (220 Ohms)
- Description: Resistor with 220 Ohms resistance.
- Pins: pin1, pin2
Resistor (10k Ohms)
- Description: Resistor with 10k Ohms resistance.
- Pins: pin1, pin2
LED: Two Pin (red)
- Description: Red LED.
- Pins: cathode, anode
LED: Two Pin (green)
- Description: Green LED.
- Pins: cathode, anode
Wiring Details
Arduino UNO
- GND: Connected to GND of DS18B20, 5V relay, 0.96" OLED, and resistors.
- 5V: Connected to VDD of DS18B20, VCC of 5V relay, and VDD of 0.96" OLED.
- Vin: Connected to + of 12V power supply.
- D2: Connected to DQ of DS18B20.
- D4: Connected to anode of green LED.
- D5: Connected to anode of red LED.
- D7: Connected to In of 5V relay.
- A4: Connected to SDA of 0.96" OLED.
- A5: Connected to SCK of 0.96" OLED.
0.96" OLED
- GND: Connected to GND of Arduino UNO.
- VDD: Connected to 5V of Arduino UNO.
- SCK: Connected to A5 of Arduino UNO.
- SDA: Connected to A4 of Arduino UNO.
12V Power Supply
- -: Connected to GND of fan and Arduino UNO.
- +: Connected to Common terminal of 5V relay and Vin of Arduino UNO.
DS18B20
- GND: Connected to GND of Arduino UNO.
- DQ: Connected to D2 of Arduino UNO.
- VDD: Connected to 5V of Arduino UNO.
Fan
- GND: Connected to - of 12V power supply.
- 5V: Connected to Normally Open of 5V relay.
5V Relay
- GND: Connected to GND of Arduino UNO.
- VCC: Connected to 5V of Arduino UNO.
- In: Connected to D7 of Arduino UNO.
- Common terminal: Connected to + of 12V power supply.
- Normally Open: Connected to 5V of fan.
Resistor (220 Ohms)
- pin1: Connected to GND of Arduino UNO.
- pin2: Connected to cathode of red LED.
Resistor (220 Ohms)
- pin1: Connected to GND of Arduino UNO.
- pin2: Connected to cathode of green LED.
Resistor (10k Ohms)
- pin1: Connected to VDD of DS18B20.
- pin2: Connected to DQ of DS18B20.
LED: Two Pin (red)
- cathode: Connected to pin2 of 220 Ohms resistor.
- anode: Connected to D5 of Arduino UNO.
LED: Two Pin (green)
- cathode: Connected to pin2 of 220 Ohms resistor.
- anode: Connected to D4 of Arduino UNO.
Documented Code
sketch.ino
void setup() {
  // put your setup code here, to run once:

}

void loop() {
  // put your main code here, to run repeatedly:

}
documentation.txt