
Circuit Documentation
Summary
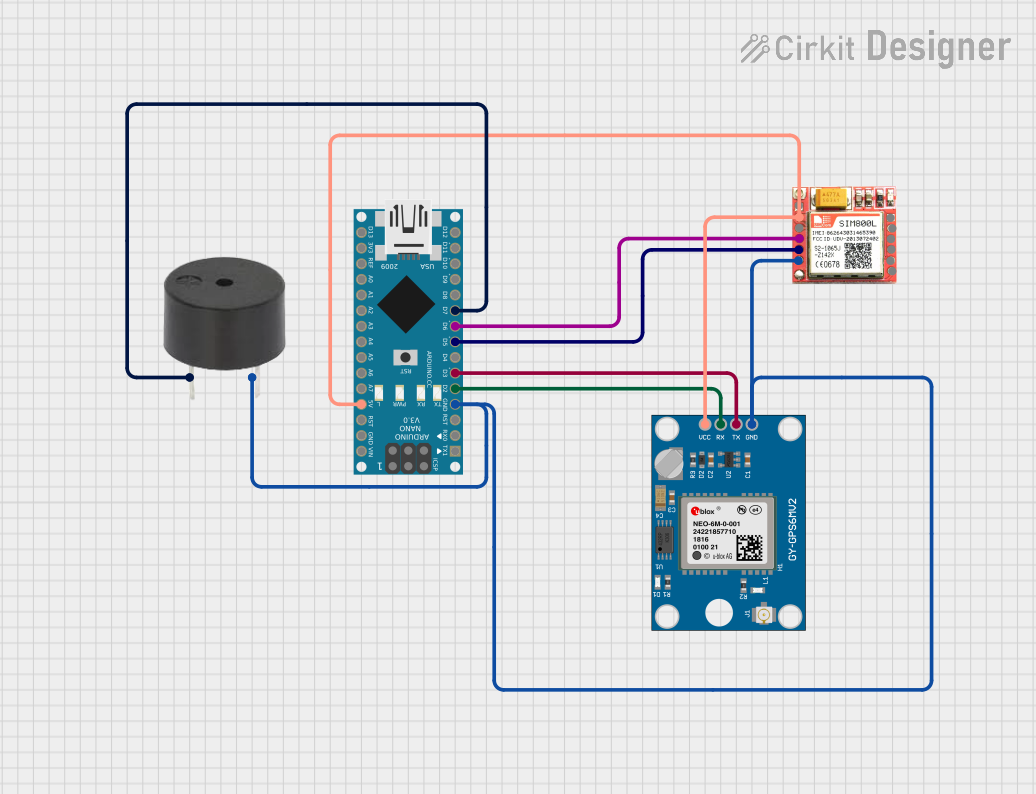
This document provides a detailed overview of a circuit that includes an Arduino Nano, a SIM 800L GSM module, a Neo 6M GPS module, and a buzzer. The circuit is designed to interface these components for various functionalities, including GPS tracking and GSM communication. The Arduino Nano serves as the central microcontroller, coordinating the operations of the other components.
Component List
Arduino Nano
- Description: A small, complete, and breadboard-friendly board based on the ATmega328P.
- Pins: D1/TX, D0/RX, RESET, GND, D2, D3, D4, D5, D6, D7, D8, D9, D10, D11/MOSI, D12/MISO, VIN, 5V, A7, A6, A5, A4, A3, A2, A1, A0, AREF, 3V3, D13/SCK
SIM 800L GSM Module
- Description: A GSM/GPRS module that can send and receive SMS, make and receive voice calls, and connect to the internet via GPRS.
- Pins: NFT, RING, VCC, DTR, RST, MIC +, RXD, MIC-, TXD, SPK+, GND, SPK-
Neo 6M GPS Module
- Description: A GPS module that provides location data.
- Pins: GND, TX, RX, VCC
Buzzer
- Description: An audio signaling device.
- Pins: PIN, GND
Wiring Details
Arduino Nano
- GND: Connected to GND of SIM 800L, Neo 6M GPS Module, and Buzzer.
- D2: Connected to RX of Neo 6M GPS Module.
- D3: Connected to TX of Neo 6M GPS Module.
- D5: Connected to TXD of SIM 800L.
- D6: Connected to RXD of SIM 800L.
- D7: Connected to PIN of Buzzer.
- 5V: Connected to VCC of SIM 800L and Neo 6M GPS Module.
SIM 800L GSM Module
- GND: Connected to GND of Arduino Nano, Neo 6M GPS Module, and Buzzer.
- TXD: Connected to D5 of Arduino Nano.
- RXD: Connected to D6 of Arduino Nano.
- VCC: Connected to 5V of Arduino Nano and Neo 6M GPS Module.
Neo 6M GPS Module
- GND: Connected to GND of Arduino Nano, SIM 800L, and Buzzer.
- RX: Connected to D2 of Arduino Nano.
- TX: Connected to D3 of Arduino Nano.
- VCC: Connected to 5V of Arduino Nano and SIM 800L.
Buzzer
- GND: Connected to GND of Arduino Nano, SIM 800L, and Neo 6M GPS Module.
- PIN: Connected to D7 of Arduino Nano.
Documented Code
Arduino Nano Code (sketch.ino)
void setup() {
  // put your setup code here, to run once:

}

void loop() {
  // put your main code here, to run repeatedly:

}
Additional Documentation (documentation.txt)
This document provides a comprehensive overview of the circuit, including the components used, their wiring details, and the code running on the Arduino Nano.