
Arduino Nano Gas and Temperature Monitoring System with Buzzer and LED Alerts
View and Edit Project In Cirkit Designer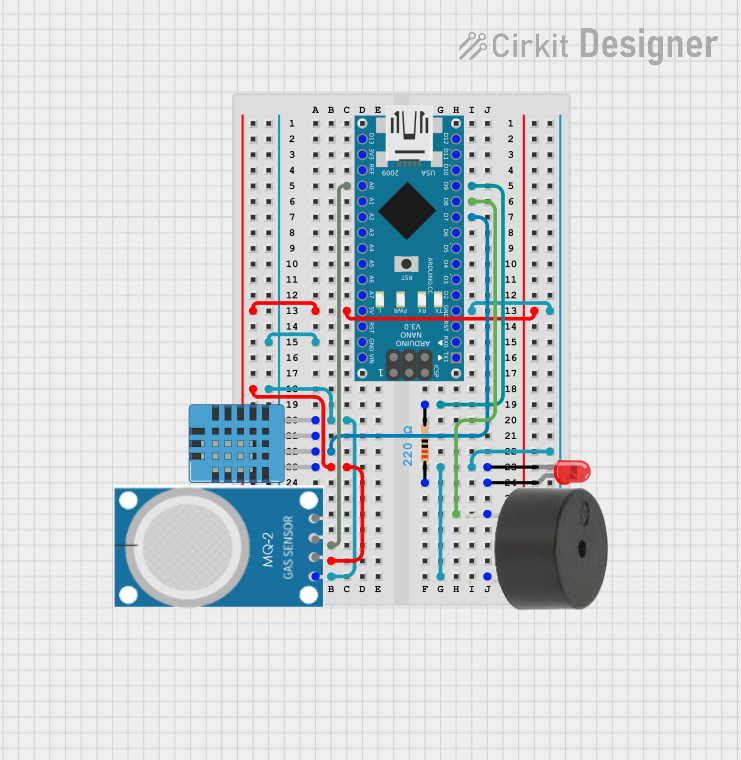
Circuit Documentation
Summary
This circuit is designed to monitor gas levels, temperature, and humidity using an MQ-2 gas sensor and a DHT11 humidity and temperature sensor. The circuit includes an Arduino Nano microcontroller, a red LED, a buzzer, and a resistor. The system triggers the buzzer and LED when gas levels, temperature, or humidity exceed predefined thresholds.
Component List
LED: Two Pin (red)
- Pins: Cathode, Anode
- Description: A red LED used to indicate when thresholds are exceeded.
Arduino Nano
- Pins: D1/TX, D0/RX, RESET, GND, D2, D3, D4, D5, D6, D7, D8, D9, D10, D11/MOSI, D12/MISO, VIN, 5V, A7, A6, A5, A4, A3, A2, A1, A0, AREF, 3V3, D13/SCK
- Description: The main microcontroller used to read sensor data and control the LED and buzzer.
MQ-2
- Pins: GND, VCC, ANALOG, Digital
- Description: A gas sensor used to detect gas levels.
DHT11 Humidity and Temperature Sensor
- Pins: VDD, DATA, NULL, GND
- Description: A sensor used to measure humidity and temperature.
Buzzer
- Pins: PIN, GND
- Description: A buzzer used to provide an audible alert when thresholds are exceeded.
Resistor
- Pins: Pin1, Pin2
- Description: A 220 Ohm resistor used to limit current to the LED.
- Properties:
- Resistance: 220 Ohms
Wiring Details
LED: Two Pin (red)
- Cathode: Connected to GND of Arduino Nano.
- Anode: Connected to Pin1 of the Resistor.
Arduino Nano
- A0: Connected to ANALOG pin of MQ-2.
- D9: Connected to Pin2 of the Resistor.
- D8: Connected to PIN of the Buzzer.
- D7: Connected to DATA pin of DHT11 Humidity and Temperature Sensor.
- 5V: Connected to VDD pin of DHT11 Humidity and Temperature Sensor.
- GND: Connected to:
- Cathode of LED
- GND of Buzzer
- GND of DHT11 Humidity and Temperature Sensor
- GND of MQ-2
MQ-2
- GND: Connected to GND of Arduino Nano.
- VCC: Not connected in this circuit.
- ANALOG: Connected to A0 of Arduino Nano.
- Digital: Not connected in this circuit.
DHT11 Humidity and Temperature Sensor
- VDD: Connected to 5V of Arduino Nano.
- DATA: Connected to D7 of Arduino Nano.
- NULL: Not connected in this circuit.
- GND: Connected to GND of Arduino Nano.
Buzzer
- PIN: Connected to D8 of Arduino Nano.
- GND: Connected to GND of Arduino Nano.
Resistor
- Pin1: Connected to Anode of LED.
- Pin2: Connected to D9 of Arduino Nano.
Documented Code
Arduino Nano Code
#include <DHT.h>

#define GAS_SENSOR_PIN A0
#define BUZZER_PIN 9
#define LED_PIN 8
#define DHT_PIN 7           // DHT sensor connected to pin 7
#define GAS_THRESHOLD 400    // Gas threshold value
#define TEMP_THRESHOLD 45.0  // Temperature threshold in Celsius (example)
#define HUMIDITY_THRESHOLD 80.0  // Humidity threshold in percentage

// Initialize DHT sensor
DHT dht(DHT_PIN, DHT11);  // DHT11 sensor type

void setup() {
  pinMode(GAS_SENSOR_PIN, INPUT);
  pinMode(BUZZER_PIN, OUTPUT);
  pinMode(LED_PIN, OUTPUT);
  Serial.begin(9600);

  // Initialize DHT sensor
  dht.begin();
}

void loop() {
  // Read gas level from MQ-2 sensor
  int gasLevel = analogRead(GAS_SENSOR_PIN);

  // Read temperature and humidity from DHT11 sensor
  float humidity = dht.readHumidity();
  float temperature = dht.readTemperature();  // Temperature in Celsius

  // Check if readings are valid
  if (isnan(humidity) || isnan(temperature)) {
    Serial.println("Failed to read from DHT sensor!");
    return;  // Stop if there's an error in reading from the sensor
  }

  // Print sensor readings to Serial Monitor
  Serial.print("Gas Level: ");
  Serial.println(gasLevel);
  Serial.print("Temperature: ");
  Serial.print(temperature);
  Serial.print(" °C, Humidity: ");
  Serial.print(humidity);
  Serial.println(" %");

  // Check if gas level exceeds threshold
  if (gasLevel > GAS_THRESHOLD || temperature > TEMP_THRESHOLD || humidity > HUMIDITY_THRESHOLD) {
    Serial.println("Gas or temperature/humidity threshold exceeded! Triggering buzzer and LED...");
    tone(BUZZER_PIN, 1000);  // Trigger buzzer with 1kHz tone
    digitalWrite(LED_PIN, HIGH);  // Turn on LED
  } else {
    noTone(BUZZER_PIN);  // Turn off buzzer
    digitalWrite(LED_PIN, LOW);  // Turn off LED
  }

  delay(500);  // Delay to make readings easier to observe
}
Additional Code for Arduino Nano
void setup() {
  // put your setup code here, to run once:

}

void loop() {
  // put your main code here, to run repeatedly:

}
This documentation provides a comprehensive overview of the circuit, including a summary, detailed component list, wiring details, and the code used in the microcontroller.