
Arduino Mega 2560 Controlled RFID Access System with Servo and LCD Feedback
View and Edit Project In Cirkit Designer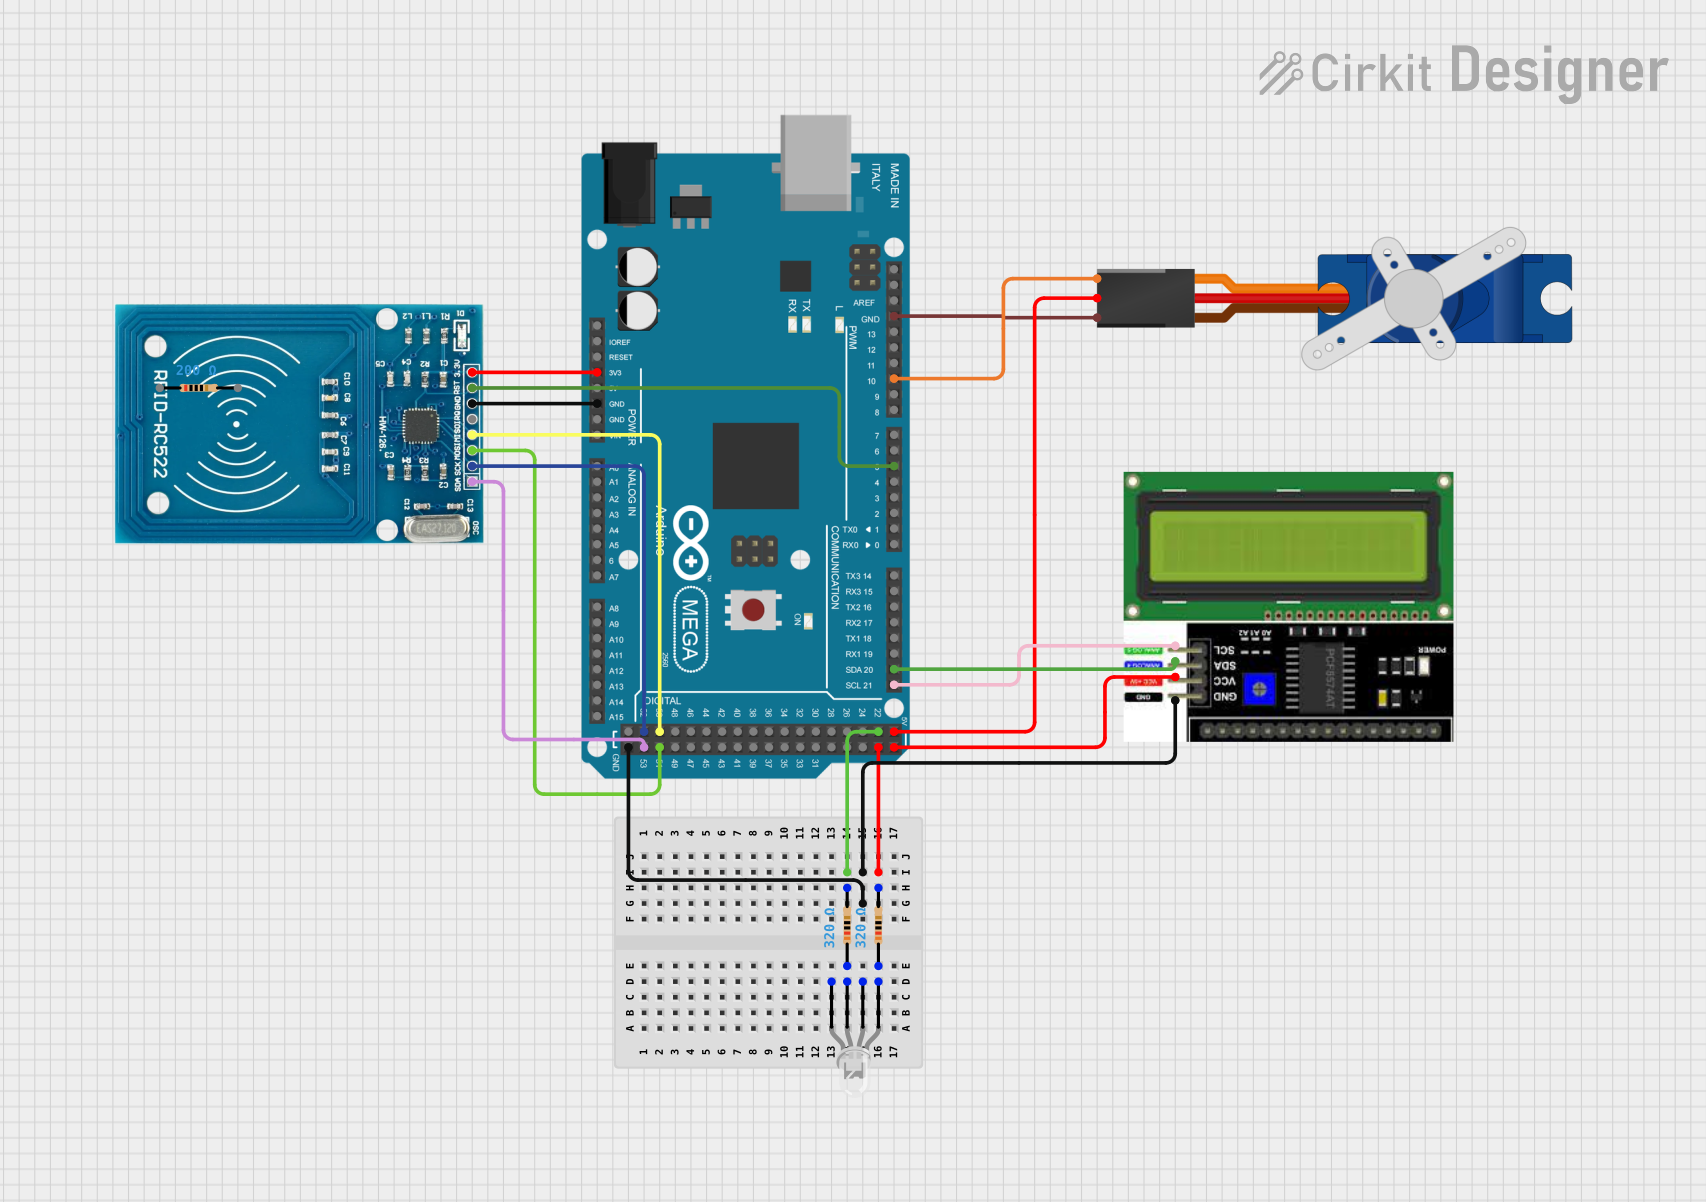
Circuit Documentation
Summary
This circuit integrates various components controlled by an Arduino Mega 2560 microcontroller to perform tasks involving an LCD display, a servo motor, an RFID reader, and LED indicators. The Arduino Mega 2560 is the central processing unit that interfaces with an I2C LCD display for user feedback, a Tower Pro SG90 servo for mechanical movements, an RFID-RC522 module for RFID card scanning, and LEDs for visual signaling. The circuit is designed to scan RFID cards, display messages on the LCD, and actuate the servo motor based on the card scans.
Component List
Arduino Mega 2560
- Microcontroller board based on the ATmega2560
- Provides a large number of IO pins for interfacing with various peripherals
- Operates at 5V but also provides a 3.3V output for compatible devices
Tower Pro SG90 Servo
- A small and lightweight servo motor
- Operates on +5V power supply
- Controlled via a PWM signal
LCD I2C Display
- An alphanumeric liquid crystal display with an I2C interface
- Requires power (VCC), ground (GND), and I2C communication lines (SDA, SCL)
RFID-RC522
- An RFID reader module for reading RFID tags
- Operates at 3.3V and communicates with the microcontroller via SPI
LED: Four Pin (Common Cathode)
- A multi-color LED with separate pins for the red, green, and blue anodes
- Shares a common cathode connection
Resistor (200 Ohms)
- A resistor with a resistance value of 200 Ohms
Resistor (320 Ohms)
- Two resistors each with a resistance value of 320 Ohms
Wiring Details
Arduino Mega 2560
D22connected to a 320 Ohm resistor (green LED anode)D23connected to a 320 Ohm resistor (red LED anode)D10 PWMconnected to the Tower Pro SG90 servo (Signal)5Vconnected to the Tower Pro SG90 servo (+5V) and LCD I2C Display (VCC)GNDconnected to the Tower Pro SG90 servo (GND), LCD I2C Display (GND), and RFID-RC522 (GND)3V3connected to the RFID-RC522 (VCC 3.3V)D5 PWMconnected to the RFID-RC522 (RST)D52connected to the RFID-RC522 (SCK)D50connected to the RFID-RC522 (MISO)D53connected to the RFID-RC522 (SDA)D51connected to the RFID-RC522 (MOSI)D20/SDAconnected to the LCD I2C Display (SDA)D21/SCLconnected to the LCD I2C Display (SCL)
Tower Pro SG90 Servo
Signalconnected to Arduino Mega 2560 (D10 PWM)+5Vconnected to Arduino Mega 2560 (5V)GNDconnected to Arduino Mega 2560 (GND)
LCD I2C Display
GNDconnected to Arduino Mega 2560 (GND)VCCconnected to Arduino Mega 2560 (5V)SDAconnected to Arduino Mega 2560 (D20/SDA)SCLconnected to Arduino Mega 2560 (D21/SCL)
RFID-RC522
VCC (3.3V)connected to Arduino Mega 2560 (3V3)RSTconnected to Arduino Mega 2560 (D5 PWM)GNDconnected to Arduino Mega 2560 (GND)SCKconnected to Arduino Mega 2560 (D52)MISOconnected to Arduino Mega 2560 (D50)SDAconnected to Arduino Mega 2560 (D53)MOSIconnected to Arduino Mega 2560 (D51)
LED: Four Pin (Common Cathode)
red anodeconnected to a 320 Ohm resistorgreen anodeconnected to a 320 Ohm resistorblue anodenot connected in this circuitcommon cathodenot connected in this circuit
Resistor (200 Ohms)
- Not connected in this circuit
Resistor (320 Ohms)
- One end connected to Arduino Mega 2560 (D22) and the other end to the green anode of the LED
- One end connected to Arduino Mega 2560 (D23) and the other end to the red anode of the LED
Documented Code
#include <Servo.h>
#include <Wire.h>
#include <LiquidCrystal_I2C.h>
#include <MFRC522.h>

// Define pin numbers
#define GREEN_LED_PIN 22
#define RED_LED_PIN 23
#define SERVO_PIN 10
#define RST_PIN 5
#define SS_PIN 53

Servo myServo;
LiquidCrystal_I2C lcd(0x27, 16, 2); // Set the LCD address to 0x27 for a 16 chars and 2 line display
MFRC522 mfrc522(SS_PIN, RST_PIN);   // Create MFRC522 instance

void setup() {
  // Set pin modes
  pinMode(GREEN_LED_PIN, OUTPUT);
  pinMode(RED_LED_PIN, OUTPUT);

  // Initialize the servo, LCD, and RFID reader
  myServo.attach(SERVO_PIN);
  lcd.begin();
  SPI.begin();
  mfrc522.PCD_Init();

  // Start with green LED on, servo at 0 degrees
  digitalWrite(GREEN_LED_PIN, HIGH);
  myServo.write(0);

  // Display initial message on LCD
  lcd.clear();
  lcd.print("Scan your card");
}

void loop() {
  // Look for new cards
  if (!mfrc522.PICC_IsNewCardPresent() || !mfrc522.PICC_ReadCardSerial()) {
    return;
  }

  // Turn off green LED and move servo to 90 degrees
  digitalWrite(GREEN_LED_PIN, LOW);
  myServo.write(90);

  // Display seat assignment on LCD
  lcd.clear();
  lcd.print("Assign to seat 1");

  // Hold the position and wait
  delay(3000); // Hold for 3 seconds before allowing another scan
}
This code is designed to run on the Arduino Mega 2560 and controls the servo, LCD, and RFID reader. It sets up the necessary pins, initializes the peripherals, and enters a loop where it waits for an RFID card to be scanned. Upon scanning a card, it turns off the green LED, moves the servo to 90 degrees, and displays a message on the LCD. After a delay, it resets to wait for another card scan.