
Arduino-Controlled LCD Interface with Button Selection and Potentiometer Contrast Adjustment
View and Edit Project In Cirkit Designer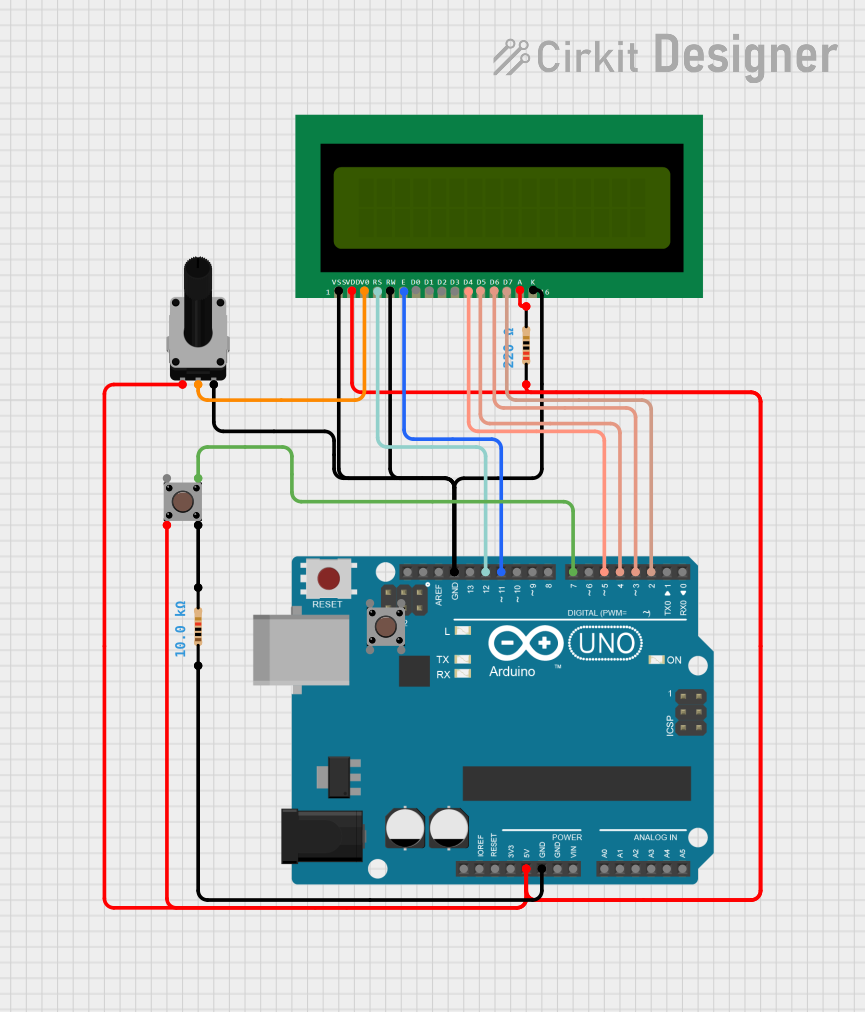
Circuit Documentation
Summary of the Circuit
This circuit is designed to control a 16x2 LCD display using an Arduino UNO microcontroller. The display's contrast is adjustable via a rotary potentiometer, and a pushbutton is used to switch between three different display messages. The LCD is interfaced with the Arduino through digital pins, and the potentiometer is connected to an analog input for contrast control. The pushbutton is debounced in software and triggers a change in the displayed message when pressed.
Component List
16X2 LCD
- Description: A liquid crystal display capable of displaying 16 characters per line across 2 lines.
- Pins: VSS, VDD, V0, RS, RW, E, D0, D1, D2, D3, D4, D5, D6, D7, A, K
Resistor (220 Ohms)
- Description: A resistor with a resistance of 220 Ohms, typically used for current limiting applications.
Resistor (10k Ohms)
- Description: A resistor with a resistance of 10k Ohms, often used for pull-up or pull-down applications.
Pushbutton
- Description: A momentary pushbutton switch used to trigger actions when pressed.
Arduino UNO
- Description: A microcontroller board based on the ATmega328P, widely used for prototyping and educational purposes.
- Pins: UNUSED, IOREF, Reset, 3.3V, 5V, GND, Vin, A0-A5, SCL, SDA, AREF, D0-D13
Rotary Potentiometer (10k Ohms)
- Description: A variable resistor with a knob used to adjust resistance, typically used for adjusting settings such as volume or contrast.
Wiring Details
16X2 LCD
- VDD: Connected to 5V power supply.
- VSS: Connected to GND.
- V0: Connected to the wiper of the rotary potentiometer for contrast adjustment.
- RS: Connected to Arduino pin D12.
- RW: Connected to GND.
- E: Connected to Arduino pin D11.
- D4: Connected to Arduino pin D5.
- D5: Connected to Arduino pin D4.
- D6: Connected to Arduino pin D3.
- D7: Connected to Arduino pin D2.
- A: Connected to one end of a 220 Ohm resistor, the other end connected to 5V power supply.
- K: Connected to GND.
Resistor (220 Ohms)
- One end: Connected to the anode (A) of the 16X2 LCD.
- Other end: Connected to 5V power supply.
Resistor (10k Ohms)
- One end: Connected to GND.
- Other end: Connected to one of the pushbutton's output pins.
Pushbutton
- Pin 1 (in): Not connected.
- Pin 2 (in): Connected to 5V power supply through a 220 Ohm resistor.
- Pin 3 (out): Connected to Arduino pin D7.
- Pin 4 (out): Connected to one end of a 10k Ohm resistor, the other end connected to GND.
Arduino UNO
- 5V: Connected to VDD of the 16X2 LCD and one end of a 220 Ohm resistor.
- GND: Connected to VSS, RW, and K of the 16X2 LCD, one end of a 10k Ohm resistor, and leg2 of the rotary potentiometer.
- D12: Connected to RS of the 16X2 LCD.
- D11: Connected to E of the 16X2 LCD.
- D5: Connected to D4 of the 16X2 LCD.
- D4: Connected to D5 of the 16X2 LCD.
- D3: Connected to D6 of the 16X2 LCD.
- D2: Connected to D7 of the 16X2 LCD.
- D7: Connected to Pin 3 (out) of the pushbutton.
Rotary Potentiometer (10k Ohms)
- Leg1: Connected to 5V power supply.
- Wiper: Connected to V0 of the 16X2 LCD for contrast adjustment.
- Leg2: Connected to GND.
Documented Code
/*
 * This Arduino sketch controls a 16x2 LCD display with a button and a potentiometer.
 * The button switches between three different display messages.
 * The potentiometer adjusts the contrast of the LCD.
 */

#include <LiquidCrystal.h>

// LCD pin connections
const int rs = 12, en = 11, d4 = 5, d5 = 4, d6 = 3, d7 = 2;
LiquidCrystal lcd(rs, en, d4, d5, d6, d7);

// Button and potentiometer pin connections
const int buttonPin = 7;
const int potPin = A0;

// Variables to store button state and display mode
int buttonState = 0;
int lastButtonState = 0;
int displayMode = 0;

void setup() {
  // Initialize the LCD
  lcd.begin(16, 2);
  lcd.print("Hello, World!");

  // Set button pin as input
  pinMode(buttonPin, INPUT);
}

void loop() {
  // Read the button state
  buttonState = digitalRead(buttonPin);

  // Check if the button is pressed
  if (buttonState != lastButtonState) {
    if (buttonState == HIGH) {
      // Change display mode
      displayMode = (displayMode + 1) % 3;
      updateDisplay();
    }
    delay(50); // Debounce delay
  }
  lastButtonState = buttonState;

  // Read the potentiometer value
  int potValue = analogRead(potPin);
  int contrast = map(potValue, 0, 1023, 0, 255);
  analogWrite(6, contrast); // Adjust contrast (assuming pin 6 is used for contrast)
}

void updateDisplay() {
  lcd.clear();
  switch (displayMode) {
    case 0:
      lcd.print("Display Mode 1");
      break;
    case 1:
      lcd.print("Display Mode 2");
      break;
    case 2:
      lcd.print("Display Mode 3");
      break;
  }
}
Note: The code assumes that pin 6 is used for contrast adjustment, but this is not reflected in the wiring details provided. Please ensure that the correct pin is used for the contrast control or modify the code accordingly.