
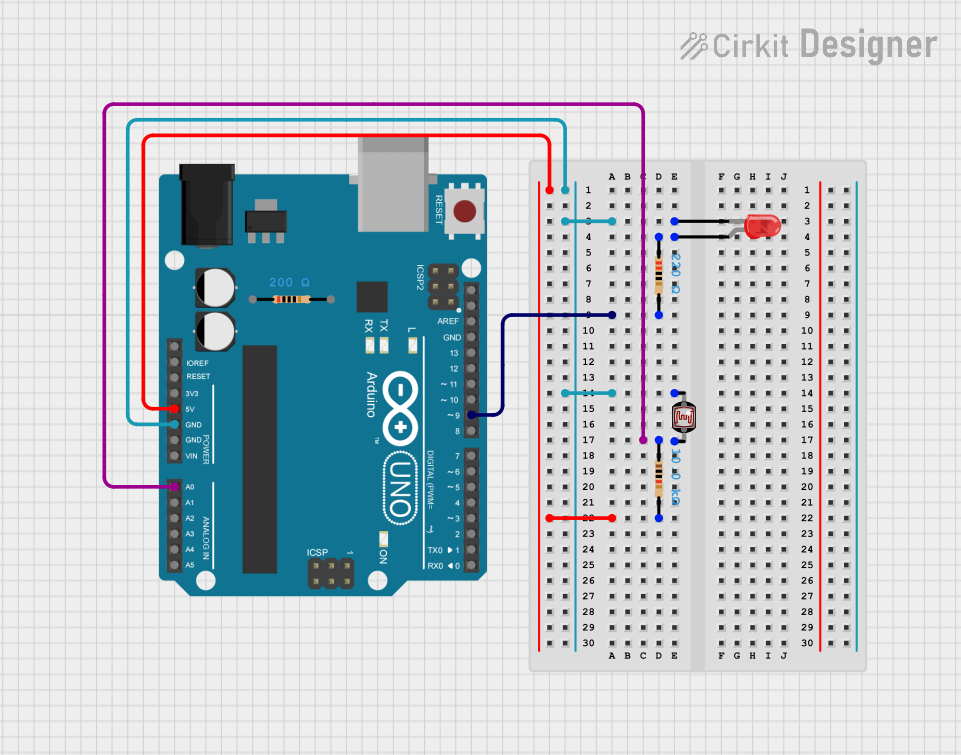
Circuit Documentation
Summary
This document provides a detailed description of a circuit that includes an Arduino UNO, a red LED, a photocell (LDR), and several resistors. The circuit is designed to demonstrate basic interactions between these components, with the Arduino UNO serving as the central microcontroller.
Component List
Arduino UNO
- Description: A microcontroller board based on the ATmega328P.
- Pins: UNUSED, IOREF, Reset, 3.3V, 5V, GND, Vin, A0, A1, A2, A3, A4, A5, SCL, SDA, AREF, D13, D12, D11, D10, D9, D8, D7, D6, D5, D4, D3, D2, D1, D0
LED: Two Pin (red)
- Description: A red light-emitting diode with two pins.
- Pins: cathode, anode
Resistor (200 Ohms)
- Description: A resistor with a resistance of 200 Ohms.
- Pins: pin1, pin2
Resistor (220 Ohms)
- Description: A resistor with a resistance of 220 Ohms.
- Pins: pin1, pin2
Photocell (LDR)
- Description: A light-dependent resistor that changes its resistance based on the light intensity.
- Pins: pin 0, pin 1
Resistor (10k Ohms)
- Description: A resistor with a resistance of 10k Ohms.
- Pins: pin1, pin2
Wiring Details
Arduino UNO
- 5V is connected to pin2 of the 10k Ohms Resistor.
- GND is connected to:
- cathode of the red LED
- pin 0 of the Photocell (LDR)
- D9 is connected to pin2 of the 220 Ohms Resistor.
- A0 is connected to:
- pin1 of the 10k Ohms Resistor
- pin 1 of the Photocell (LDR)
LED: Two Pin (red)
- cathode is connected to GND of the Arduino UNO.
- anode is connected to pin1 of the 220 Ohms Resistor.
Resistor (200 Ohms)
- pin1 is not connected.
- pin2 is not connected.
Resistor (220 Ohms)
- pin1 is connected to anode of the red LED.
- pin2 is connected to D9 of the Arduino UNO.
Photocell (LDR)
- pin 0 is connected to GND of the Arduino UNO.
- pin 1 is connected to:
- pin1 of the 10k Ohms Resistor
- A0 of the Arduino UNO
Resistor (10k Ohms)
- pin1 is connected to:
- pin 1 of the Photocell (LDR)
- A0 of the Arduino UNO
- pin2 is connected to 5V of the Arduino UNO.
Code Documentation
Arduino UNO Code
void setup() {
  // put your setup code here, to run once:

}

void loop() {
  // put your main code here, to run repeatedly:

}
This code is a basic template for the Arduino UNO. The setup() function is used to initialize any settings or configurations, and the loop() function contains the main code that runs repeatedly. Currently, both functions are empty and can be filled with the desired logic for the circuit.