
Arduino-Controlled Robotic Hand with Servo Actuation and EXG Sensor Feedback
View and Edit Project In Cirkit Designer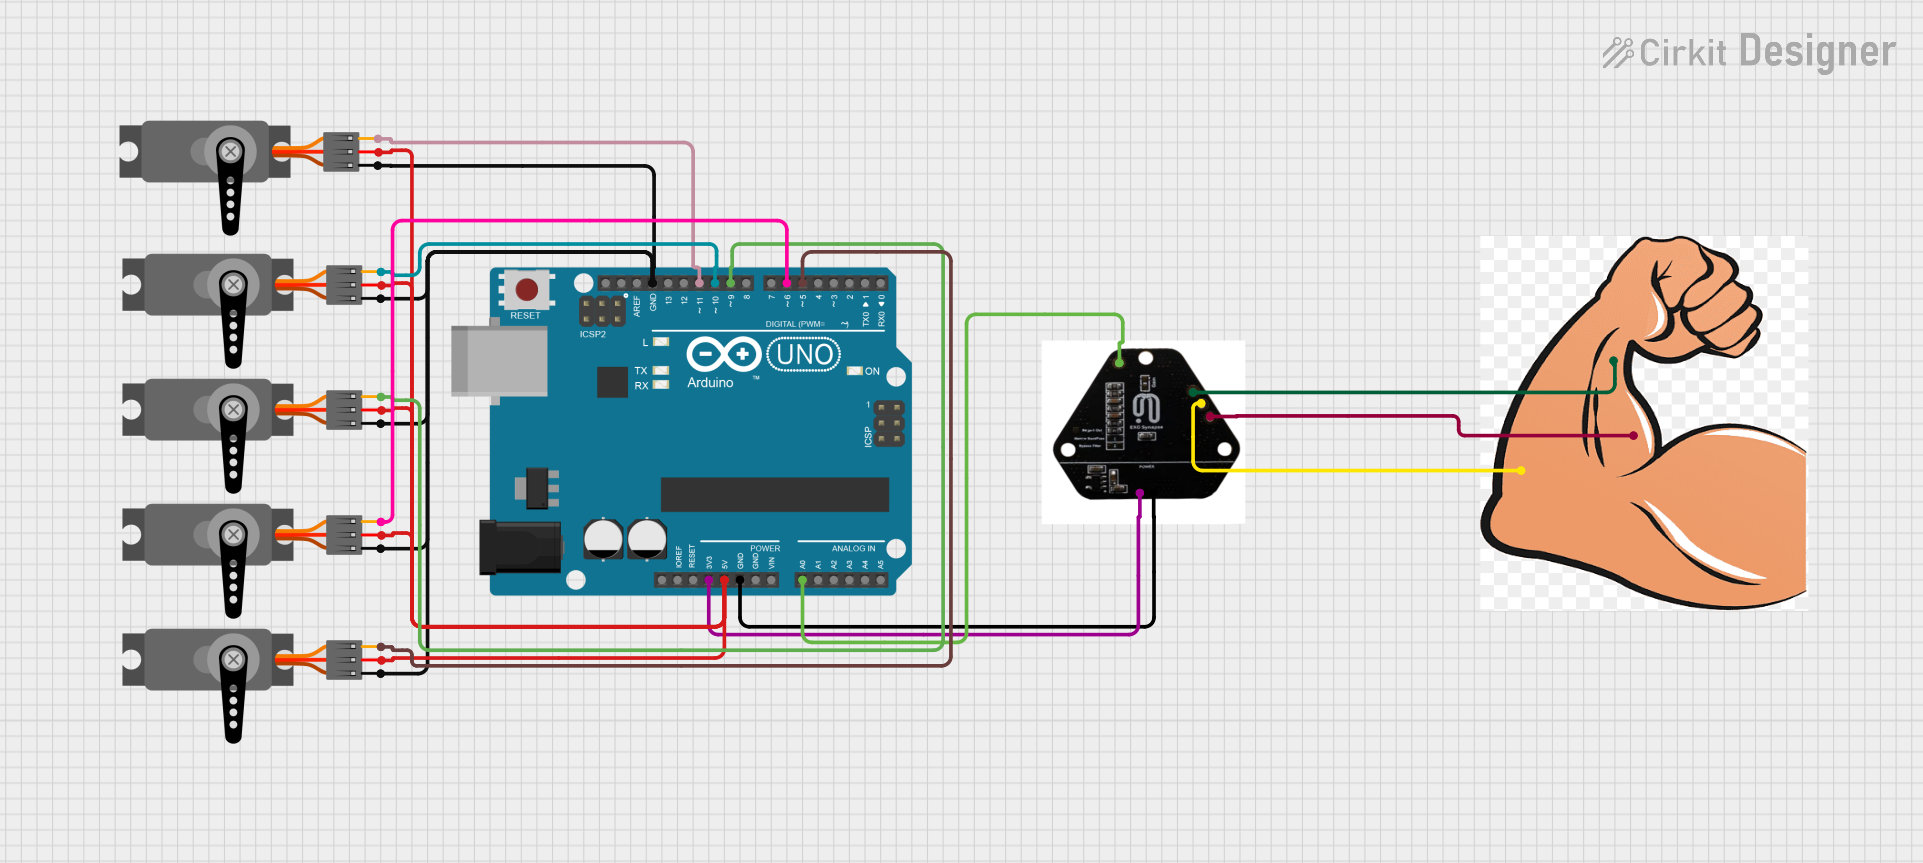
Circuit Documentation
Summary
The circuit in question appears to be designed for interfacing an electromyography (EMG) sensor with an Arduino UNO microcontroller, which in turn controls multiple servo motors. The EMG sensor is likely used to detect electrical activity in muscles, which can then be processed by the Arduino to drive the servos accordingly. This setup could be part of a prosthetic device, a robotic control system, or an interactive installation.
Component List
exg sensor
- Description: An electromyography (EMG) sensor capable of detecting electrical activity in muscles.
- Pins:
-IN,DRL,+IN,OUT,GND,+3.3V
Arduino UNO
- Description: A microcontroller board based on the ATmega328P, widely used for prototyping and educational purposes.
- Pins:
UNUSED,IOREF,Reset,3.3V,5V,GND,Vin,A0toA5,SCL,SDA,AREF,D13toD0
hand
- Description: A component representing the user's hand, interfacing with the EMG sensor.
- Pins:
DNL,+IN,-IN
Servo Motors
- Description: Servo motors are used for precise control of angular or linear position, velocity, and acceleration.
- Pins:
GND,VCC,PWM
Wiring Details
exg sensor
-INconnected to hand-INDRLconnected to handDNL+INconnected to hand+INOUTconnected to Arduino UNOA0GNDconnected to Arduino UNOGND+3.3Vconnected to Arduino UNO3.3V
Arduino UNO
3.3Vconnected to exg sensor+3.3V5Vconnected to all ServoVCCGNDconnected to exg sensorGNDand all ServoGNDA0connected to exg sensorOUTD11connected to Servo (instance 1)PWMD10connected to Servo (instance 2)PWMD9connected to Servo (instance 3)PWMD6connected to Servo (instance 4)PWMD5connected to Servo (instance 5)PWM
Servo Motors
- All Servo
VCCconnected to Arduino UNO5V - All Servo
GNDconnected to Arduino UNOGND - Servo (instance 1)
PWMconnected to Arduino UNOD11 - Servo (instance 2)
PWMconnected to Arduino UNOD10 - Servo (instance 3)
PWMconnected to Arduino UNOD9 - Servo (instance 4)
PWMconnected to Arduino UNOD6 - Servo (instance 5)
PWMconnected to Arduino UNOD5
Documented Code
Arduino UNO Code (sketch.ino)
void setup() {
  // put your setup code here, to run once:

}

void loop() {
  // put your main code here, to run repeatedly:

}
Additional Notes (documentation.txt)
No additional code documentation was provided for the Arduino UNO.