
Arduino Mkr Zero Battery-Powered RGB LED Strip with Button Control and Sound Feedback
View and Edit Project In Cirkit Designer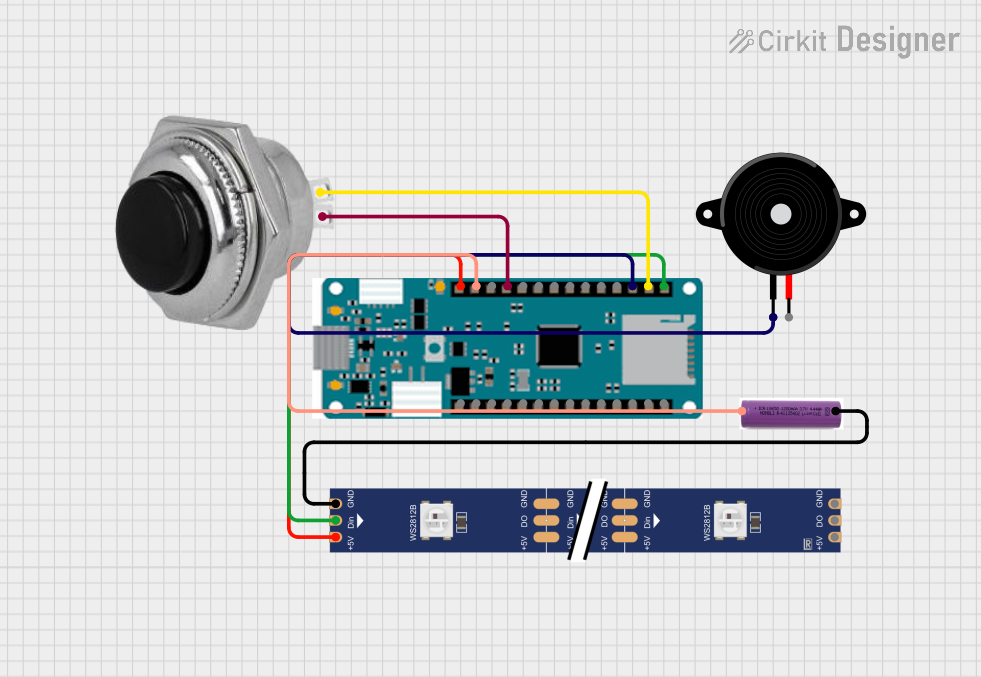
Circuit Documentation
Summary
This circuit consists of an Arduino Mkr Zero microcontroller, a WS2812 RGB LED strip, a black momentary switch, a piezo speaker, and a 3.7V battery. The circuit is designed to control the LED strip and the piezo speaker based on the state of the momentary switch. When the switch is pressed, the LED strip toggles between on and off states, and the piezo speaker emits different tones.
Component List
Arduino Mkr Zero
- Description: A microcontroller board based on the SAMD21 microcontroller.
- Pins: 5V, Vin, VCC, GND, Reset, 14, 13, 12, 11, 10, 9, 8, 7, 6, 5, 4, 3, 2, 1, 0, A6, A5, A4, A3, A2, A1, A0, AREF
WS2812 RGB LED strip
- Description: An addressable RGB LED strip.
- Pins: DIN, 5V, GND, DO
Black momentary switch 32 mm
- Description: A momentary push button switch.
- Pins: In, Out
Piezo Speaker
- Description: A piezoelectric speaker.
- Pins: pin1, pin2
3.7V battery
- Description: A rechargeable lithium-ion battery.
- Pins: +, -
Wiring Details
Arduino Mkr Zero
- 5V connected to 5V of WS2812 RGB LED strip
- Vin connected to + of 3.7V battery
- GND connected to Out of Black momentary switch
- Pin 8 connected to pin1 of Piezo Speaker
- Pin 7 connected to In of Black momentary switch
- Pin 6 connected to DIN of WS2812 RGB LED strip
WS2812 RGB LED strip
- 5V connected to 5V of Arduino Mkr Zero
- DIN connected to Pin 6 of Arduino Mkr Zero
- GND connected to - of 3.7V battery
Black momentary switch 32 mm
- In connected to Pin 7 of Arduino Mkr Zero
- Out connected to GND of Arduino Mkr Zero
Piezo Speaker
- pin1 connected to Pin 8 of Arduino Mkr Zero
- pin2 not connected
3.7V battery
- + connected to Vin of Arduino Mkr Zero
- - connected to GND of WS2812 RGB LED strip
Code Documentation
Arduino Code
#include <Adafruit_NeoPixel.h>

#define LED_PIN 6
#define BUTTON_PIN 7
#define SPEAKER_PIN 8
#define NUM_LEDS 30 // Adjust based on your LED strip length

Adafruit_NeoPixel strip = Adafruit_NeoPixel(NUM_LEDS, LED_PIN, NEO_GRB + NEO_KHZ800);

bool ledState = false;
bool lastButtonState = LOW;

void setup() {
  pinMode(BUTTON_PIN, INPUT_PULLUP);
  pinMode(SPEAKER_PIN, OUTPUT);
  strip.begin();
  strip.show(); // Initialize all pixels to 'off'
}

void loop() {
  bool buttonState = digitalRead(BUTTON_PIN);

  if (buttonState == LOW && lastButtonState == HIGH) {
    ledState = !ledState;
    if (ledState) {
      strip.fill(strip.Color(255, 0, 0), 0, NUM_LEDS); // Turn on LEDs (red color)
      strip.show();
      tone(SPEAKER_PIN, 1000, 200); // Play a tone for 200ms
    } else {
      strip.clear();
      strip.show();
      tone(SPEAKER_PIN, 500, 200); // Play a different tone for 200ms
    }
  }

  lastButtonState = buttonState;
}
This code initializes the WS2812 RGB LED strip and sets up the button and speaker pins. In the main loop, it checks the state of the button. When the button is pressed, it toggles the state of the LED strip and plays a tone on the speaker.